The Grid Trading Module helps you plan and place a grid of pending orders directly on your MetaTrader chart. You see the grid before you place it, you can drag lines to adjust levels, and you can send or remove the whole grid with one click. It is designed for traders who want a simple and visual way to build buy or sell grids with clear risk and target control.
🔹 You can get the Grid Trading Module for MT4 or MT5 from the official InvestSoft store.
Table of Contents
Important requirement
The Grid Trading Module is an add on for Trade Manager. It does not work on its own.
You must have Trade Manager for MT4 or MT5 and you must load Trade Manager on the chart first. Then attach the Grid Trading Module to the same chart.
If you do not own Trade Manager yet, please purchase Trade Manager together with this module to use it.
Installation
Installation steps
- After purchase, download the program file and unzip it. Save EX4 or EX5 file on your computer.
- Open MetaTrader platform.
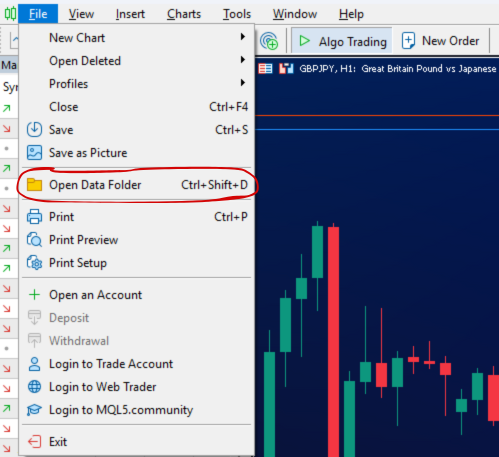
- In the top menu choose File and then Open Data Folder. A new window will open.
- Open the folder MQL4 or MQL5 and then Indicators.
- Copy the EX4/EX5 file into the Indicators folder.
- In MetaTrader open Tools and then Options. Go to the Expert Advisors tab and check Allow DLL imports.

- Restart MetaTrader platform.
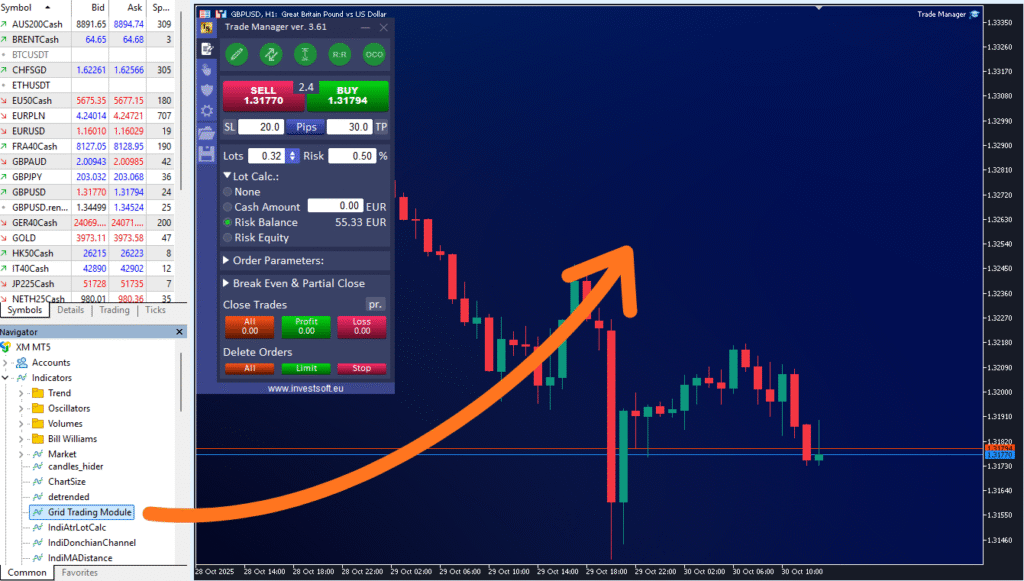
- In the Navigator open Indicators and find Grid Trading Module.
- Make sure Trade Manager MT4 or MT5 is loaded on the chart.
- Drag Grid Trading Module onto the same chart.
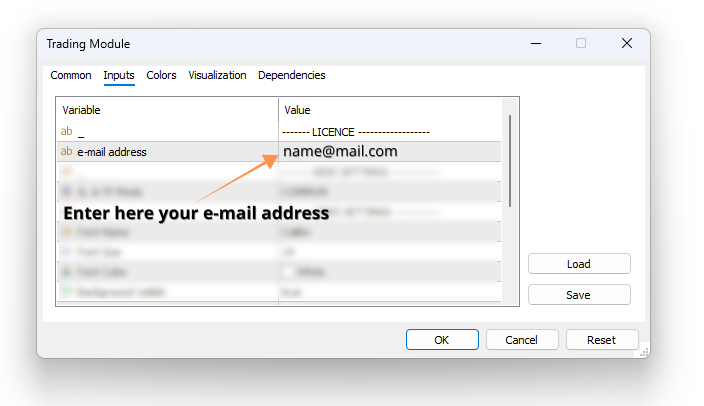
- When the input window appears, enter your email address to activate the license. You need to do this only the first time because the program remembers it, and during the next launch you can leave this field empty.
Canceling the License Activation
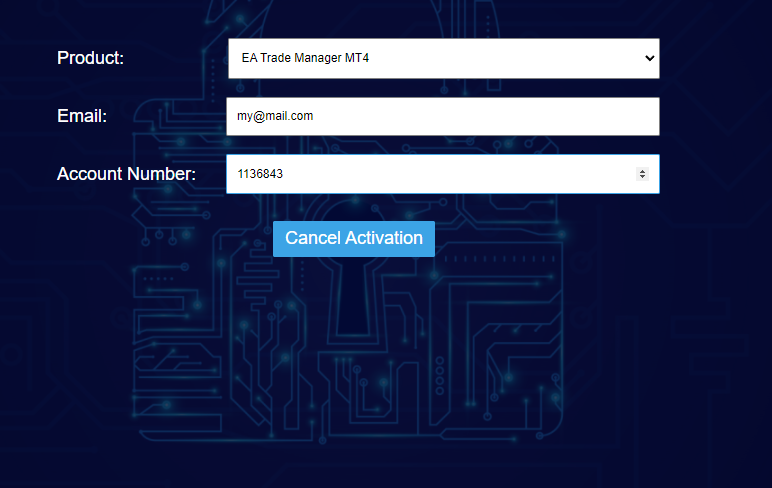
The license for the program includes 5 activations related to the broker’s account number. Every time you start the program on a new account, the program is activated. However, you can cancel old activations and use them again.
To cancel activation, visit https://www.investsoft.eu/cancelact
Just select a product, enter your email address and enter the account number for which you want to cancel the activation.
If you want to cancel all activations for a selected product, enter any negative number, e.g. -99, instead of the account number.
Panel controls overview
After the Grid Trading Module starts successfully, a panel will appear on the chart next to the Trade Manager. In this panel you can set all the parameters for your grid of orders. Below you will find a detailed explanation of each function.
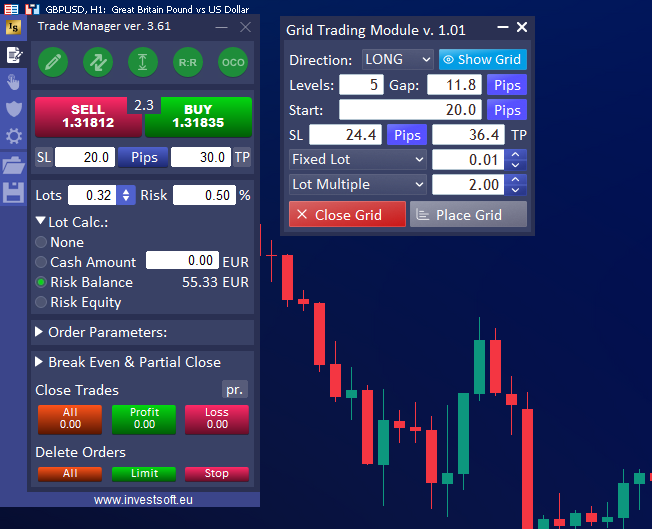
Direction
Choose the side for your grid. Pick Long to place the grid above the current price. Pick Short to place the grid below the current price.
You can change the direction at any time. The module will redraw the grid instantly to match your choice.
Levels
Set how many orders the grid will contain. Enter a whole number, for example 4 or 6.
The module will create that many order levels at your chosen spacing.
Gap
Set the distance in pips between each order in the grid. This is a constant spacing.
Example
Gap 20 creates equal steps of twenty pips between every order.
Start
Choose where the first order of the grid begins. You can define the start in two ways.
Start as pips
Enter a pip distance from the current price to the first order.
For a Long grid a value of 20 starts twenty pips above the current price.
For a Short grid a value of 20 starts twenty pips below the current price.
Start as price
Click the blue button next to the Start field labeled PIPS to switch to PRICE.
Now type an exact price level. The first order will begin at this fixed price, and the rest of the grid will follow with the same gap.
Stop Loss and Take Profit
You can set Stop Loss and Take Profit as pips by default or as exact prices in some modes. These values tell the module how far protection and targets should be.
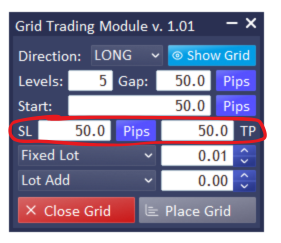
SL and TP mode selector
In Grid Settings choose SL and TP mode
- Common one shared Stop Loss and one shared Take Profit for the entire grid
- Individual a separate Stop Loss and a separate Take Profit for every order
Individual mode
- SL and TP are entered in pips only
- For each order the module places SL and TP at the same pip distance from that order’s open price
Common mode
- The shared SL and TP are referenced to the outermost order of the grid in the direction of the trade
- You can enter the shared SL and TP in pips or switch to price levels
- To switch, use the middle toggle button between the SL and TP fields. It shows PIPS or PRICE.
- When you choose PRICE, SL and TP become fixed chart levels that do not move when you drag the grid preview
Tip
Use pips when you plan to drag the grid and keep proportional distances. Use price levels when you want hard lines that stay where you place them.
Lot and risk sizing
Choose one method from the drop down to control how big each order should be. Enter the value in the field next to the selector.
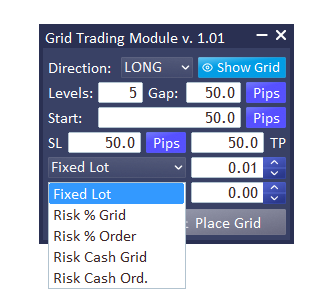
Fixed lot
- Every order uses the same lot size that you type
- Works with Lot Add and Lot Multiple if you want the size to grow across the grid
Risk % Grid
- Enter a percent of the account balance for the entire grid
- The module spreads this total risk across all orders using your SL distance
For example, if you set risk to 1 percent and your account balance is 50,000 USD, the module takes 1 percent of 50,000 which is 500 USD. This 500 USD is the total risk for the whole grid. In the worst case when all planned orders are opened and price turns and hits the Stop Loss, the loss will not exceed 1 percent of the account balance, in this case 500 USD.
Risk % Order
- Enter a percent of balance per order
- Each order is sized separately to risk this percent using its own SL distance
For example, if you set the risk to 1 percent and your account balance is 10,000 USD, the module takes 1 percent of 10,000 which is 100 USD. This means each single order in the grid risks 100 USD, so the maximum loss for one order is 100 USD.
Risk Cash Grid
- Enter a cash amount for the entire grid in the account currency
- The module splits this amount across all orders
For example, if you set the cash risk to 500, the module treats 500 in your account currency as the total risk for the entire grid. In the worst case when all planned orders are opened and price hits the Stop Loss, the loss will not be more than 500.
Risk Cash Order
- Enter a cash amount per order
- Each order risks the same cash value you type
For example, if you set the cash risk to 100 USD, each single order in the grid risks 100 USD.
Notes and tips
- Risk based sizing uses the SL distance to compute lots. Very tight SL may produce large lots and very wide SL may produce very small lots. Check the preview before placing.
- Broker rules such as minimum lot step and maximum lot size apply and the module follows them.
- In Common SL and TP mode with PRICE selected, moving the grid preview does not move the fixed SL and TP lines. In Individual mode the module always uses pips and recalculates relative to each order.
- If you want equal lots even with Fixed lot progression enabled, set Lot Add to zero or Lot Multiple to one.
Lot progression across the grid
This control tells the module how to grow the lot size from one order to the next. It works only when the sizing method above is set to Fixed lot.
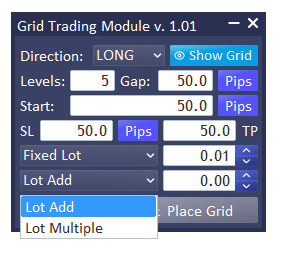
You can choose one of two modes
Lot Add
Lot Add increases the size of each new order by the same fixed amount.
For example, if the fixed lot is 1.00 and Lot Add is 0.50, the first order is 1.00, the second grows to 1.50, the third becomes 2.00, the fourth 2.50, and it continues in the same regular step.
Lot Multiple
Lot Multiple grows the size of each new order by multiplying it with the same factor every time.
For example, if the fixed lot is 1.00 and Lot Multiple is set to 2, the first order is 1.00, the next one doubles to 2.00, the third becomes 4.00, the fourth 8.00, and it keeps increasing by the same multiplier with each step.
If you want all orders to have the same size, set Lot Add to 0 or set Lot Multiple to 1.
Note
This feature is often used for martingale style plans where the position size grows with each new order.
Displaying and managing the grid on the chart
Once all parameters are set and you are ready to see your plan, you can draw the grid directly on the chart. Next to the Direction field you will find the Show Grid button.
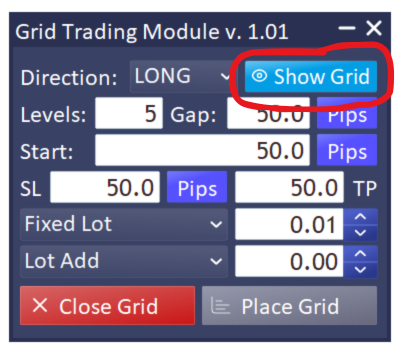
When you press it, the module draws your planned orders on the right side of the chart together with their Stop Loss and Take Profit levels.
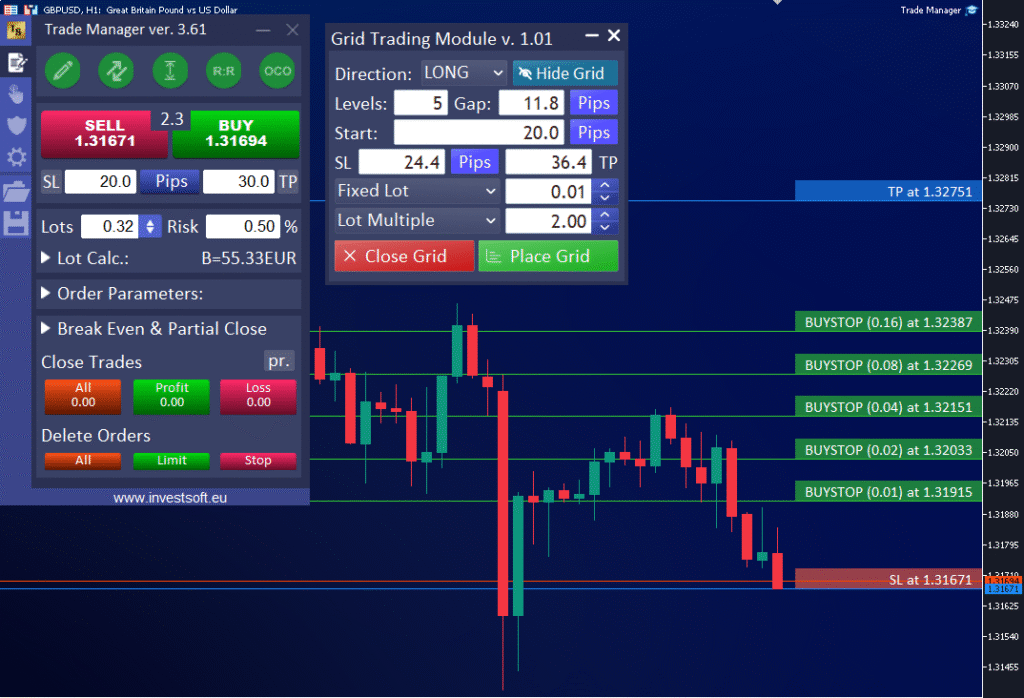
The grid lines are fully interactive. You can click and drag them to adjust positions and shape the grid to match the price levels you want.
If you drag any of the middle orders, the entire grid moves up or down together, including its Stop Loss and Take Profit lines. This helps you shift the whole setup without changing its spacing.
If you grab the bottom order, the grid stretches downward. The top order stays fixed, while all other orders move evenly so that equal spacing is maintained.
Similarly, if you grab the top order, the grid stretches or compresses upward while the bottom one stays in place. The module automatically adjusts the middle orders to keep regular gaps between them.

Important note on Stop Loss and Take Profit behavior
If Stop Loss and Take Profit are defined in pips, moving the grid up or down also moves the SL and TP lines. The module keeps the same distance in pips between the outermost order and the SL or TP.
However, if SL and TP are defined as price levels, they become fixed on the chart. When you drag or stretch the grid, these SL and TP lines stay in place at their set prices. This makes it easier to hold fixed protection or target levels while adjusting the grid range.
You can freely move and resize the grid to match the area you want to trade, for example to cover a chosen price range identified in your analysis.
Executing the Grid
When everything looks right, press Place Grid on the panel. The module sends all pending orders to your broker and removes the visual grid from the chart, keeping your chart clean.
If later you decide to remove the grid, simply press Close Grid. The module will delete all orders belonging to that grid – both active and pending – so the entire setup is closed instantly.
Standard parameters of the Grid Trading Module
The Grid Trading Module includes several groups of parameters that allow you to adjust how the module works and how the grid looks on the chart. These parameters are found in the module’s settings window and can be changed before attaching the module or later in the inputs tab.
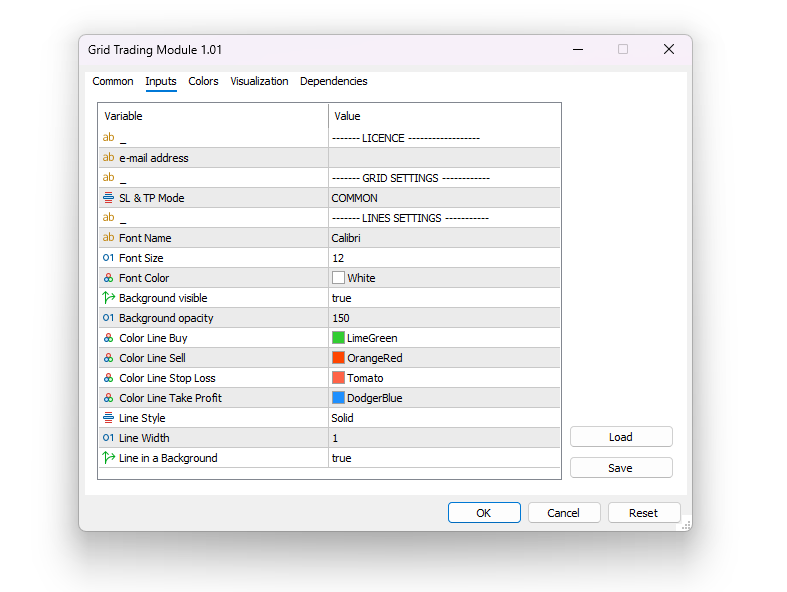
License section
In this section you enter your email address used for license activation.
Use the same email that you provided when purchasing the product in the online store.
You need to enter the email only once during the first launch of the module. The program saves it automatically and uses it for the next sessions, so on future launches you can leave this field empty.
Grid Settings section
In this part you can define how Stop Loss and Take Profit are applied to your grid.
- SL and TP mode
Choose from the list- Common means one shared Stop Loss and one shared Take Profit for the entire grid. In practice this means that every order in the grid has its Stop Loss and Take Profit set at exactly the same price level.
- Individual means each order in the grid has its own Stop Loss and its own Take Profit
This setting directly affects how risk and targets are calculated for every order.
Line Settings section
This section controls how grid lines and labels appear on the chart. You can customize fonts, colors, and visibility to match your preferred chart style.
- Font name – sets the font used for all text displayed on the grid lines
- Font size – defines the text size on the lines
- Font color – sets the text color for all line labels
- Background visible – determines whether a background is displayed behind the text.
If set to true, a background box appears. If set to false, the background is hidden. - Background opacity – controls how transparent the background behind the text is
- Color line buy – sets the color of the lines and background for long (buy) orders in the grid
- Color line sell – sets the color of the lines and background for short (sell) orders
- Color line stop loss – defines the line and background color for the Stop Loss level
- Color line take profit – defines the line and background color for the Take Profit level
- Line style – selects the appearance of the lines, for example solid, dashed, or dotted
- Line width – sets the thickness of the lines
- Line in the background – decides whether the grid lines are drawn behind the price candles or displayed on top in the foreground
These visual settings let you adjust the grid’s appearance for better visibility and comfort when analyzing and placing orders.