The Trade Manager program is built to easily plan, place and manage orders on the Metatrader 4 and 5 platform.
By using the Trade Manager program you can control your risk and you don’t have to sit in front of the monitor all the time managing your opened trades because the program will do it for you.
In the Trade Manager program you get:
- automatic calculation of the deal size based on the risk %
- calculations of stop and target values in the account currency
- automatic and manual partial closing of transactions
- automatic Break Even
- automatic Trailing Stop
This user guide is to provide a step-by-step instruction for you to become familiar with the operation of Trade Manager to support you with an easier trade operation on Metatrader.
Contents
HOW TO INSTALL AND RUN THE PROGRAM
Program installation
EA Trade Manager is distributed via the mql5.com market. Below are the steps to install the Trade Manager purchased in mql5.com market.
- Open the MT4 or MT5 terminal;
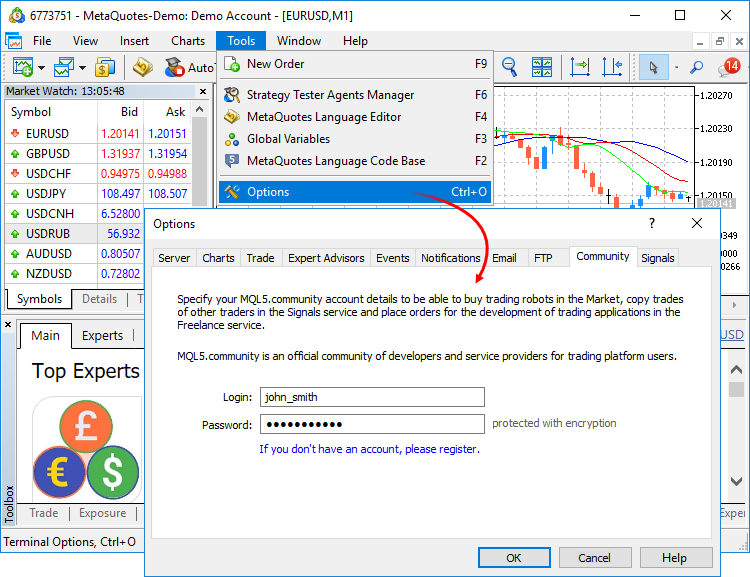
- Go to menu Tools and Select Options;
- In the opened window go to “Community” tab and log in to MQL5.com;
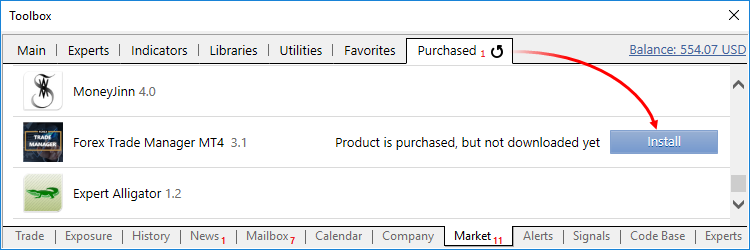
- Open the Purchased tab of the Market section. The list of products purchased using the specified MQL5 account will be displayed here;
- Select the desired product and click “Install”. The app will be downloaded to the disk and installed in the terminal folder;
Attention! A new activation is required in order to install an app on a new computer.
Trade Manager is automatically activated and installed to the Market folder in the Navigator of the MetaTrader terminal. A notification of successful purchase and activation is sent to your email, as well as to the MetaTrader terminal and as a private message to your MQL5 account.
Starting the program
For the correct operation of the program, you have to enable autotrading/algotrading in Metatrader terminal.
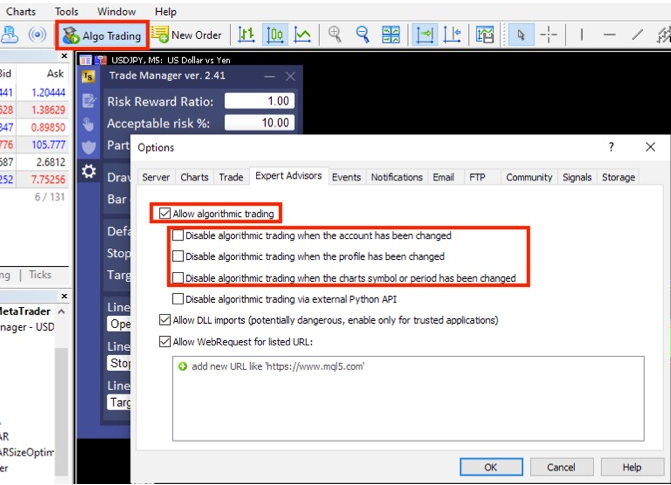
Turn ON AlgoTrading in a MT4/MT5 toolbar and set it in options:
- Go to menu Tools
- Select Options
- Go to “Expert Advisors” tab
- Check option “Allow algorithmic trading” and uncheck 3 options “Disable algorithmic trading when…”;
Apply changes by clicking “OK” and restart metatrader terminal.
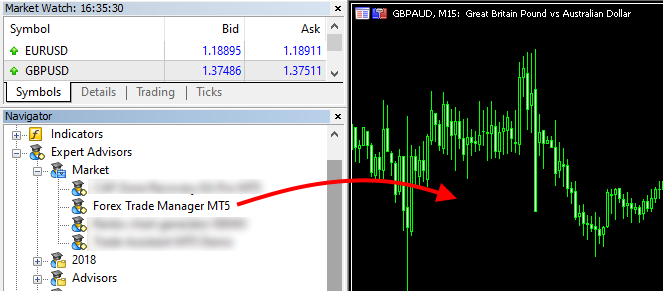
When you are ready to start the program, go to the “Navigator” window, find the program in the Expert Advisors \ Market section and run the program by double-clicking the left mouse button or dragging the program onto the chart.
Quick Overview
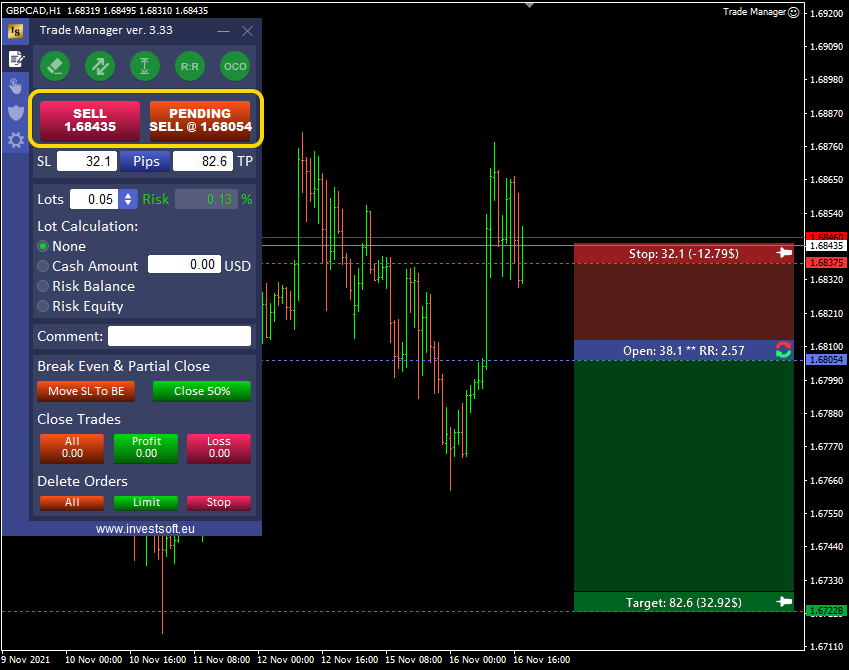
When you run the Trade Manager program, a panel will appear on the chart. It mainly consists of four parts.
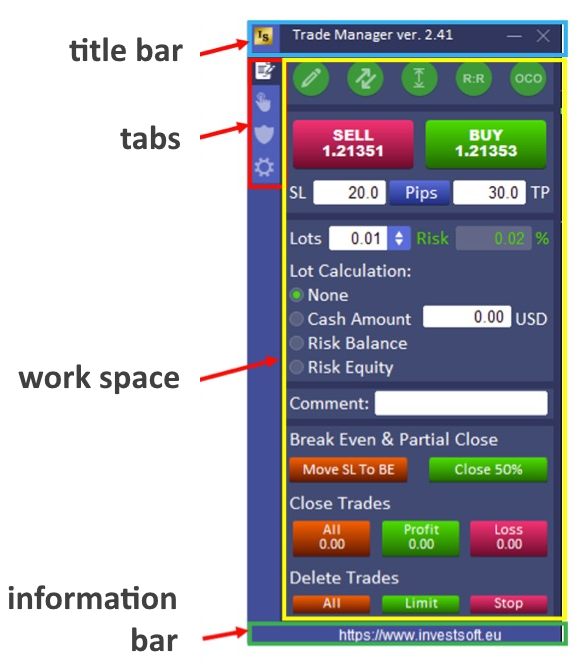
We will look closely at all parts of the panel.
Title bar
In the title bar of the window you will find information about the current version of the program and the button for minimizing the panel and closing the program.
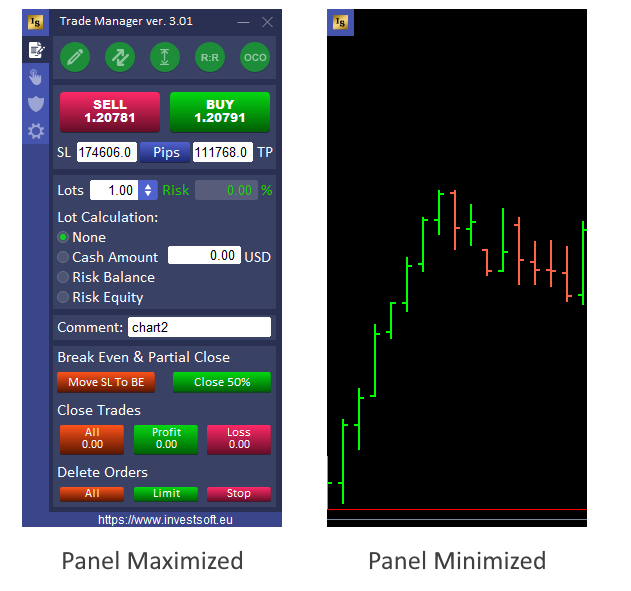
After minimizing, the panel is visible only as a square with the program logo. Just click on the logo to maximize the panel.

The X button exits the program and removes EA Trade Manager from the chart.
Tabs
There are 4 tabs on the left side of the panel:
![]() Placing orders
Placing orders
![]() Manual managing orders and partial profit/loss closing
Manual managing orders and partial profit/loss closing
![]() Break Even and Trailing stop
Break Even and Trailing stop
![]() Configuration
Configuration
You can click these tabs to switch between the main functions of Trade Manager EA.
PLACING ORDERS
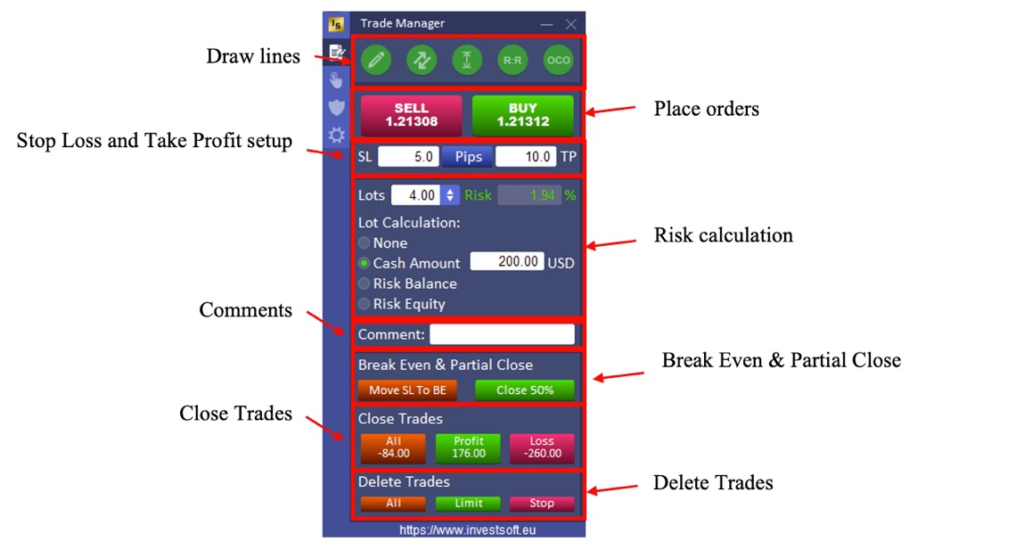
In the Trade Manager, you can place market orders and pending orders. Orders can be placed in two ways:
1. fast opening of market orders (especially useful for scalping) with the BUY and SELL buttons on the panel
2. visual order planning by drawing horizontal lines on the chart indicating the level of opening, stop and target.
At the beginning, in the panel, we see two buttons BUY and SELL, which we can quickly place a market order on the market.

However, before you can press the button to open a market order, you need to set some options.
First, set the Stop Loss and Take Profit levels under the BUY / SELL buttons.

By default, we set SL and TP in pips as the distance from the opening price, but it is also possible to set SL and TP as the price.

Just click the button that says “Pips” to switch to the price levels. Then, the word “Price” will appear on the button. Clicking the button again (this time saying “Price”) will switch back to the pip value.
It is also possible to configure the default Stop Loss and Take profit values, which is described in detail in the “Program configuration option” section.
Lot size calculation
Another important element is determining the size of the transaction. You can either determine the size of the transaction yourself or define the risk level for a given transaction and the program will calculate the lot size.
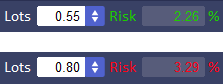
If you set the size of the transaction yourself, the program, based on the entered value and the stop loss distance, will determine in the next field what is the risk percentage for the planned transaction (it is the balance percentage).
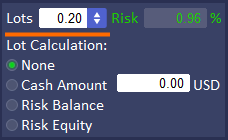
On the “Configuration” tab, you can define the acceptable risk level. If you exceed an acceptable level of risk, the numbers in the risk field will turn red.
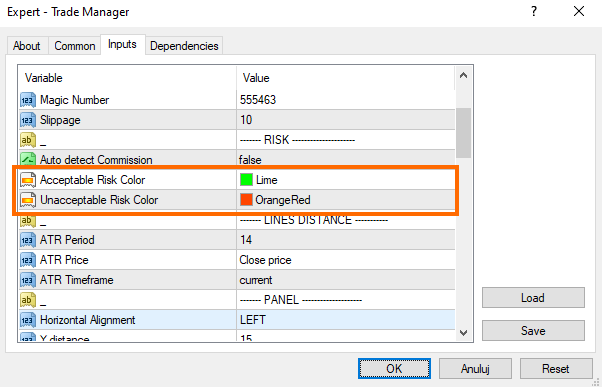
The colors of the accepted / unaccepted risk can also be defined in the program settings window (press F7) in the “— RISK —” section in the parameters:
– Acceptable Risk Color
– Unacceptable Risk Color.
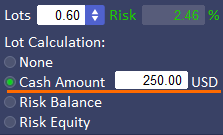
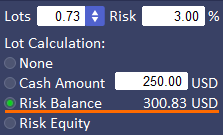
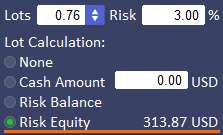
In the case of automatic lot size calculation, we have 3 options:
– Cash Amount – with this option, you can define fixed value of stop loss in the account currency, and the Trade Manager will be automatically calculating lot size when you will be changing stop loss distance by moving lines on chart or just define its value in the SL field on the panel.
– Risk Balance – with this type, you can define in the field “Risk” max allowed risk% per trade and program calculate lot size based on stop loss distance and% of account balance. Next to the “Risk Balance” option, the calculated risk value in the account currency will be displayed.
– Risk Equity – this method works the same way as “Risk Balance”, with the difference that the percentage size of the loss depends on account equity. Next to “Risk Equity”, the calculated risk value in the currency of the account will be displayed.
For the calculation of risk, we take into account the Balance or Equity of the account, i.e. we define the risk, e.g. 2%, then we risk only 2% per transaction from the Balance / Equity of the account. For example, if we have Balance = $ 48000, then 2% of $ 48000 = $ 960 so the SL value cannot exceed $ 960.

Visually placing the orders with the use of horizontal lines
Another way to place orders is to visually plan entry and exit points (stop and target) on the chart. This is especially convenient when we have designated potential market turning points and want to set a target and defense for the order in this area. We do not have to enter exact values then, but simply move the horizontal lines to the previously designated places.
Line drawing
To draw lines on the chart, in the first step, click the pencil button on the panel in the upper left corner. When the button is “highlighted” then the line drawing mode is active and now you can click anywhere on the chart.
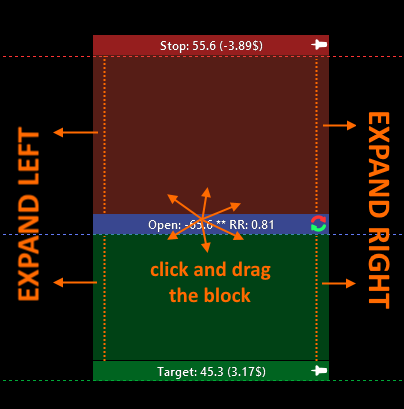
The program will draw a block with open, stop and target lines on the chart. The opening price level will be where we clicked on the chart.

Then adjust the order opening level (in the case of a pending order) as well as stop loss and take profit. These levels are set by simply clicking on the bar with the text and dragging it up or down.
Setting up an order with a lines
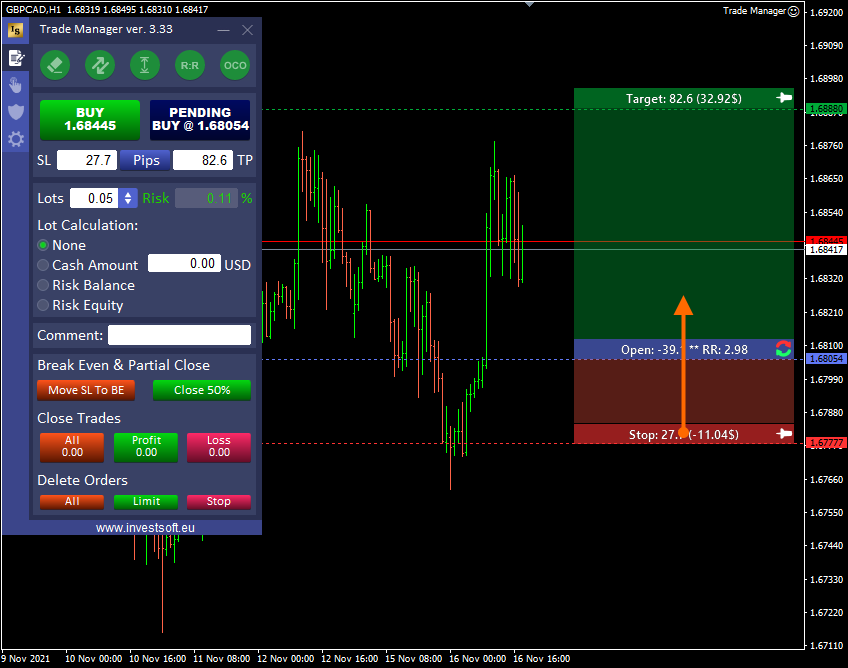
The entire block can be freely moved in the chart area. Just click on the opening price bar and move in any direction.
Similarly, click and move to the stop or target bar to set the desired target and stop levels.
You can also widening and narrowing the entire block by clicking and moving the mouse at the right or left edge of the block.
There are buttons on the bars:
- Reverse Button
 – a button for quickly switching between the long and short positions
 - Pin
 / Unpin
  Button – pinning or unpinning the stop or target level.
Attention! Note here that the two states of pinning SL and TP are here.
With a single click on the pin button, we pin the SL or TP level so that when changing the opening level, SL and TP are stay the same, but we can drag these levels with the mouse
When double-clicking on the pin button, a red dot appears on the pin and makes it impossible to change this level even by clicking and dragging with the mouse.
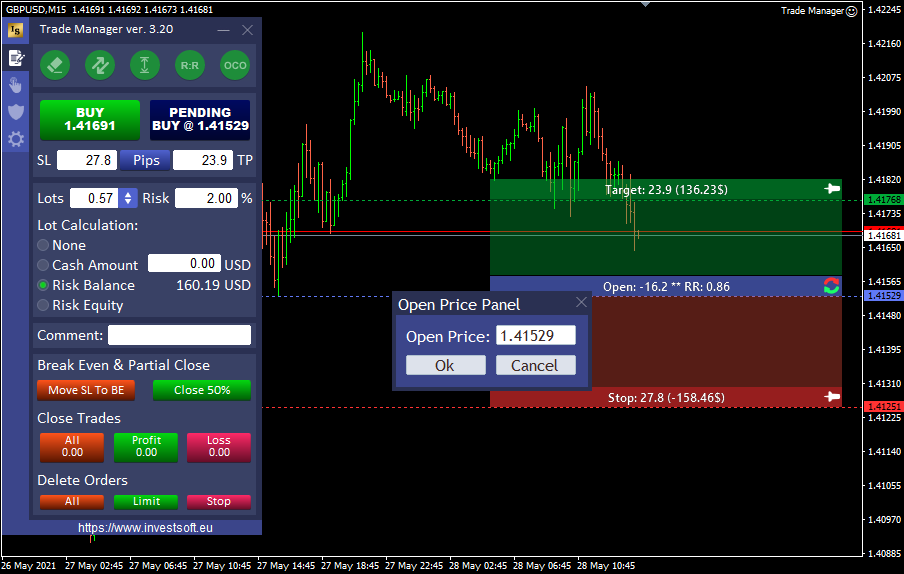
To set the exact opening price (the open bar/line level), you should call a special price edit window. To do this, hold down the CTRL key and click on the opening price bar.
In the window that opens, enter the correct price and confirm the changes by clicking the “OK” button.
When you draw lines on the chart, the default direction is BUY.
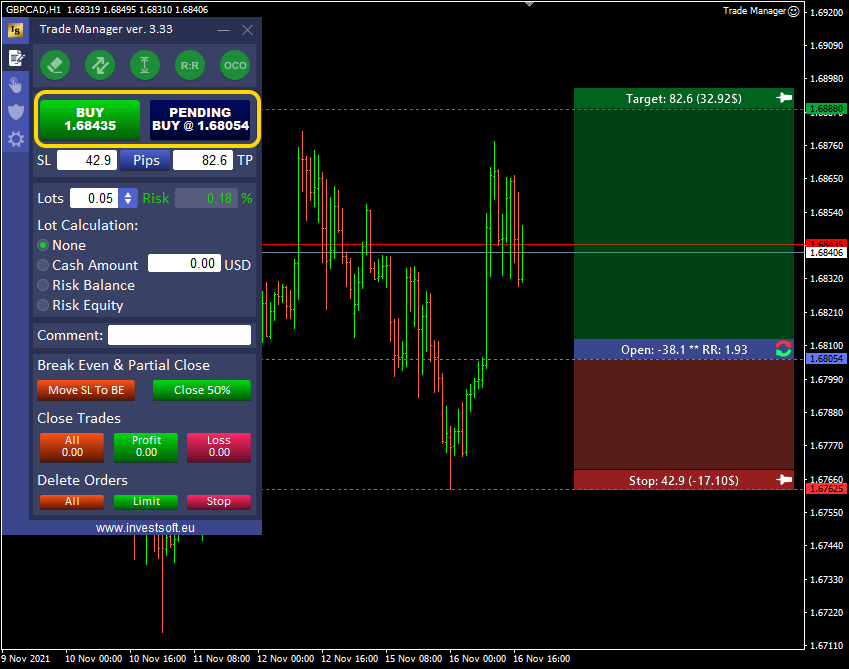
However, when you drag the Stop Loss level above the opening price, then the direction of the order changes to SELL. The buttons on the panel also change.
If you have previously selected the automatic lot calculation then the program calculates the transaction size on an ongoing basis based on the specified risk and Stop Loss size when you are changing the Stop Loss position. A detailed description of the lot calculation types can be found here.


Open/Stop/Target block options on the panel
In the upper part of the panel, we have round buttons through which we can draw an open / stop / target block and we can set the block’s operation when we plan to open an order.
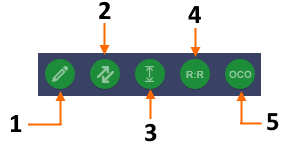
- Line draw or clear button
- Button to auto-adjust the line to the current price
- SL and TP freeze button
- Fixed Risk Reward Ratio
- OCO (One Cancels the Other)
When you want to draw open / stop / target lines on the chart, then you need to click the pencil button to activate the drawing.

When the button is highlighted (lighter color) now you have to click anywhere on the chart to draw the lines (the block opening price level is located at the click level on the chart).

After you successfully draw a line on the chart, the pencil button changes to an eraser button that you can use to remove lines from the chart.
The entire process of drawing lines in the chart is shown here.
When you activate the “auto-adjust” button then the entire block is moved to the current price and with each new tick the block will follow the current price.

If the block is in the BUY direction, then the opening level is “sticked” to the Ask price, while for a planned SELL order the block will “follow” the Bid price.
If this option is activated, then the block can only be moved horizontally with a mouse.
This is a particularly useful option when you plan to open a market order right away. For a pending order, it is best to keep turned OFF the “autoadjust” function so that you can freely adjust the level of the opening price.
3. SL and TP freeze button
This option determines the behavior of the Stop Loss and Take Profit lines.

When you activate the “Freeze SL and TP” option, the pins on the SL and TP lines are activated and both Stop Loss and Take Profit keep their level constant if the level of the opening line changes. This is important when you want to set a constant profit or loss exit level on the chart and then adjust the entry point or open a market order at the current price.
If this function is inactive (pins are deactived on the SL and TP bars), then the stop loss and take profit distance is kept constant and by changing the opening price we move the entire block including SL and TP.
4. Fixed Risk Reward Ratio
By activating this option, the program maintains a constant risk-to-risk ratio, which in practice means that by dragging SL the program automatically increases or decreases the TP distance. Likewise, if we drag TP, the program adjusts the SL distance.

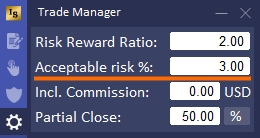
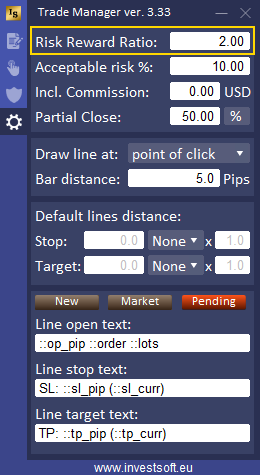
The size of the RR ratio is defined in the panel on the configuration tab in the “Risk Reward Ratio” field.
5. OCO (One Cancels the Other)
This option does not apply to the operation of the line, but directly affects the behaviour of pending orders that have already been placed.
A one-cancels-the-other order (OCO) is a pair of conditional orders assuming that if one order executes, then the other order is automatically cancelled.
After activating the OCO function, the Trade Manager “remembers” all pending orders and when one of them is activated, the rest are deleted.

WARNING! Removing one of the orders does not cancel the other ones, but only activating the pending order will do it.
The appearance of the block
The open / stop / target block appearance is fully customizable via parameters in the Trade Manager settings window. You can set such elements as the background color of the open, stop or target bar (each separately), the background color between the bars, background and text transparency, as well as font family, size and color, and even text transparency. Below is a short presentation of the possibilities of changing the block appearance settings:

A detailed description of the parameters can be found here.
The texts to be displayed next to the lines can be defined in the program configuration tab. For this you need to use special tags that define individual data. You can define texts for the bar at the opening price, for stop loss and for take profit, and separately for a planned order, a market order and a pending order. More information about the configuration of the texts on the bars can be found here.
MANAGEMENT OF AN EXISTING ORDER
After opening the order, the program assigns an information bar to the opening line, which displays basic information about the order, e.g. lot size, transaction type, or the current transaction profit.
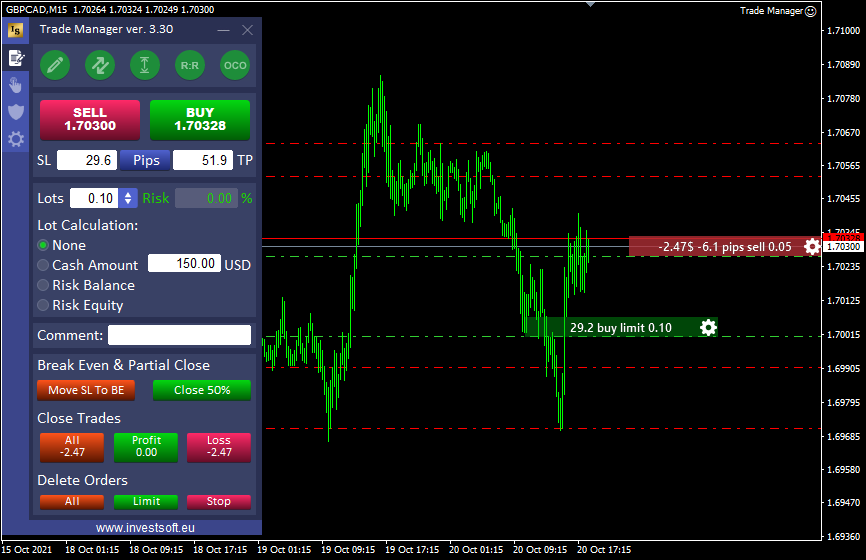
The bar can be freely moved along the line of the order opening price, but after clicking on the bar, it is expanded and shows the bars at Stop Loss and Take Profit.
When the block is expanded, we can modify the order by clicking and dragging vertically the Stop Loss or Take Profit bar, and in the case of a pending order, even the opening price.
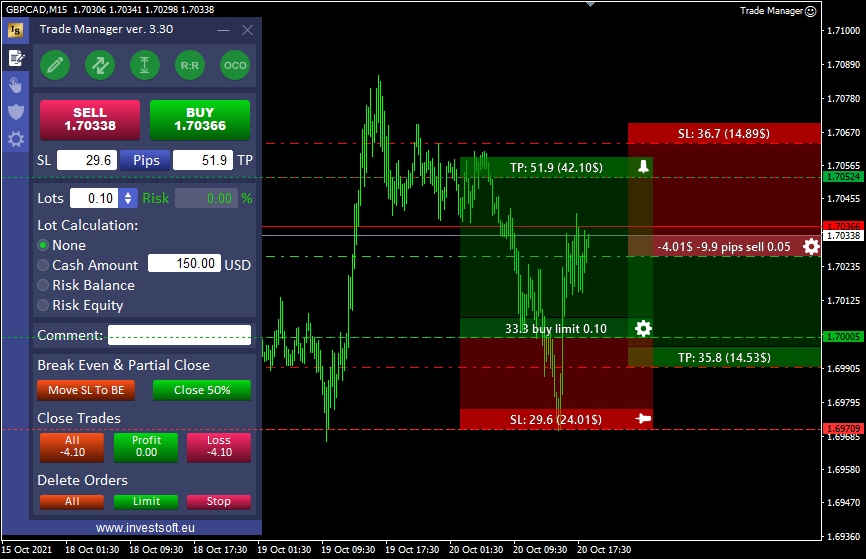
Attention! For a pending order, the pins work the same as for a planned order, i.e. we can freeze SL or TP or both at the current levels and change the position of the opening price only.
The texts on the bars can be freely defined in the program configuration tab. Separate texts can be defined for a planned order, for a market order and for a pending order. A detailed description of the text configuration can be found here.
Each info bar has a gear icon.
When you click it, a new panel opens where you can manage the selected transaction.
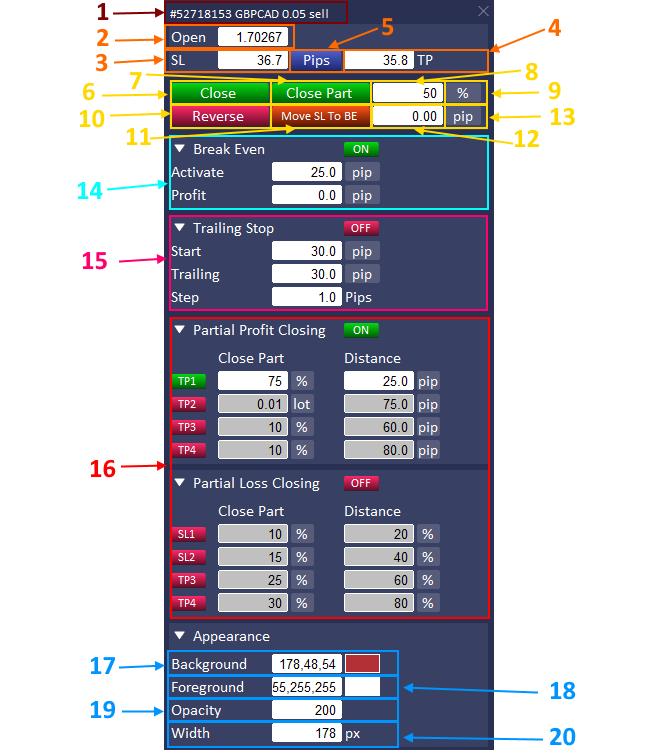
- The header of the window with the ticket, symbol, type and size of the transaction.
- Open order price. In the case of a pending order, you can enter a new value here to modify the order.
- Stop Loss. Enter a new value to modify the Stop Loss.
- Take Profit. Enter a new value here to modify Take Profit.
- Pips / Price button – changes displayed SL and TP values. These values can be given in pips (Pips) or as price levels (Price).
- Delete / Close – delete or close the order.
- Close the part of the order.
- Specify the part of the order to be closed.
- Specify the unit of the order part to be closed as a lot or a% value of the current trade size.
- Reverse – close / delete current order and open opposite.
- Move SL to BE – move SL to BE.
- Break Even offset – here specify the offset from the opening price after moving Stop to Break Even.
- Break Even offset unit – offset unit for the stop from the opening price (pip or percentage of distance to TP)
- Automatic Break Even section.
- Trailing Stop section.
- Section for partial closing of the deal. A detailed description of the parameters can be found here.
- Background color of the information bar.
- Font color on the information bar.
- The transparency of the background of the bar.
- Width of the bar.
By clicking on the headings of individual sections, you can collapse and expand them.
MANUAL MANAGE ORDERS
under construction …
BREAK EVEN
When a trade reaches a certain profit level, many traders protect their account by moving the Stop Loss to the trade opening level or a little further so that in the event of a negative scenario, when the price turns back, they do not get a loss on that trade.
To avoid sitting at the screen and “keep an eye on” transactions all the time, the Trade Manager program has an automatic Break Even feature.
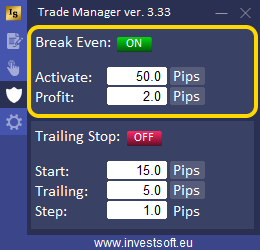
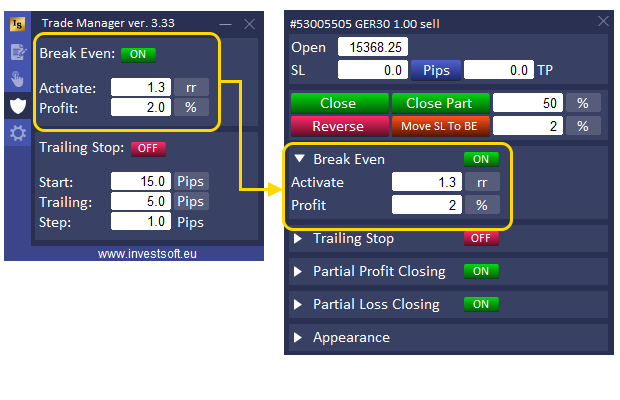
Before we activate the automatic Break Even, we need to set two parameters:
- Activation – that is the level / moment when the stop loss should be moved to Break Even. The moment of activation can be set as:
- distance in pips from the opening price
- percent (%) of the distance from the opening price to TP, e.g. TP = 120 pips BE Activation = 30% means activate BE at 36 pips of profit (30% of 120 pips)
- Risk Reward (RR) means distance as ratio of SL distance eg activation = 1.0 R: R and SL = 30 pips then activate BE at 30 pips of profit; another example BE activation = 1.5 R: R and SL = 30 pips then activate BE at 45 pips of profit
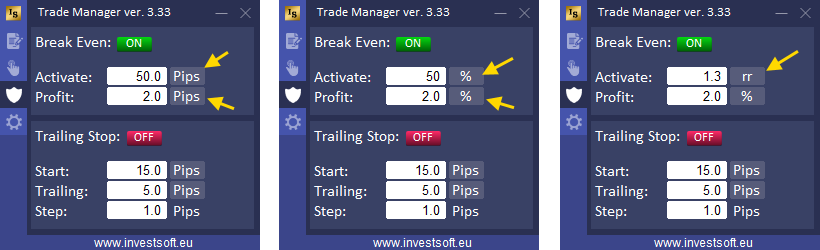
- Profit – the amount you need to protect by a BreakEven option. You can set this value in pips or percent (%).
If you have BUY order and set BE activation= 50 pips and profit = 20 pips then after gaining 50 pips of profit it moves Stop to 20 pips over the open level, so if price turns back and hits your stop you get 20 pips of profit protected by a Break Even.
Profit value in percent means % of current profit, so when you set BE profit = 50% and in the moment of activation of BE profit is eg 30 pips then Stop is moved to 15 pips (50% of 30 pips).
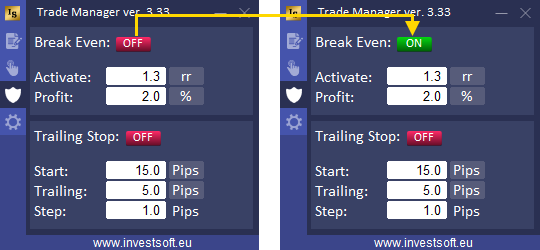
You can switch between the individual units of the “Activation” and “Profit” parameters by clicking on the buttons with the unit (pips, %, rr).
After all parameters are set, activate the function by clicking the button at the top.
When setting individual parameters for each job is active, then the settings from the main panel of the program are copied to each new job.
Otherwise, the settings from the main panel apply to all orders from the current symbol.
TRAILING STOP
under construction…
PARTIAL PROFIT AND LOSS CLOSING
The partial closing is a feature that allows you to exit trade with stages, therefore you can taking the next parts of profit as the price goes in the right direction or perform a phased exiting from a losing trade, reducing the loss.
With automatic setting of partial order closing, you can set default parameters which are automatically copied to the individual settings of each opening order.
ATTENTION! If, in the program parameters in the “——- LINES – ORDERS ———–” section, you disable the option of individually setting parameters for each open order (no information bars for open orders and no possibility of calling the panel with settings) by setting the parameter “Active” = FALSE, then the settings from the main panel apply to all open orders. In this situation, each change in the main panel is immediately applied to all active orders.
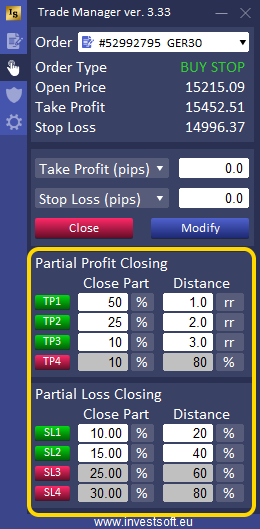
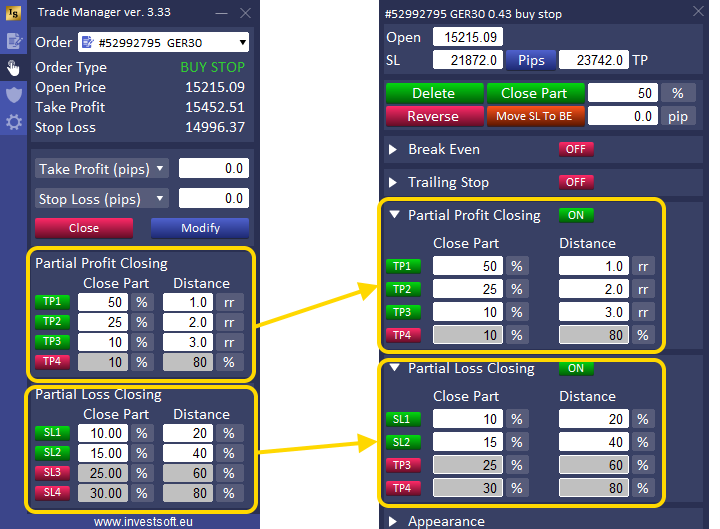
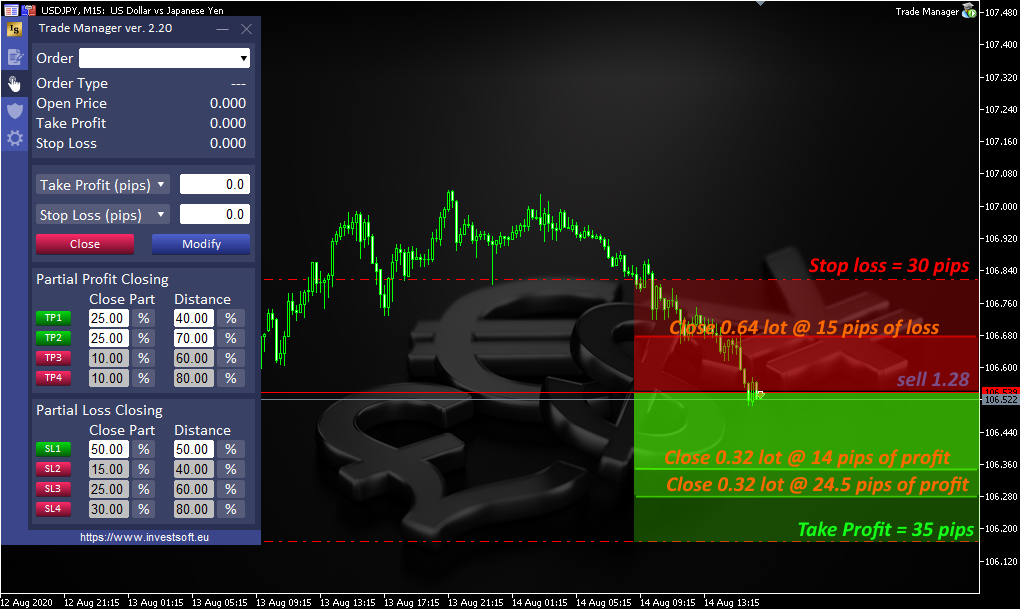
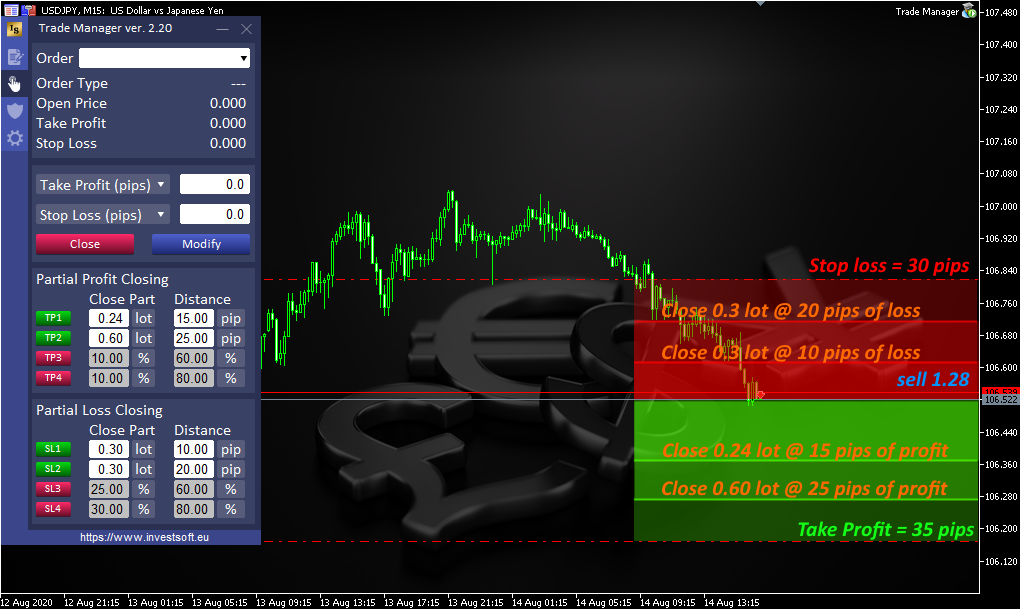
We can set up to 4 levels of partial closings in profit and also max. 4 levels of partial closing of trades on a loss.
For each stage of closing a part of the transaction, we can define the size of the part to be closed and the distance from the opening price.
The size of the part to be closed can be specified in lots or as a percentage of the initial order size.
The level where the part of the trade should be closed also can be defined as the distance from the opening price in pips or as a percentage of the distance from the opening price to the take profit or to the stop loss.
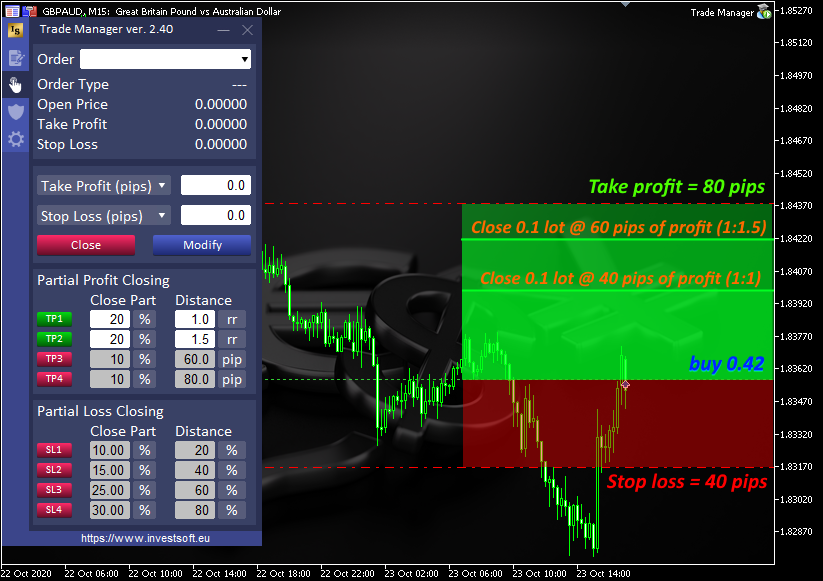
For a Partial Profit Closing there is a 3rd option to set distance to close part of trade and this is Risk Reward (“rr”).
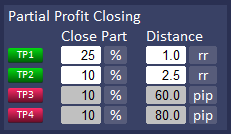
If you set the value rr = 1.0, then part of the order will be closed when the current price is in the distance equal to the distance of the SL. If the value is set to y = 2.0, part of the order will be closed when the price is 2 x SL and so on.
When the Stop Loss of a transaction is changed, whether by an automatic Break Even, Trailing Stop, manually by the trader or otherwise, the program calculates the distance defined as risk reward (“rr”) based on the initial Stop Loss distance.
Some examples below:
PROGRAM CONFIGURATION OPTION
Default lines (Stop Loss and Take Profit) distance
under construction
Texts configuration
The texts on the bars can be freely defined in the program configuration tab. Separate texts can be defined for a planned order, for a market order and for a pending order.
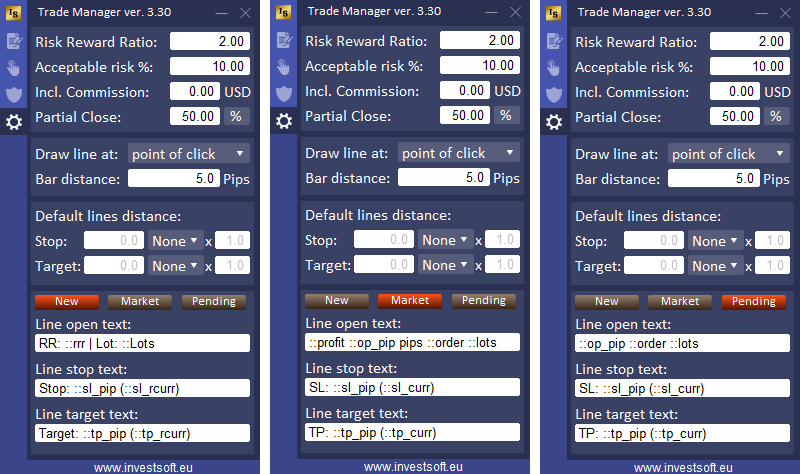
The values to be displayed on the bars are defined with the following markers:
::op_price – open price e.g. 1.23964
::op_dprice – open price distance as price e.g. 0.00059
::op_pip – open price distance in pips e.g. 5.9
::op_pt – open price distance in points e.g. 59
::tp_price – take profit e.g. 1.39649
::tp_dprice – take profit distance as price e.g. 0.00139
::tp_pip – take profit distance in pips e.g. 13.9
::tp_point – take profit distance in points e.g. 139
::tp_curr – take profit value in account currency e.g. $1648.33
::tp_rcurr – take profit value in account currency without decimal places and currency symbol e.g. 1648
::tp_bpct – take profit value as % of the account balance e.g. 5%
::tp_epct – take profit value as % of the account equity e.g. 11%
::sl_price – stop loss e.g. 1.19694
::sl_dprice – stop loss distance as price e.g. 0.00077
::sl_pip – stop loss distance in pips e.g. 7.7
::sl_point – stop loss distance in points e.g. 77
::sl_curr – stop loss value in account currency e.g. $732.10
::sl_rcurr – stop loss value in account currency without decimal places and currency symbol e.g. 732
::sl_bpct – stop loss value as % of the account balance e.g. 5%
::sl_epct – stop loss value as % of the account equity e.g. 11%
::rrr – risk reward ratio e.g. 2.5
::lots – calculated or current order lot
::profit – profit of the current order (include commission and swap) e.g. 346.34
::rprofit – profit of the current order without decimal places (include commission and swap) e.g. 346
::bprofit – profit of the current order (exclude commission and swap) e.g. 346.34
::rbprofit – profit of the current order without decimal places (exclude commission and swap) e.g. 346
::order – order type name
DESCRIPTION OF PROGRAM PARAMETERS
In the Trade Manager settings window, you can define how the program should work and what the individual components of the program should look like.
To display the program settings window, right-click anywhere on the chart and select “Expert Advisors” (MT4) lub “Experts List” and “Properties” from the context menu or simply press the F7 key.
The individual parameters are described below.
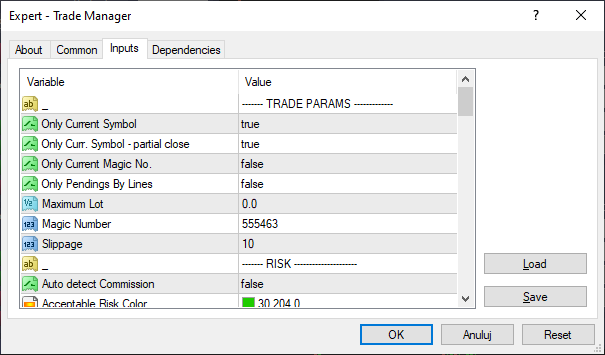
——- TRADE PARAMS ————-
In this section, you define how the program should handle orders.
- “Only Current Symbol” – set to TRUE cause that the Trade Manager manages only trades opened for current symbol, FALSE value cause that program manages trade for different symbols
- “Only Curr. Symbol – partial close” – this setting applies only to the partial close section and the value TRUE means to partially close only the trades for the symbol the Trade Manager is working on, the value FALSE means to partially close all open trades, regardless of the symbol.
- “Only Current Magic No.” – set to TRUE to manage only trades with Magic Number defined in parameter “Magic Number”. FALSE means to manage trades regardless of Magic Number value.
- “Only Pendings By Lines” – if you set this to TRUE, then when you plan to open a trade by drawing lines (open, stop and target) on the chart, you can only open a pending order (BUY or SELL button is disabled).
- “Maximum Lot” – you can define here max. allowed lot size. If you try to open a trade with a larger lot, you will get a warning when clicking the button on the panel to open/place an order. Value 0.0 turns off this option.
- “Magic Number” – an identifier that is assigned to the orders placed by the Trade Manager. When the program should manage only the transactions submitted by the panel (according to the settings), it selects orders on the basis of this number.
- “Slippage” – it is a difference between the expected price of a trade, and the price the trade actually executes at. Slippage often occurs during periods of higher volatility, when market orders are used, and also when large orders are executed when there may not be enough interest at the desired price level to maintain the expected price of trade. Here you can define max deviation of the price.
——- RISK ——————
- “Acceptable/Unacceptable Risk Color” – is the only definition of the color risk % value in the panel to warn the trader while lot size is too large and exceeds acceptable risk amount (this value you can set config tab on the panel).
——- LINES DISTANCE ———–
——- PANEL ——————–
In this section you can define the appearance and behavior of the main panel and the panel for managing an open order.
- “Order Window Location” – default location of the order panel. The following options are available:
- At Open Bar – display the panel next to the information bar near the order opening price
- Center Chart – display a panel in the middle of the chart
- Last Location – display the panel in the last remembered location of the panel.
——- LINES – ORDERS ———–
In this section you can define default settings for the appearance of information bars placed at each opened order on the chart.
- “Active” – possibility to enable or disable information bars for transactions.
- “Text Color” – font color.
- “Background Market Buy” – The color of the bar background for the market order Buy.
- “Background Market Sell” – the color of the bar background for the Sell market order.
- “Background Pending Buy” – background color of the bar for the Buy stop / limit pending order.
- “Background Pending Sell” – the color of the bar background for the Sell stop / limit pending order.
- “Opacity Market Order” – background transparency of the market order bar.
- “Opacity Pending Order” – background transparency of the pending order bar.
- “Width” – the default width of the bar.
——- LINES ——————–
In this section you will find settings that will allow you to define the appearance of the Open / Stop / Target block displayed when you plan to open an order.
- Font & Font size – the name and size of the font used on the bars
- Fill opacity – transparency of fills between open / stop / target bars
- Bars opacity – transparency of open / stop / target bars
- Text opacity – transparency of texts
- Target & Stop fill color – the color of filling the space between the bars
- Lines visibility – visibility of horizontal lines:
- Disabled – lines are never displayed
- On hover – lines appear when you hover the mouse over the block area
- Always visible – lines visible all the time whenever the block is on the chart
- Position – block position on the chart:
- Unlimited – the ability to move the block across the entire chart area
- At Newest Bar – fixed location of the block behind the newest candle. The distance from the latest candle can be defined in the “Position Offset to Bar” parameter.
- Align Right – fixed position of the block on the right edge of the chart
- Position Offset to Bar – block distance from the newest candle. The value is given as the width of the bar. Positive values mean that the left edge of the block is moved to the right of the current bar / candle. Negative values mean that the left edge of the block is moved to the left of the current bar / candle.
- Bars Space Fill – TRUE means that the background is displayed between the open-target and open-stop bars. FALSE hides the background between the bars.
- Icons Visible – TRUE displays reverse and pin icons on open / stop / target bars. FALSE hides icons.