The Trade Manager program is built to easily plan, place and manage orders on the Metatrader 4 and 5 platform.
By using the Trade Manager program you can control your risk and you don’t have to sit in front of the monitor all the time managing your opened trades because the program will do it for you.
In the Trade Manager program you get:
- automatic calculation of the deal size based on the risk %
- calculations of stop and target values in the account currency
- automatic and manual partial closing of transactions
- automatic Break Even
- automatic Trailing Stop
This user guide is to provide a step-by-step instruction for you to become familiar with the operation of Trade Manager to support you with an easier trade operation on Metatrader.
Table of Contents
How to install and run the program
Program installation
EA Trade Manager is distributed via the mql5.com market. Below are the steps to install the Trade Manager purchased in mql5.com market.
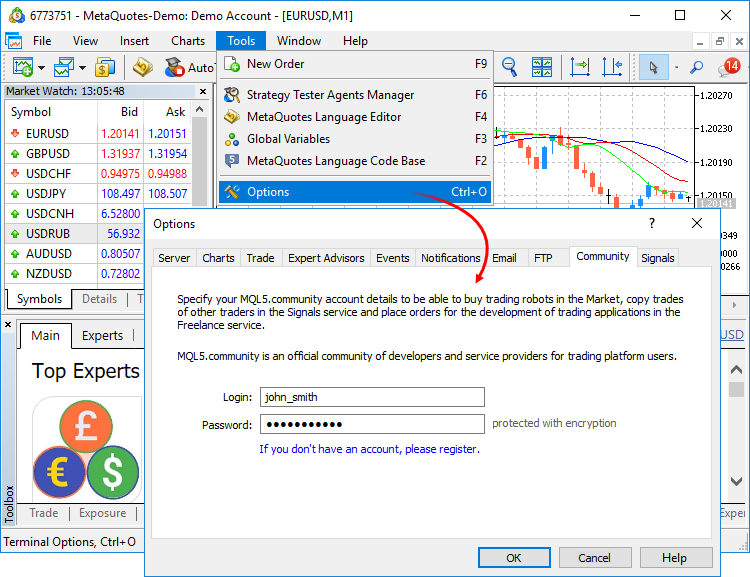
- Open the MT4 or MT5 terminal;
- Go to menu Tools and Select Options;
- In the opened window go to “Community” tab and log in to MQL5.com;
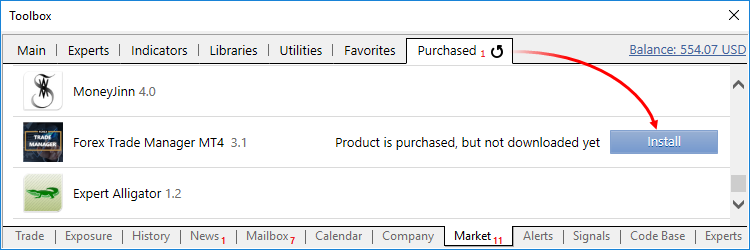
- Open the Purchased tab of the Market section. The list of products purchased using the specified MQL5 account will be displayed here;
- Select the desired product and click “Install”. The app will be downloaded to the disk and installed in the terminal folder;
Attention! A new activation is required in order to install an app on a new computer.
Trade Manager is automatically activated and installed to the Market folder in the Navigator of the MetaTrader terminal. A notification of successful purchase and activation is sent to your email, as well as to the MetaTrader terminal and as a private message to your MQL5 account.
Starting the program
For the correct operation of the program, you have to enable autotrading/algotrading in Metatrader terminal.
Turn ON AlgoTrading in a MT4/MT5 toolbar and set it in options:
- Go to menu Tools
- Select Options
- Go to “Expert Advisors” tab
- Check option “Allow algorithmic trading” and uncheck 3 options “Disable algorithmic trading when…”;
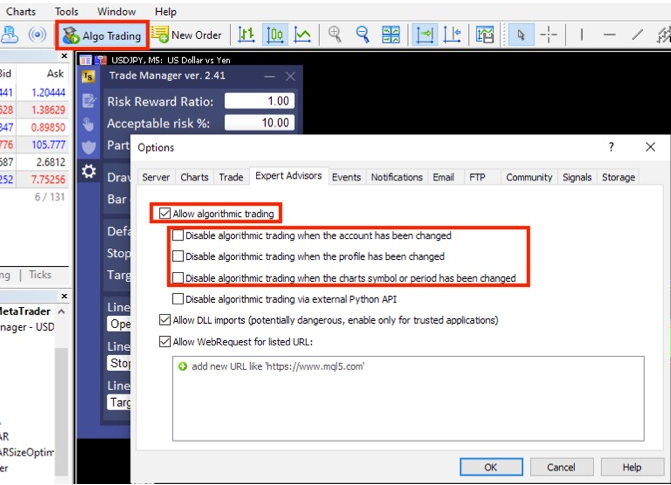
Apply changes by clicking “OK” and restart metatrader terminal.
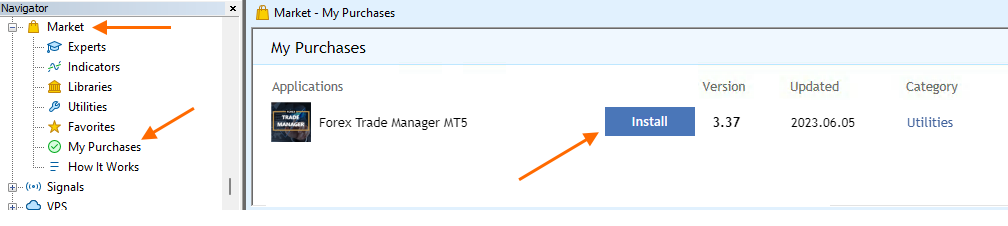
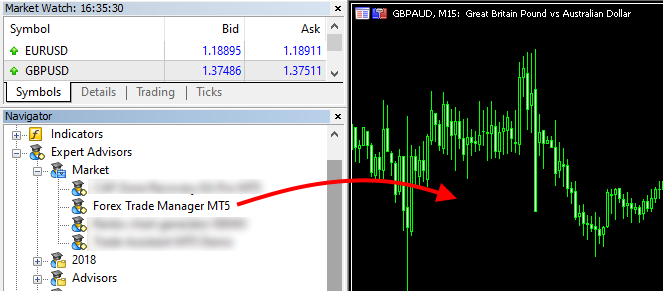
When you are ready to start the program, go to the “Navigator” window, find the program in the Expert Advisors \ Market section and run the program by double-clicking the left mouse button or dragging the program onto the chart.
Quick Overview
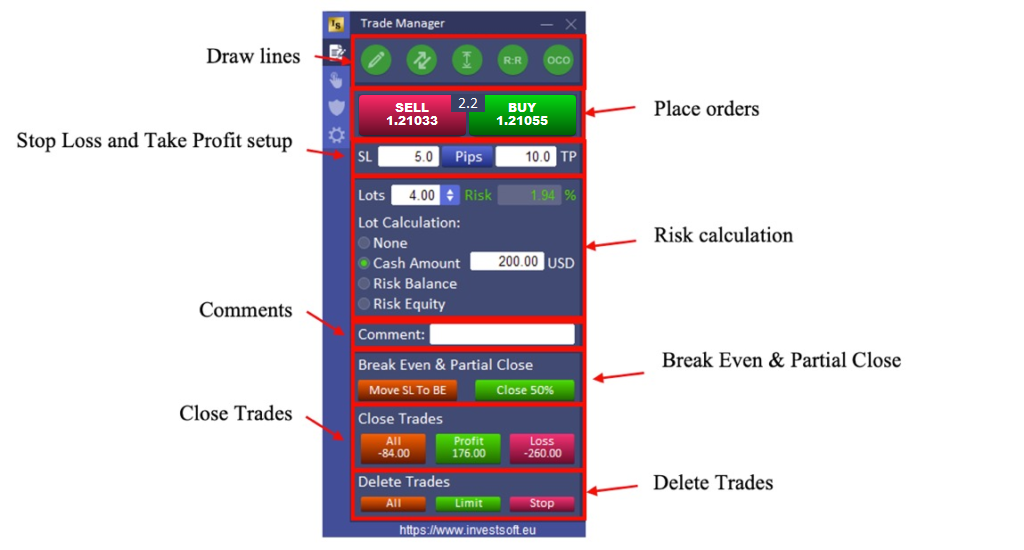
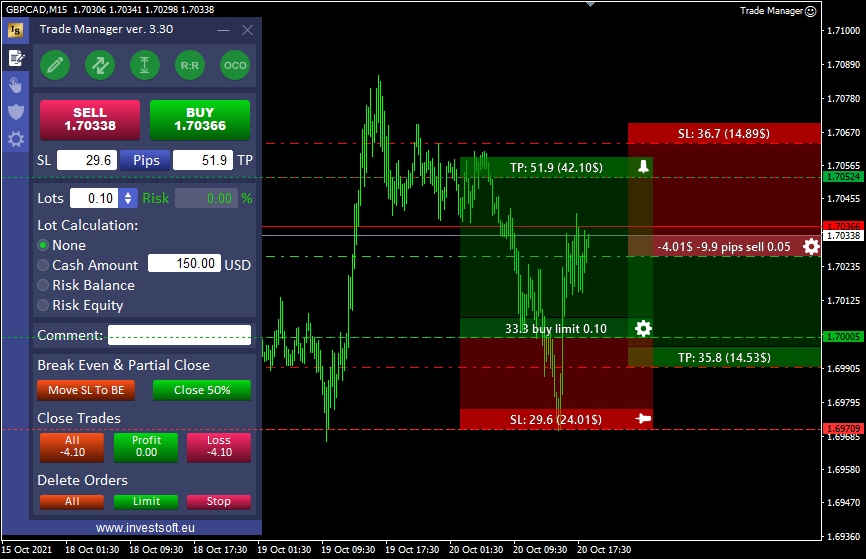
When you run the Trade Manager program, a panel will appear on the chart. It mainly consists of four parts.

We will look closely at all parts of the panel.
Title bar
In the title bar of the window you will find information about the current version of the program and the button for minimizing the panel and closing the program.
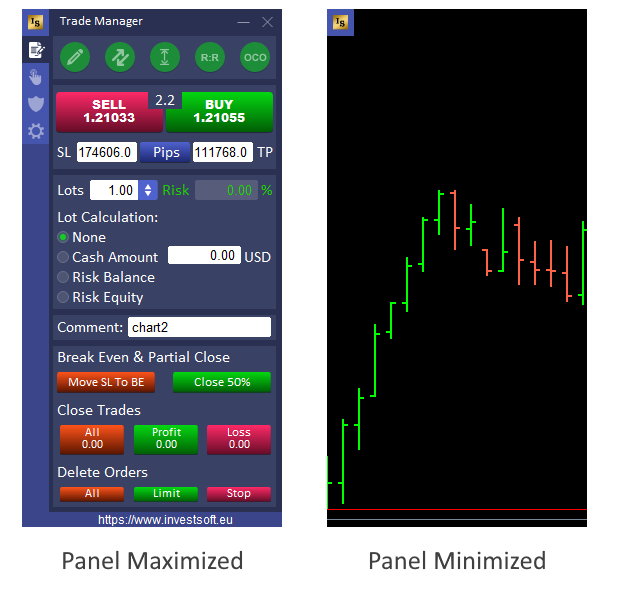
After minimizing, the panel is visible only as a square with the program logo. Just click on the logo to maximize the panel.

The X button exits the program and removes EA Trade Manager from the chart.
Tabs
There are 4 tabs on the left side of the panel:
![]() Placing orders
Placing orders
![]() Manual managing orders and partial profit/loss closing
Manual managing orders and partial profit/loss closing
![]() Break Even and Trailing stop
Break Even and Trailing stop
![]() Configuration
Configuration
You can click these tabs to switch between the main functions of Trade Manager EA.
Placing orders
In the Trade Manager, you can place market orders and pending orders. Orders can be placed in two ways:
1. fast opening of market orders (especially useful for scalping) with the BUY and SELL buttons on the panel
2. visual order planning by drawing horizontal lines on the chart indicating the level of opening, stop and target.
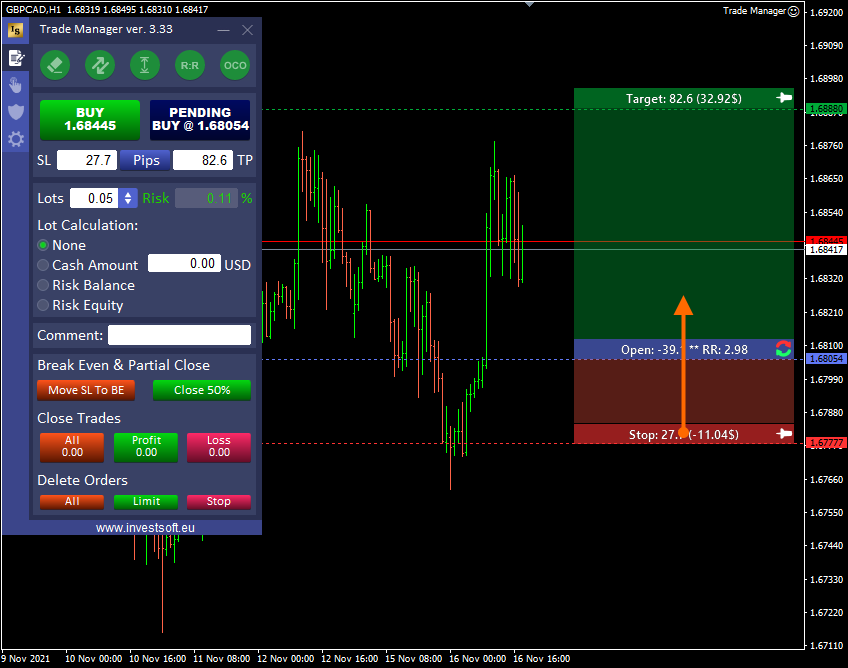
Quick opening of orders using the BUY / SELL buttons on the panel
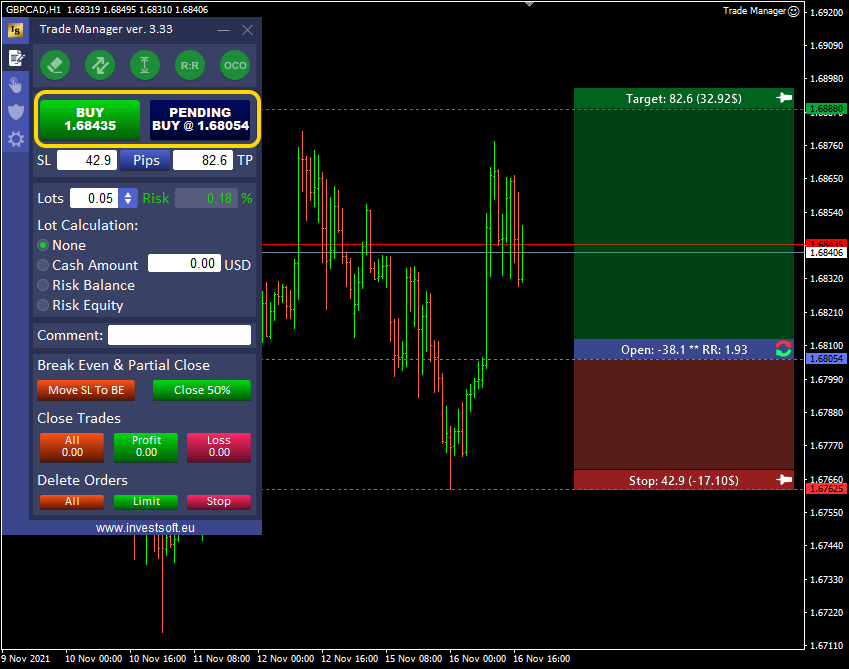
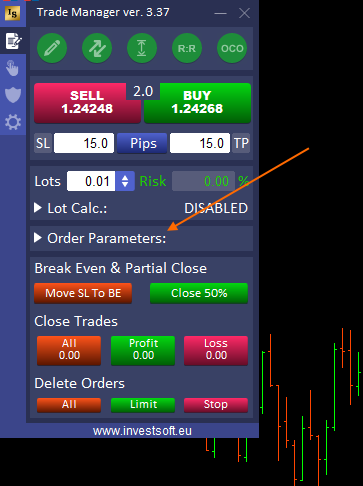
At the beginning, in the panel, we see two buttons BUY and SELL, which we can quickly place a market order on the market.

However, before you can press the button to open a market order, you need to set some options.
First, set the Stop Loss and Take Profit levels under the BUY / SELL buttons.
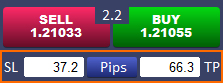
By default, we set SL and TP in pips as the distance from the opening price, but it is also possible to set SL and TP as the price.

Just click the button that says “Pips” to switch to the price levels. Then, the word “Price” will appear on the button. Clicking the button again (this time saying “Price”) will switch back to the pip value.
It is also possible to configure the default Stop Loss and Take profit values, which is described in detail in the “Program configuration option” section.
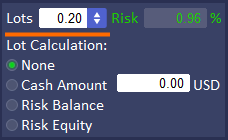
Lot size calculation
Another important element is determining the size of the transaction. You can either determine the size of the transaction yourself or define the risk level for a given transaction and the program will calculate the lot size.
If you set the size of the transaction yourself, the program, based on the entered value and the stop loss distance, will determine in the next field what is the risk percentage for the planned transaction (it is the balance percentage).
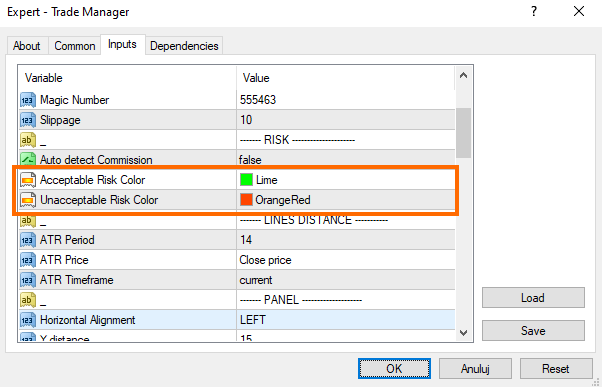
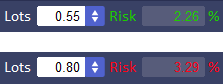
On the “Configuration” tab, you can define the acceptable risk level. If you exceed an acceptable level of risk, the numbers in the risk field will turn red.
The colors of the accepted / unaccepted risk can also be defined in the program settings window (press F7) in the “— RISK —” section in the parameters:
– Acceptable Risk Color
– Unacceptable Risk Color.
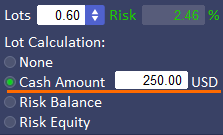
In the case of automatic lot size calculation, we have 3 options:
– Cash Amount – with this option, you can define fixed value of stop loss in the account currency, and the Trade Manager will be automatically calculating lot size when you will be changing stop loss distance by moving lines on chart or just define its value in the SL field on the panel.
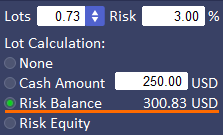
– Risk Balance – with this type, you can define in the field “Risk” max allowed risk% per trade and program calculate lot size based on stop loss distance and% of account balance. Next to the “Risk Balance” option, the calculated risk value in the account currency will be displayed.
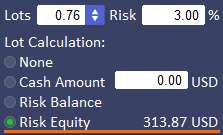
– Risk Equity – this method works the same way as “Risk Balance”, with the difference that the percentage size of the loss depends on account equity. Next to “Risk Equity”, the calculated risk value in the currency of the account will be displayed.
For the calculation of risk, we take into account the Balance or Equity of the account, i.e. we define the risk, e.g. 2%, then we risk only 2% per transaction from the Balance / Equity of the account. For example, if we have Balance = $ 48000, then 2% of $ 48000 = $ 960 so the SL value cannot exceed $ 960.

Visually placing the orders with the use of horizontal lines
Another way to place orders is to visually plan entry and exit points (stop and target) on the chart. This is especially convenient when we have designated potential market turning points and want to set a target and defense for the order in this area. We do not have to enter exact values then, but simply move the horizontal lines to the previously designated places.
Line drawing
To draw lines on the chart, in the first step, click the pencil button on the panel in the upper left corner. When the button is “highlighted” then the line drawing mode is active and now you can click anywhere on the chart.
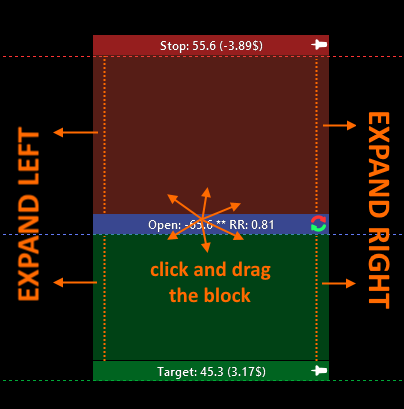
The program will draw a block with open, stop and target lines on the chart. The opening price level will be where we clicked on the chart.

Then adjust the order opening level (in the case of a pending order) as well as stop loss and take profit. These levels are set by simply clicking on the bar with the text and dragging it up or down.
Setting up an order with a lines
The entire block can be freely moved in the chart area. Just click on the opening price bar and move in any direction.
Similarly, click and move to the stop or target bar to set the desired target and stop levels.
You can also widening and narrowing the entire block by clicking and moving the mouse at the right or left edge of the block.
There are buttons on the bars:
- Reverse Button
 – a button for quickly switching between the long and short positions
 - Pin
 / Unpin
  Button – pinning or unpinning the stop or target level.
Attention! Note here that the two states of pinning SL and TP are here.
With a single click on the pin button, we pin the SL or TP level so that when changing the opening level, SL and TP are stay the same, but we can drag these levels with the mouse
When double-clicking on the pin button, a red dot appears on the pin and makes it impossible to change this level even by clicking and dragging with the mouse.
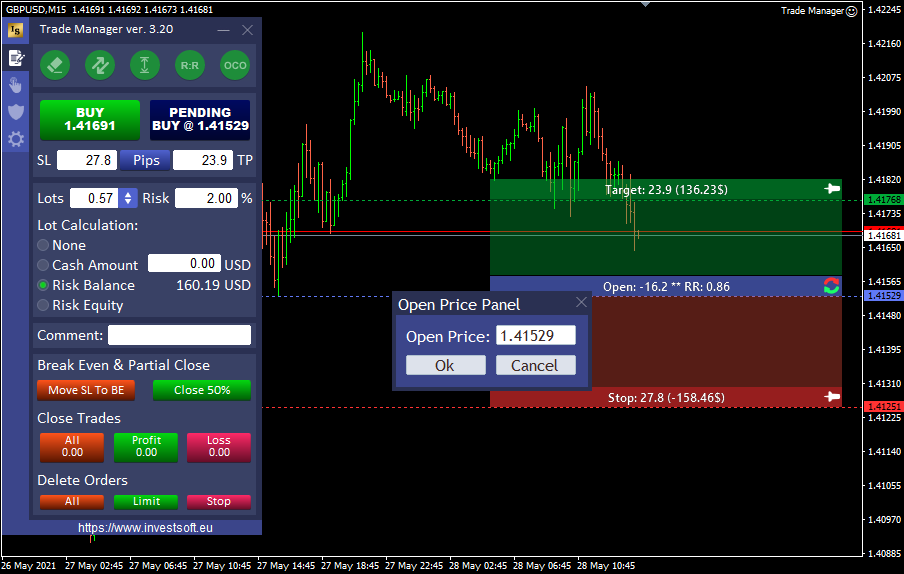
To set the exact opening price (the open bar/line level), you should call a special price edit window. To do this, hold down the CTRL key and click on the opening price bar.
In the window that opens, enter the correct price and confirm the changes by clicking the “OK” button.
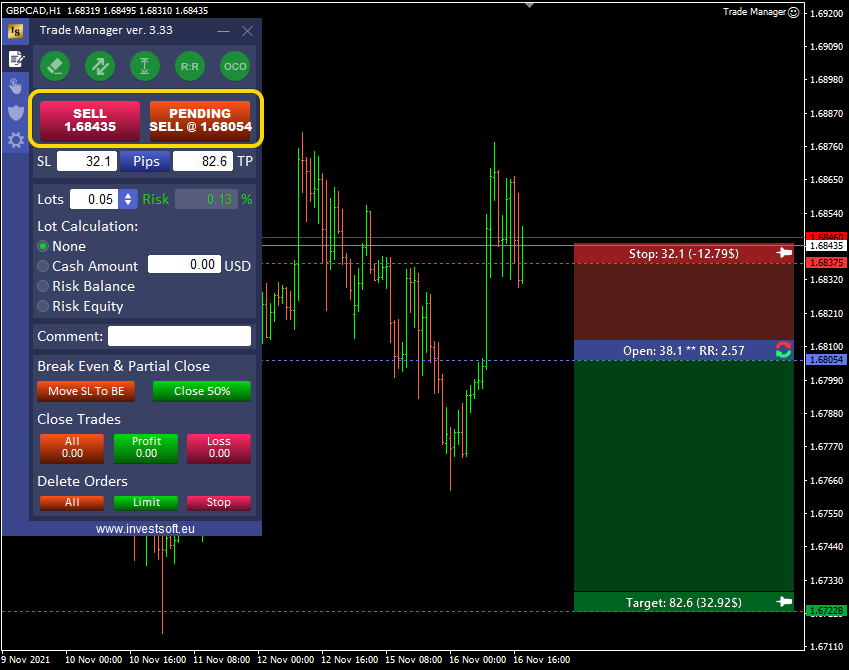
When you draw lines on the chart, the default direction is BUY.
However, when you drag the Stop Loss level above the opening price, then the direction of the order changes to SELL. The buttons on the panel also change.
If you have previously selected the automatic lot calculation then the program calculates the transaction size on an ongoing basis based on the specified risk and Stop Loss size when you are changing the Stop Loss position. A detailed description of the lot calculation types can be found here.


The appearance of the open / stop / target block, such as colors, transparency, font size or bar size, can be defined in the parameters described here.
Open/Stop/Target block options on the panel
In the upper part of the panel, we have round buttons through which we can draw an open / stop / target block and we can set the block’s operation when we plan to open an order.
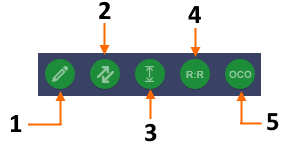
- Line draw or clear button
- Button to auto-adjust the line to the current price
- SL and TP freeze button
- Fixed Risk Reward Ratio
- OCO (One Cancels the Other)
When you want to draw open / stop / target lines on the chart, then you need to click the pencil button to activate the drawing.

When the button is highlighted (lighter color) now you have to click anywhere on the chart to draw the lines (the block opening price level is located at the click level on the chart).

After you successfully draw a line on the chart, the pencil button changes to an eraser button that you can use to remove lines from the chart.
The entire process of drawing lines in the chart is shown here.
When you activate the “auto-adjust” button then the entire block is moved to the current price and with each new tick the block will follow the current price.

If the block is in the BUY direction, then the opening level is “sticked” to the Ask price, while for a planned SELL order the block will “follow” the Bid price.
If this option is activated, then the block can only be moved horizontally with a mouse.
This is a particularly useful option when you plan to open a market order right away. For a pending order, it is best to keep turned OFF the “autoadjust” function so that you can freely adjust the level of the opening price.
3. SL and TP freeze button
This option determines the behavior of the Stop Loss and Take Profit lines.

When you activate the “Freeze SL and TP” option, the pins on the SL and TP lines are activated and both Stop Loss and Take Profit keep their level constant if the level of the opening line changes. This is important when you want to set a constant profit or loss exit level on the chart and then adjust the entry point or open a market order at the current price.
If this function is inactive (pins are deactived on the SL and TP bars), then the stop loss and take profit distance is kept constant and by changing the opening price we move the entire block including SL and TP.
4. Fixed Risk Reward Ratio
By activating this option, the program maintains a constant risk-to-risk ratio, which in practice means that by dragging SL the program automatically increases or decreases the TP distance. Likewise, if we drag TP, the program adjusts the SL distance.

The size of the RR ratio is defined in the panel on the configuration tab in the “Risk Reward Ratio” field.
5. OCO (One Cancels the Other)
This option does not apply to the operation of the line, but directly affects the behaviour of pending orders that have already been placed.
A one-cancels-the-other order (OCO) is a pair of conditional orders assuming that if one order executes, then the other order is automatically cancelled.
After activating the OCO function, the Trade Manager “remembers” all pending orders and when one of them is activated, the rest are deleted.

WARNING! Removing one of the orders does not cancel the other ones, but only activating the pending order will do it.
The appearance of the block
The open / stop / target block appearance is fully customizable via parameters in the Trade Manager settings window. You can set such elements as the background color of the open, stop or target bar (each separately), the background color between the bars, background and text transparency, as well as font family, size and color, and even text transparency. Below is a short presentation of the possibilities of changing the block appearance settings:

A detailed description of the parameters can be found here.
The texts to be displayed next to the lines can be defined in the program configuration tab. For this you need to use special tags that define individual data. You can define texts for the bar at the opening price, for stop loss and for take profit, and separately for a planned order, a market order and a pending order. More information about the configuration of the texts on the bars can be found here.
Order parameters
Virtual Pending Orders
Virtual pending orders are orders that are not sent to the broker and are kept in the program’s memory.
When the current price reaches the opening price of the virtual pending order, it is activated, i.e. the program sends a request to open a market transaction.
ATTENTION! For orders to be activated, the TRADE MANAGER MUST BE RUNNING.
To place a virtual pending order, expand the section with order parameters in the main panel
and select the “Virtual Pending Order” checkbox,
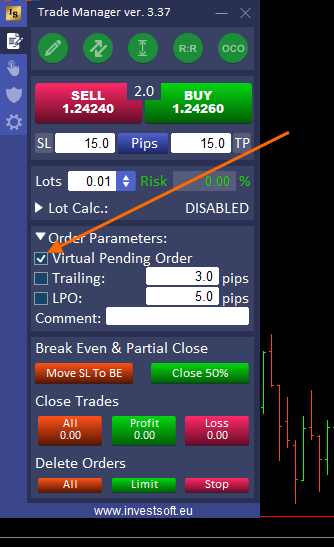
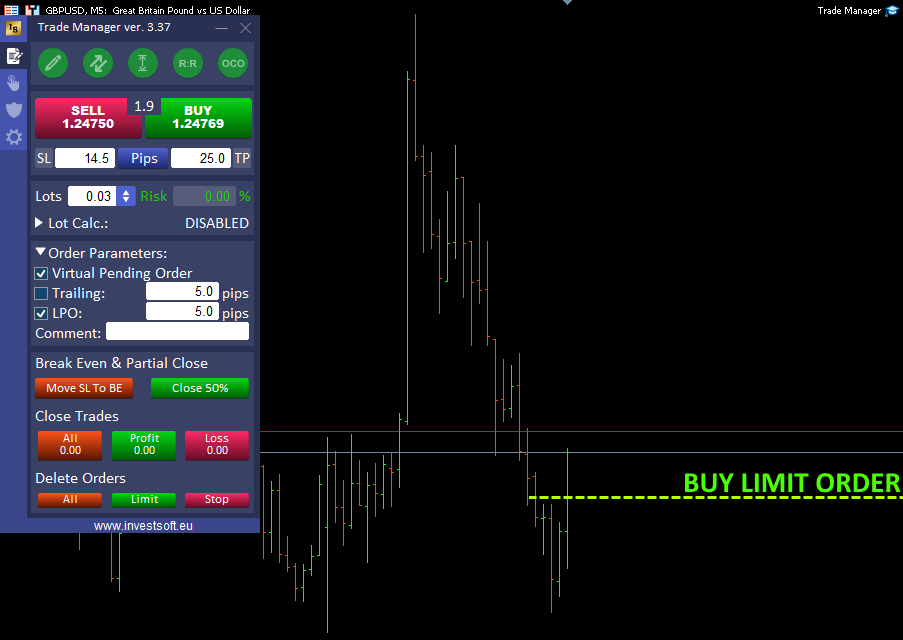
then draw the Open/Stop/Target lines on the chart, set the appropriate levels and click the Pending Buy or Pending Sell button.
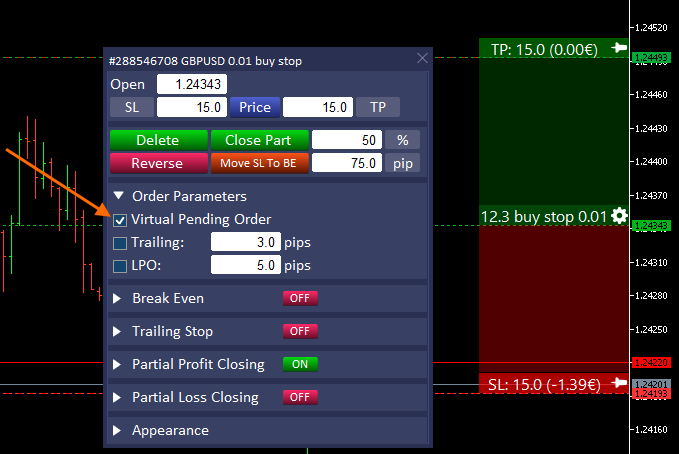
The program on the chart marks the place where the order is to be activated with a horizontal line, and after clicking on the information bar at the opening price, you can check the SL and TP levels and modify them. You can also change the opening price by dragging the line on the chart. Trade Manager treats a virtual pending order the same as a regular pending order, only it is not visible in the list of pending orders in the metatrader.

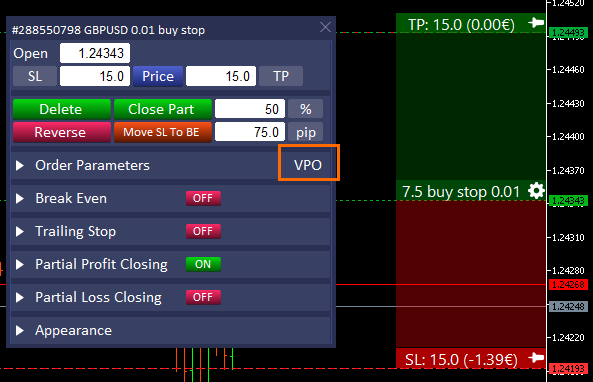
After placing a virtual order, you can change its settings in the order panel by clicking the gear icon. Then in the “Order Parameters” section, just uncheck the “Virtual Pending Order” checkbox,
confirm the change
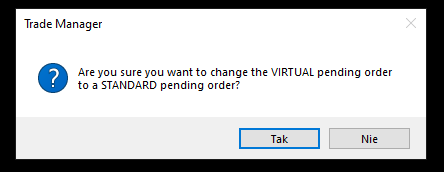
so that the pending order appears at the broker and is visible in the list of pending orders in the metatrader.
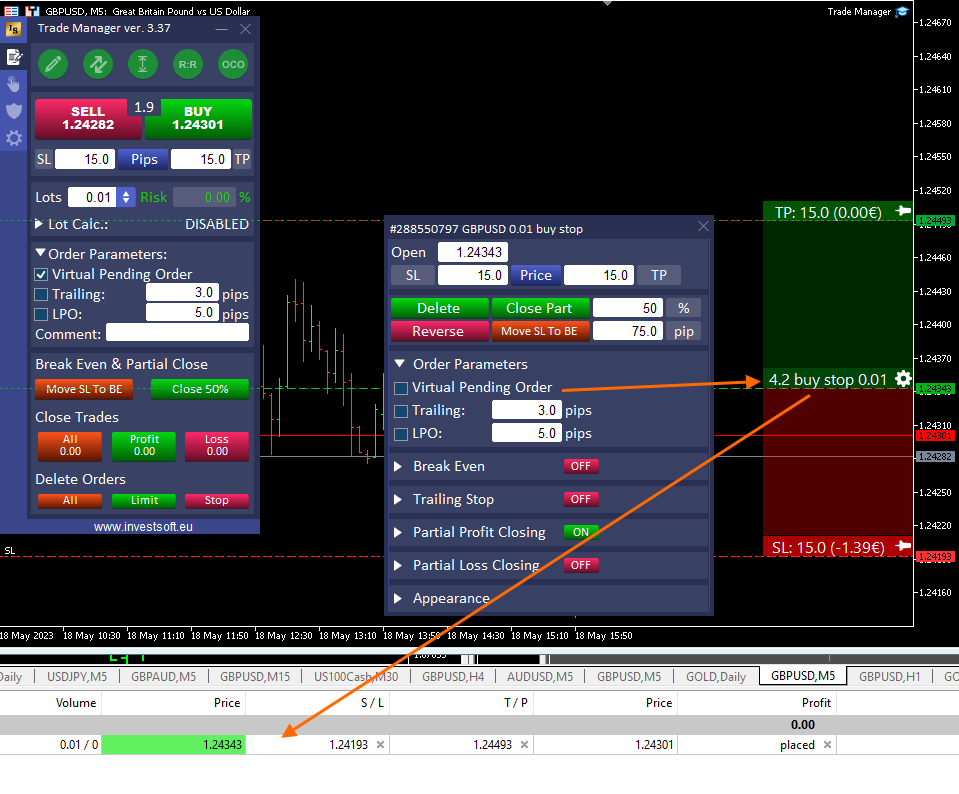
Checking the checkbox again will transform the pending order back into a virtual one.
When the “Order Parameters” section is collapsed and the Virtual Pending Orders option is active, it is indicated on the panel by the “VPO” symbol.
Trailing Pending Orders
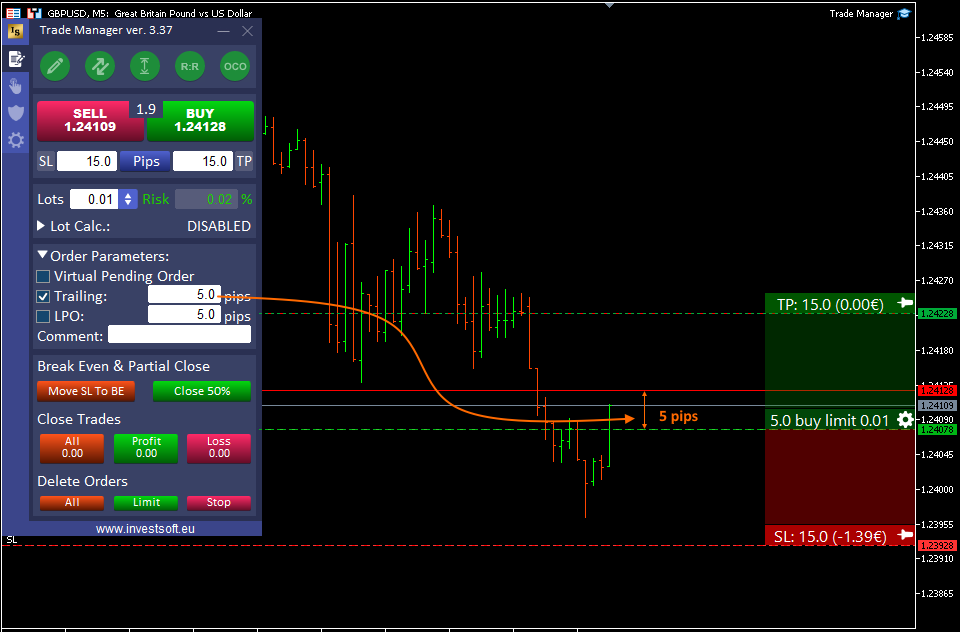
Sometimes we want to open a trade in the direction of the main trend but we want to execute it when the price does a pullback so we place a limit order. Or in another case, we want to open an order in the direction of the market but after the pullback ends when the price returns to the trend, so we place a stop order. However, in order not to miss the moment when the price turns around and get the best entry price, it would be good if our order followed the price. That’s why we’ve introduced the “Trailing Pending Order” feature in Trade Manager.
This feature can be enabled in the “Order Parameters” section by checking the “Trailing” checkbox.
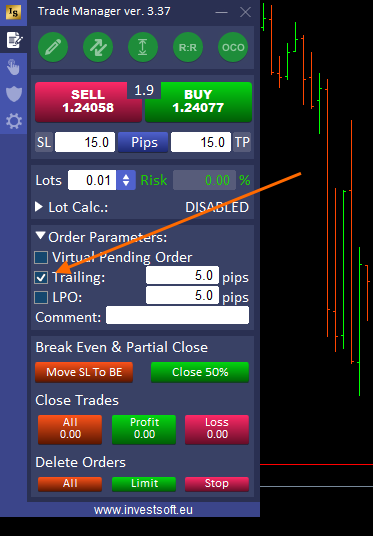
In the text box next to it, we specify the distance in pips that should be maintained between the opening level of the pending order and the current price.
Trailing Pending Orders for an existing order can be modified in the order settings window after clicking the gear icon.
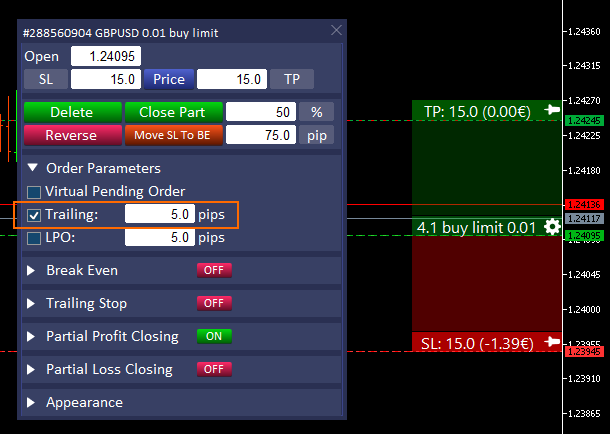
When the “Orders Parameters” section is collapsed, the active Trailing Pending Order feature is marked with the TPO symbol
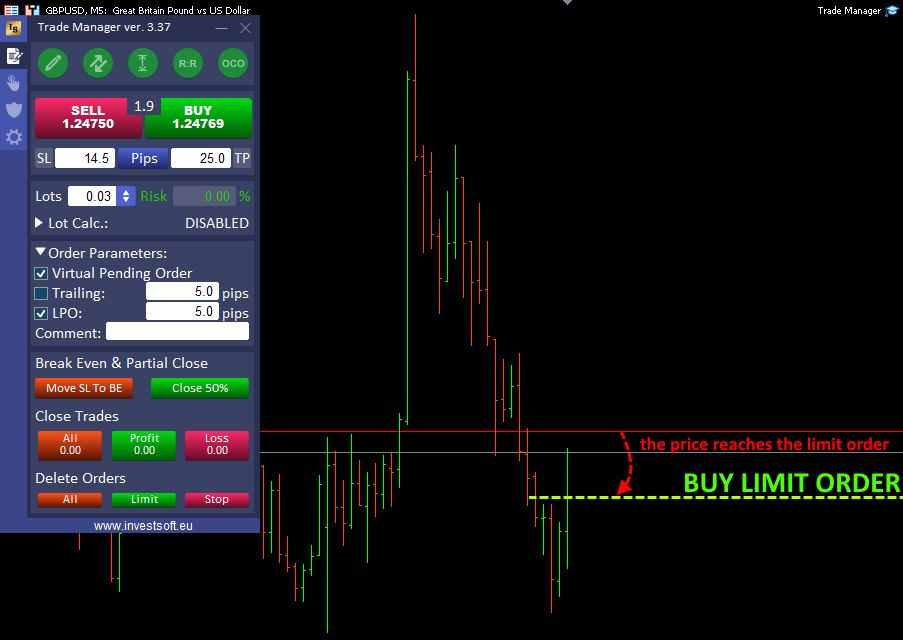
Limit Pullback Orders
Price moving in a trend often makes pullbacks, which are a good opportunity to join the existing trend at a more favorable price. Expecting the market to make a pullback, it is best to set a pending order with a price limit, but the difficulty here is that we do not know how deep the pullback will be. If we set the limit order too far and the price makes only a shallow pullback, our limit order will not be executed and the price will go further in the designated direction and we will miss a good opportunity to earn. On the other hand, if we set a limit order too close to the current price, we must either set a large stop loss or we risk hitting an SL before the price completes its pullback and reaches our expected target.
The solution here is the Limit Pullback Order (LPO). It works in such a way that when a limit order is to be activated, it is changed into a stop order and set from the current price at a distance set in the LPO distance parameter. If the price continues the pullback, the stop order follows the price keeping the LPO distance constant and when the pullback is completed and the price returns to the current trend, it will activate your stop order and you will get a much better opening price for your trade.
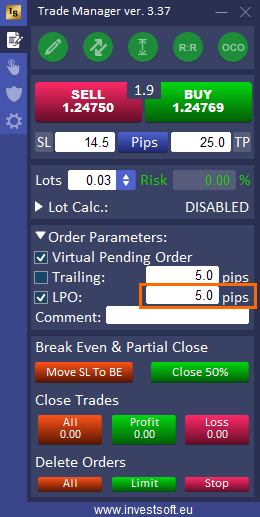
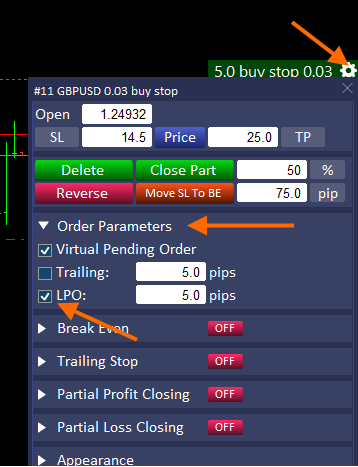
To activate LPO, expand the “Order Parameters” section in the main panel and check the LPO checkbox.
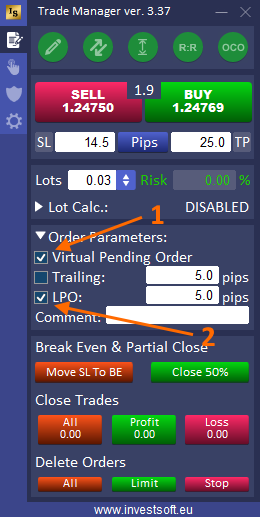
ATTENTION! Limit Pullback Orders works only for virtual pending orders, so to enable LPO you must first check the Virtual Pending Orders checkbox.
ATTENTION! Virtual Pending Orders and LPOs require the TRADE MANAGER KEEP RUNNING. When the program is turned off, the order cannot be activated and it can lead to losses on your account. You use this feature at your own risk.
In the text box next to the LPO, specify the distance that the pending stop order should keep to the current price.
When you activate the LPO function then place a limit order
When the price reaches the activation level of the limit order…
… the limit order is changed to a stop order at the distance defined in the text box at LPO
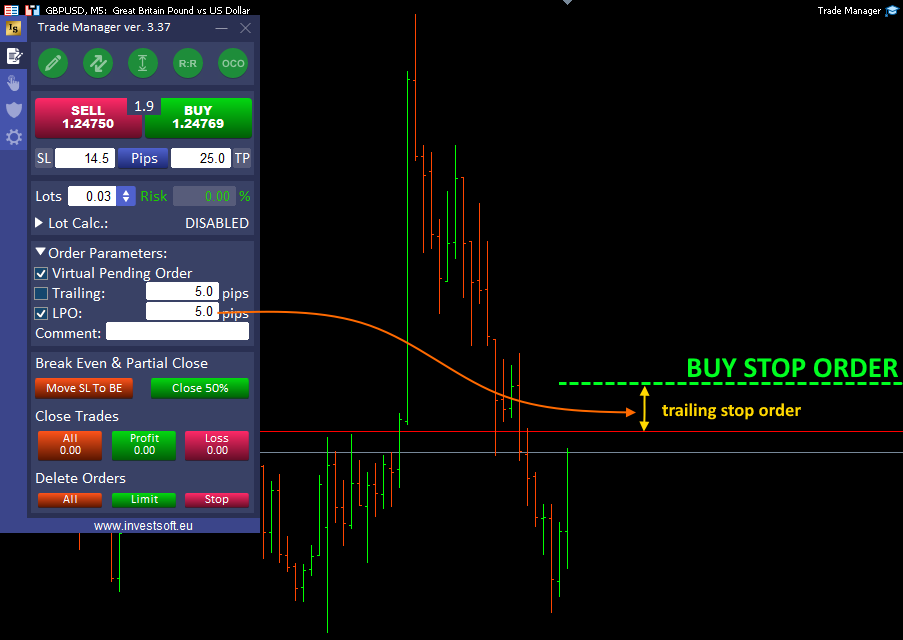
As long as the price continues to go down, the stop order follows it. When it turns up, the stop order will be activated.
For an active LPO order, you can change the parameters in the order parameters dialog after clicking the gear on the order information panel.
Comment
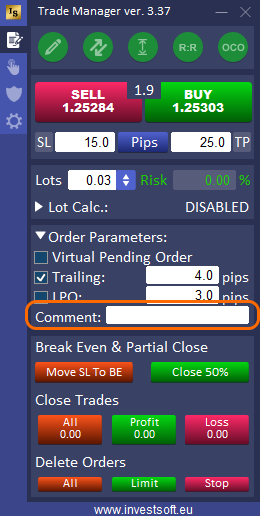
In the “Comment” field, you can enter any text that will be used to mark the order you place via Trade Manager.
Automatic correction of the SL and TP distance after placing the market order
Every trader encounters the slippage effect in their daily trading. It is especially troublesome when we use short SL and TP in ours, then the slippage of even a few tenths of a pip disturbs our initial assumptions and most often causes the extension of the SL and the shortening of the TP.
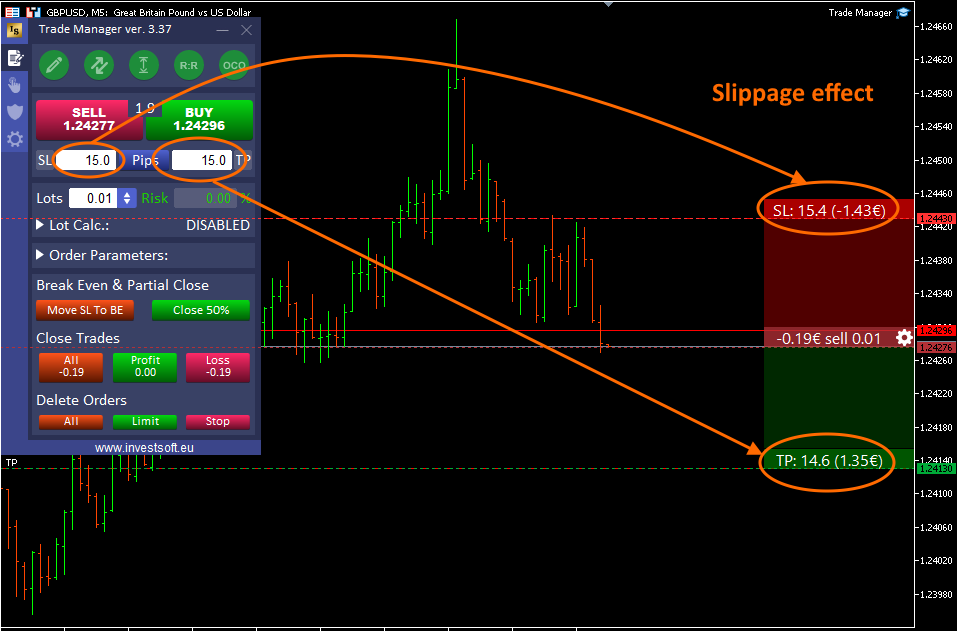
That is why in Trade Manager we introduced the SL and TP adjustment mechanism for market orders. After successfully submitting a market order, the program immediately checks the SL and TP distances and if they are different from the originally assumed ones, the program modifies the order to obtain the expected SL and TP distances.
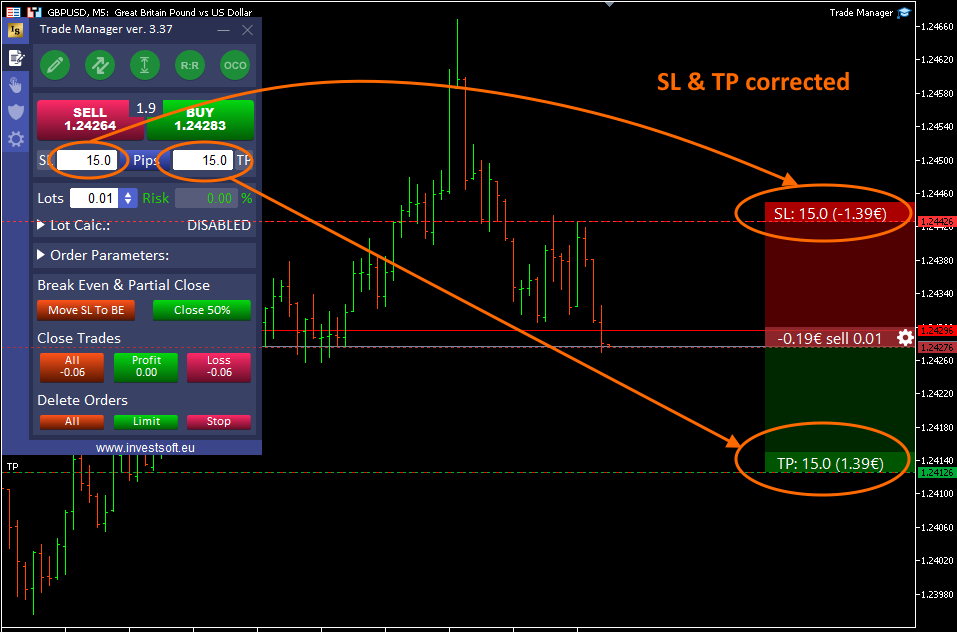
This function only works when you define SL and TP as distance in pips. Doesn’t work when specifying SL and TP as price.
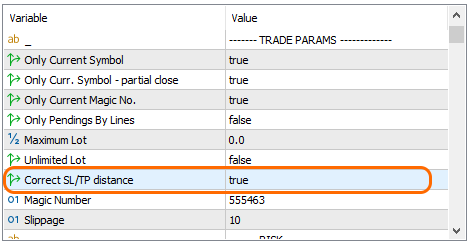
The SL and TP correction function is enabled by default, but can be disabled in the settings window in the “Correct SL/TP distance” parameter.
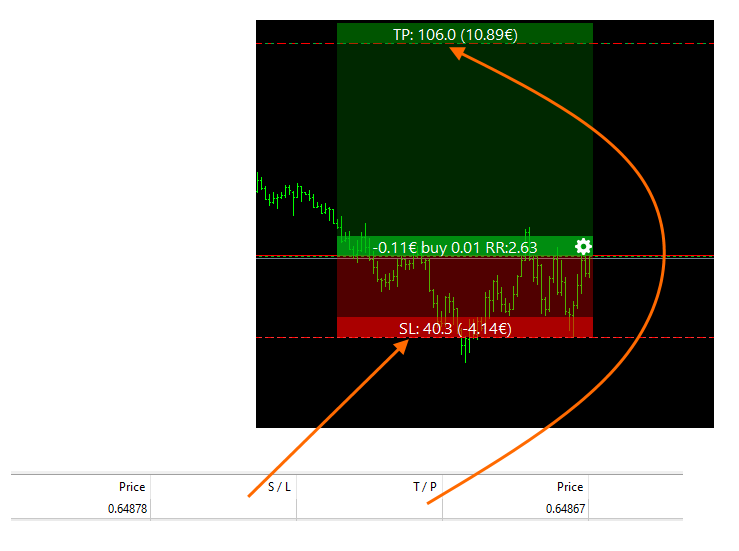
Management of an existing order
After opening the order, the program assigns an information bar to the opening line, which displays basic information about the order, e.g. lot size, transaction type, or the current transaction profit.
The bar can be freely moved along the line of the order opening price, but after clicking on the bar, it is expanded and shows the bars at Stop Loss and Take Profit.
When the block is expanded, we can modify the order by clicking and dragging vertically the Stop Loss or Take Profit bar, and in the case of a pending order, even the opening price.
Attention! For a pending order, the pins work the same as for a planned order, i.e. we can freeze SL or TP or both at the current levels and change the position of the opening price only.
The texts on the bars can be freely defined in the program configuration tab. Separate texts can be defined for a planned order, for a market order and for a pending order. A detailed description of the text configuration can be found here.
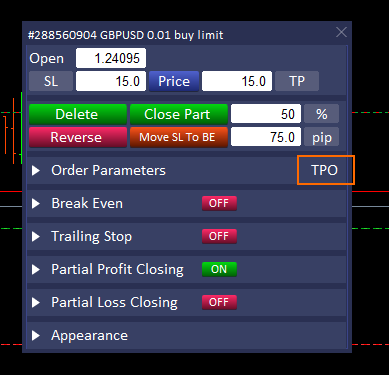
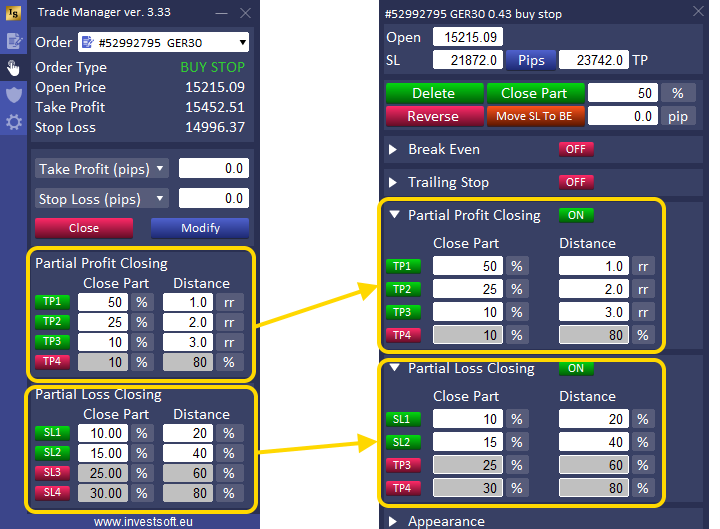
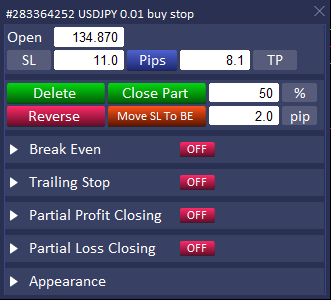
Each info bar has a gear icon.
When you click it, a new panel opens where you can manage the selected transaction.
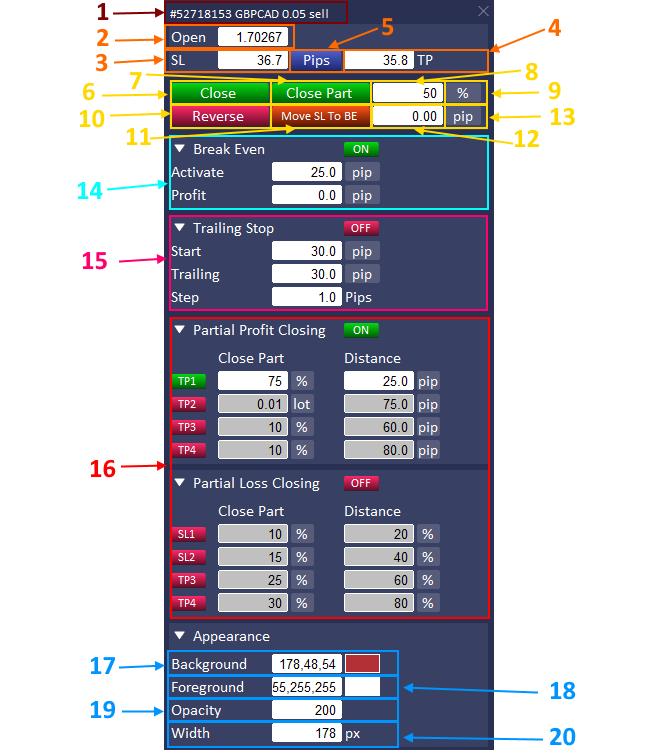
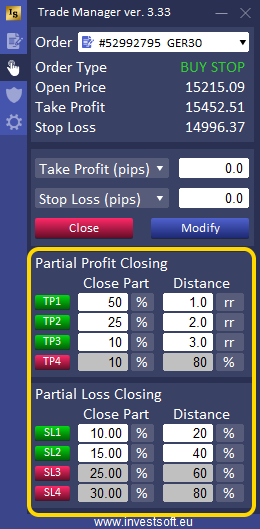
- The header of the window with the ticket, symbol, type and size of the transaction.
- Open order price. In the case of a pending order, you can enter a new value here to modify the order.
- Stop Loss. Enter a new value to modify the Stop Loss.
- Take Profit. Enter a new value here to modify Take Profit.
- Pips / Price button – changes displayed SL and TP values. These values can be given in pips (Pips) or as price levels (Price).
- Delete / Close – delete or close the order.
- Close the part of the order.
- Specify the part of the order to be closed.
- Specify the unit of the order part to be closed as a lot or a% value of the current trade size.
- Reverse – close / delete current order and open opposite.
- Move SL to BE – move SL to BE.
- Break Even offset – here specify the offset from the opening price after moving Stop to Break Even.
- Break Even offset unit – offset unit for the stop from the opening price (pip or percentage of distance to TP)
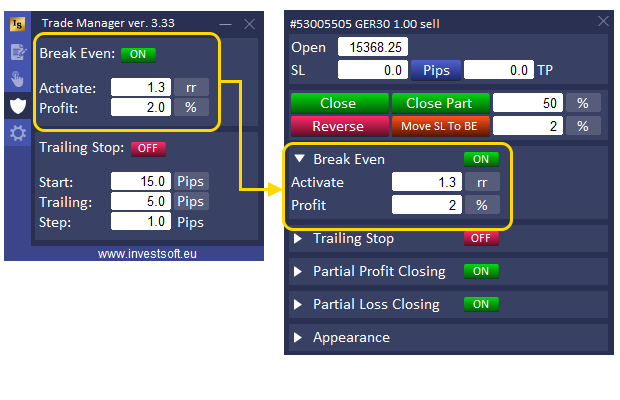
- Automatic Break Even section.
- Trailing Stop section.
- Section for partial closing of the deal. A detailed description of the parameters can be found here.
- Background color of the information bar.
- Font color on the information bar.
- The transparency of the background of the bar.
- Width of the bar.
By clicking on the headings of individual sections, you can collapse and expand them.
Manual Trade Closure
In the main panel of Trade Manager, you’ll find the “Close Trades” section, which allows you to quickly close groups of trades. With this function, you can easily close all trades, only profitable trades, only losing trades, or only buy or sell trades.
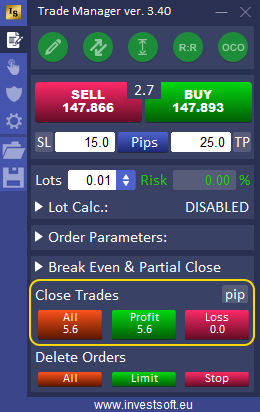
There are three main buttons:
- ALL – close all open trades.
- PROFIT – close all profitable trades.
- LOSS – close all losing trades.
By default, the values on these buttons are displayed in the account currency. However, you can change the unit in which trade values are displayed.
Changing the Trade Value Unit
To change the trade value unit, use the button next to the “Close Trades” header to toggle between:
- Account currency (e.g., USD)
- Pips
- Percentage of account balance
This allows you to customize the display to your preference.

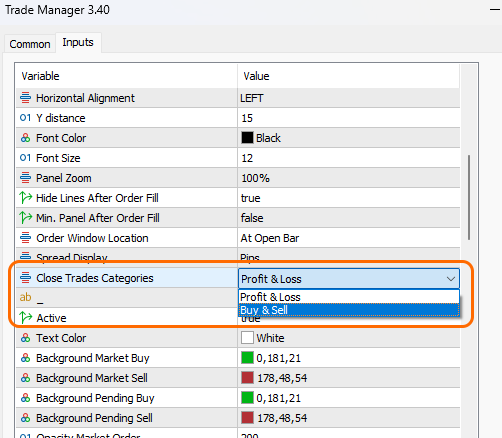
Changing the Trade Grouping Category
You can customize how trades are grouped in the “Close Trades” section, with two options available:
- Profit and Loss – organizes trades into profitable (PROFIT) and losing (LOSS) categories.
- Buy and Sell – groups trades based on type: buy (BUY) and sell (SELL).
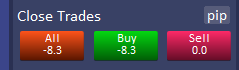
To adjust how your trades are grouped:
- Open the Trade Manager settings by pressing F7.
- In the “Panel” section, find the parameter labeled “Close Trades Categories.”
- Select either “Profit and Loss” or “Buy & Sell” to set up trade groups according to your preferences.
This enhanced flexibility lets you view and manage trades in a way that best suits your trading strategy.
Stop Loss and Take Profit modes
Stealth mode – possibility to hide stop loss or take profit
Many traders are concerned about the so-called “stop loss hunting” by brokers and would like to hide the location of its SL or TP. Therefore, in the new version of the program, we have introduced the possibility of setting a virtual stop loss / take profit.
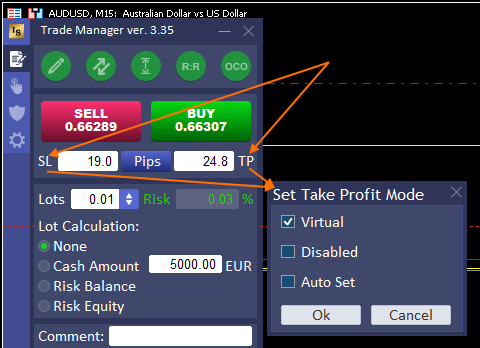
To set the virtual mode for SL / TP, click the SL or TP button in the main panel and select the Virtual option in the window. Then each new order will have a virtual SL / TP set.
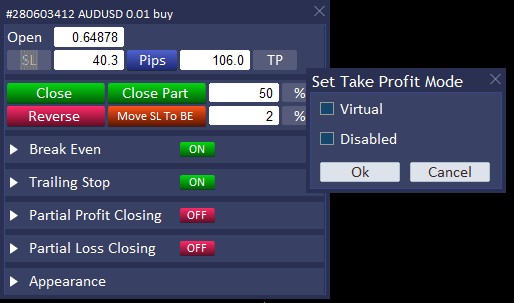
You can also set the hidden mode for only this selected order in the order parameters window:
The stealth mode is marked with the corresponding icon on the panel:

Physically, the SL / TP is not set in the order, and only the program remembers the designated levels and marks them with horizontal lines on the chart. After hovering over the line, a tooltip is displayed with information about which trade the line is from.
These lines cannot be moved directly, and SL / TP modification can only be done from the level of the open / stop / target block or the order modification panel.
ATTENTION! In order for close trade when the price reaches the virtual SL or TP, the TRADE MANAGER MUST BE RUN. When the program is turned off, the order is not protected by SL / TP and it can lead to serious losses on your account. You use this feature at your own risk.
Stop Loss or Take Profit disabled
If you do not want to define a profit limit for a given transaction, but you want the profits to follow the price and to hedge the profits with a trailing stop function, you can turn off TP.
Click on the TP button on main panel and select “Disabled” in the dialog box. From that moment on, all transactions will be made without TP.
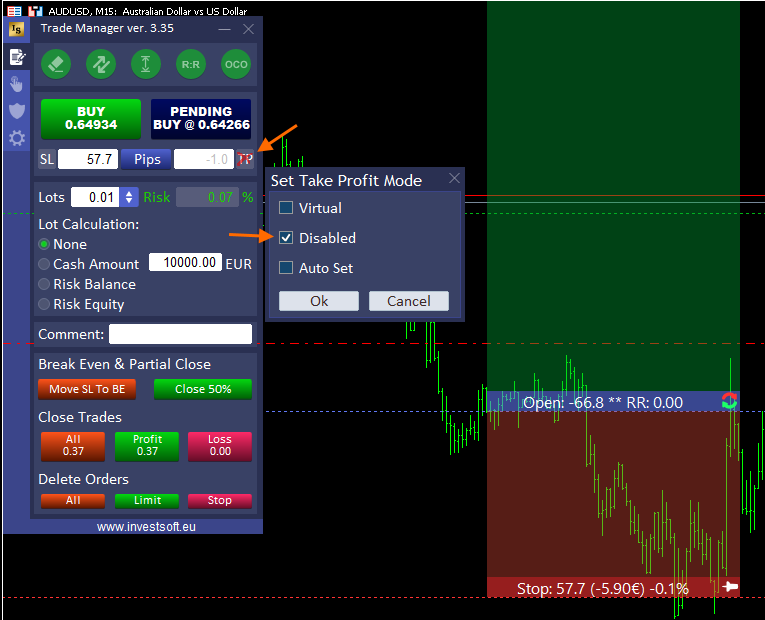
Attention! When you disable TP then you can’t specify the activation levels Trailing Stop, Break Even or partial closure as a % of distance to TP.
Automatic Stop Loss or Take Profit setting in the order
In Trade Manager you can enable automatic Stop Loss or Take Profit. If the program notices that a new order has appeared in the system that does not have SL and TP set, then it sets the values set in the SL / TP fields in the order. This function can be used when Trade Manager works on VPS and orders are placed manually via a smartphone.
Click on the SL or TP button on main panel and select “Auto Set” in the dialog box.
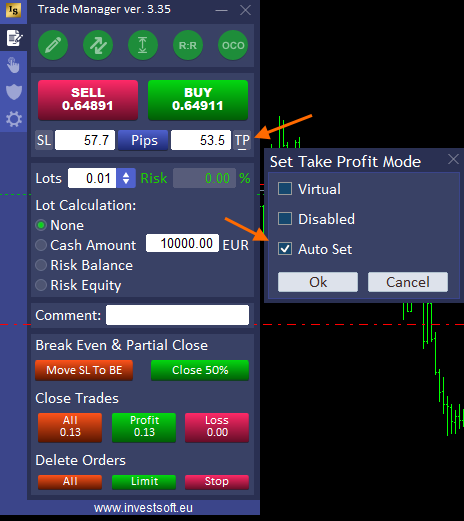
If the function is enabled a small horizontal line is displaying below the text “SL” or “TP”.
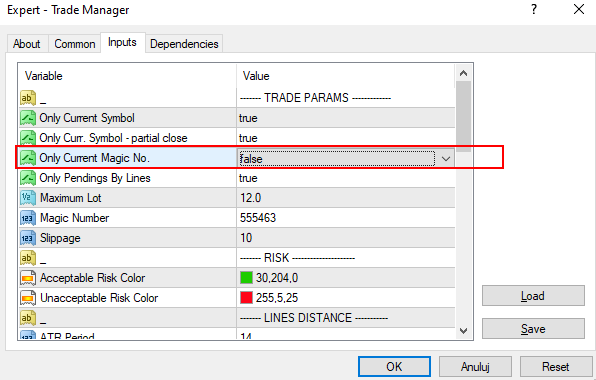
In order for the program to “see” your orders placed manually or outside the Trade Manager, you must set “Only Current Magic No.” in the parameters = FALSE.
Break Even
When a trade reaches a certain profit level, many traders protect their account by moving the Stop Loss to the trade opening level or a little further so that in the event of a negative scenario, when the price turns back, they do not get a loss on that trade.
To avoid sitting at the screen and “keep an eye on” transactions all the time, the Trade Manager program has an automatic Break Even feature.
Basic Break Even
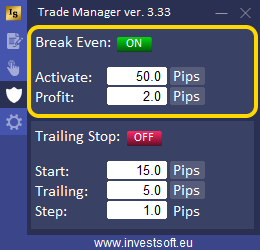
Before we activate the automatic Break Even, we need to set two parameters:
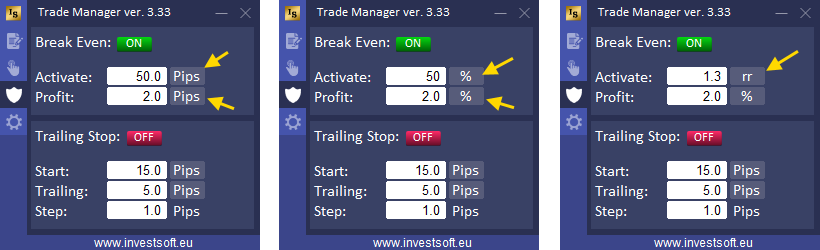
- Activation – that is the level / moment when the stop loss should be moved to Break Even. The moment of activation can be set as:
- distance in pips from the opening price
- percent (%) of the distance from the opening price to TP, e.g. TP = 120 pips BE Activation = 30% means activate BE at 36 pips of profit (30% of 120 pips)
- Risk Reward (RR) means distance as ratio of SL distance eg activation = 1.0 R: R and SL = 30 pips then activate BE at 30 pips of profit; another example BE activation = 1.5 R: R and SL = 30 pips then activate BE at 45 pips of profit. This is always related to initial Stop Loss.
- price – a certain price level
- Profit – the amount you need to protect by a BreakEven option. You can set this value in pips, percent (%), risk reward (rr) or price.
If you have BUY order and set BE activation= 50 pips and profit = 20 pips then after gaining 50 pips of profit it moves Stop to 20 pips over the open level, so if price turns back and hits your stop you get 20 pips of profit protected by a Break Even.
Profit value in percent means % of current profit, so when you set BE profit = 50% and in the moment of activation of BE profit is eg 30 pips then Stop is moved to 15 pips (50% of 30 pips).
You can switch between the individual units of the “Activation” and “Profit” parameters by clicking on the buttons with the unit (pips, %, rr or price).
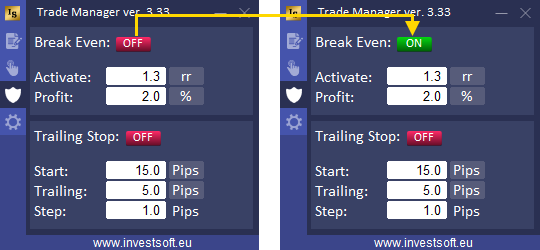
After all parameters are set, activate the function by clicking the button at the top.
When setting individual parameters for each trade is active, then the settings from the main panel of the program are copied to each new trade.
Otherwise, the settings from the main panel apply to all orders from the current symbol.
Multi-level Break Even
Depending on the strategy we use in Forex trading, it is sometimes needed to move our Stop Loss to the break-even point or above it more than once.
When the price goes in the direction we expect and starts making profits, we usually move the Stop Loss to the break-even level so that, in the worst case, we can exit the transaction at zero without reducing the size of our deposit. However, when the price continues to follow our expectations and approaches the Take Profit we have set, it would be a good idea to move the Stop Loss to the next level again, protecting a significant part of the profit already earned. If the price returns from around our Take Profit, we will exit this transaction with a profit.
In Forex Trade Manager, such a task can be performed by the multi-level break even function.
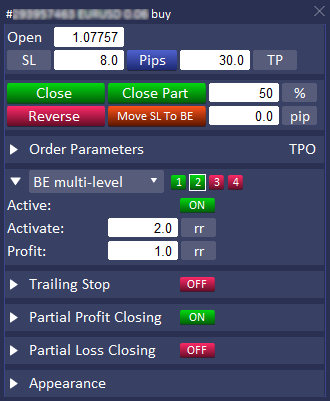
To activate multi-level break even, go to the third tab in the main panel and find the break even parameters.
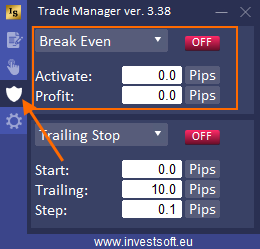
Then click on the header and select the “BE multi-level” option from the list.
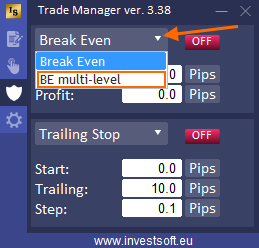
Four buttons will appear next to the list which indicate 4 different break even levels that you can define and activate.
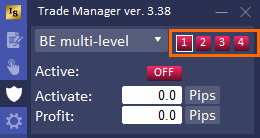
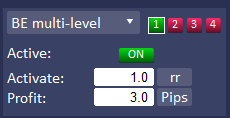
Click the button with the number “1” (you will see a white frame around the button which means it is an active button) and enter the parameters for the first level of Break Even:
- Activation – that is the level / moment when the stop loss should be moved to Break Even. The moment of activation can be set as:
- distance in pips from the opening price
- percent (%) of the distance from the opening price to TP, e.g. TP = 120 pips BE Activation = 30% means activate BE at 36 pips of profit (30% of 120 pips)
- Risk Reward (RR) means distance as ratio of SL distance eg activation = 1.0 R: R and SL = 30 pips then activate BE at 30 pips of profit; another example BE activation = 1.5 R: R and SL = 30 pips then activate BE at 45 pips of profit. This is always related to initial Stop Loss.
- price – a certain price level
- Profit – the amount you need to protect by a BreakEven option. You can set this value in pips, percent (%), risk reward (rr) or price.
Activate this BE level by clicking the red “OFF” button, which will now glow green.
The button with the number “1” will also light up green, which means that break-even is active for the first level.
Then click the “2” button and enter new parameters for the second BE level and activate it.
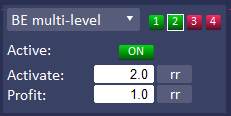
Do the same for subsequent levels if you need to activate them.
Once you have set all the parameters, you can place the order. You should now see your settings for multi-level Break Even in the order parameters window.
This is what an example activation path for a two-level Break Even might look like.

Trailing Stop
A trailing stop is a type of closing order that automatically follows market movements. It intervenes and secures profits by closing our position as long as it is favorable. Of course, the trailing stop allows you to both limit losses and protect the profits generated by our transaction.
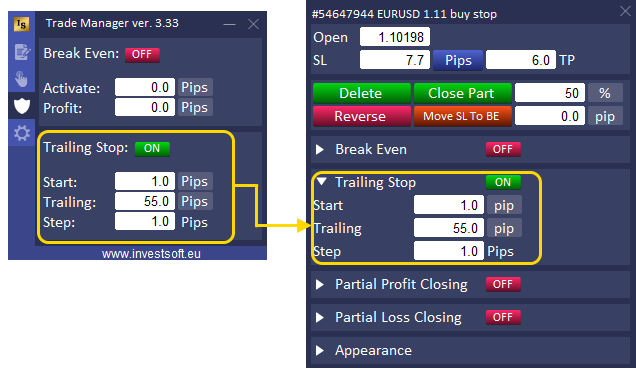
Basic Trailing Stop
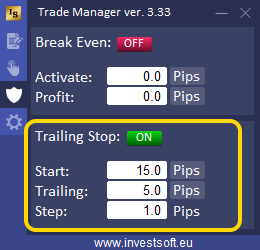
Trailing Stop in the Trade Manager has 3 parameters to set:
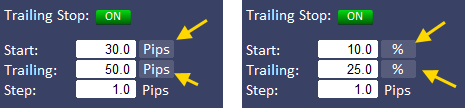
- Start – number of pips of profit to activate trailing stop. The “Start” can be set as:
- distance in pips from the opening price
- percent (%) of the distance from the opening price to TP, e.g. TP = 88 pips TS Start = 30% means activate Trailing Stop at 26.4 pips of profit (30% of 88 pips)
- Risk Reward (RR) means distance as ratio of SL distance eg activation = 1.2 R: R and SL = 30 pips then activate BE at 36 pips of profit. This is always related to initial Stop Loss.
- price (pr.) – a certain price level
- Trailing – when trailing stop will start and move stop loss, here we can define a distance of stop loss to current price. The “Trailing” value can be defined as
- fixed stop distance from the current price, e.g. 20 pips,
- percent (%) of earned profit. For example, if we set the parameter trailing = 25%, then when we have profit = 40 pips, then the stop will be moved 10 pips from the opening price (25% of 40 pips = 10 pips).
- Risk Reward (RR) – in this case, you can define the distance maintained by the stop loss to the current price as a fraction or a multiple of the initial stop loss. For example, if we have a trade with an initial stop loss = 50 pips, then by defining the trailing as 1.5 rr then at each move it will be a distance from the current price equal to 1.5 * initial stop loss = 50 pips which is 75 pips.
- Step – how many pips of profit causes the move of the stop level, i.e. how often stop loss is to be moved. You can define this parameter as distance in pips or risk reward related to the initial Stop Loss.
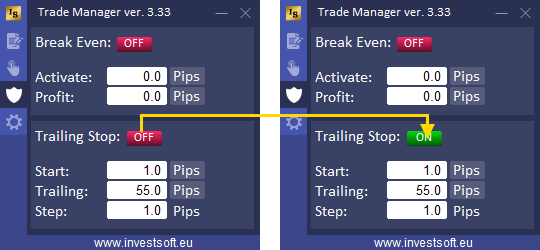
You can switch between the individual units of the “Start” and “Trailing” parameters by clicking on the buttons with the unit (pips, %, rr or price).
After all parameters are set, activate the function by clicking the button at the top.
When setting individual parameters for each trade is active, then the settings from the main panel of the program are copied to each new trade.
Otherwise, the settings from the main panel apply to all orders from the current symbol.
Multi-level Trailing Stop
When we use Trailing Stop, we usually determine at the beginning of the transaction what distance the Stop Loss from the current price should be maintained by the program. At the initial stage of the transaction, it is good to maintain a sufficiently large distance so that the first pullback does not close our transaction. However, when the price approaches Take Profit, it is best to keep the SL distance closer to the current price. So that you do not have to sit in front of the chart and constantly monitor the price movement to modify the Trailing Stop parameters at the right moment, you can use a multi-level Trailing Stop in the Forex Trade Manager.
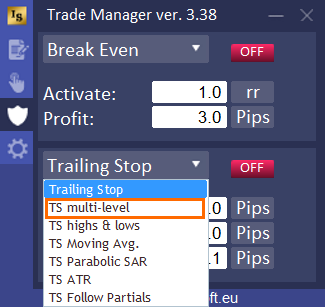
To activate multi-level Trailing Stop, go to the third tab in the main panel and find the trailing stop parameters.
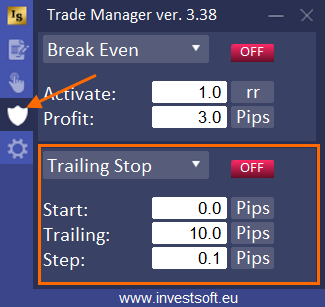
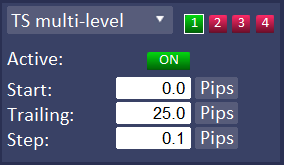
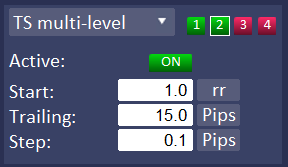
Then click on the header and select the “TS multi-level” option from the list.
Four buttons will appear next to the list which indicate 4 different trailing stop levels that you can define and activate.
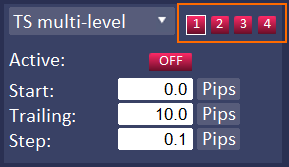
Click the button with the number “1” (you will see a white frame around the button which means it is an active button) and enter the parameters for the first level of Trailing Stop:
- Start – number of pips of profit to activate trailing stop. The “Start” can be set as:
- distance in pips from the opening price
- percent (%) of the distance from the opening price to TP, e.g. TP = 88 pips TS Start = 30% means activate Trailing Stop at 26.4 pips of profit (30% of 88 pips)
- Risk Reward (RR) means distance as ratio of SL distance eg activation = 1.2 R: R and SL = 30 pips then activate BE at 36 pips of profit. This is always related to initial Stop Loss.
- price (pr.) – a certain price level
- Trailing – when trailing stop will start and move stop loss, here we can define a distance of stop loss to current price. The “Trailing” value can be defined as
- fixed stop distance from the current price, e.g. 20 pips,
- percent (%) of earned profit. For example, if we set the parameter trailing = 25%, then when we have profit = 40 pips, then the stop will be moved 10 pips from the opening price (25% of 40 pips = 10 pips).
- Risk Reward (RR) – in this case, you can define the distance maintained by the stop loss to the current price as a fraction or a multiple of the initial stop loss. For example, if we have a trade with an initial stop loss = 50 pips, then by defining the trailing as 1.5 rr then at each move it will be a distance from the current price equal to 1.5 * initial stop loss = 50 pips which is 75 pips.
- Step – how many pips of profit causes the move of the stop level, i.e. how often stop loss is to be moved. You can define this parameter as distance in pips or risk reward related to the initial Stop Loss.
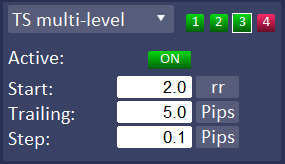
Activate this TS level by clicking the red “OFF” button, which will now glow green.
The button with the number “1” will also light up green, which means that trailing stop is active for the first level.
Then click the “2” button and enter new parameters for the second Trailing Stop level and activate it.
Do the same for subsequent levels if you need to activate them.
ATTENTION! It is important to set the Trailing Stop activation levels in ascending order, e.g. TS Start = 0 pips at level 1, then TS Start = 20 pips at level 2, TS Start = 40 pips at level 3, etc.
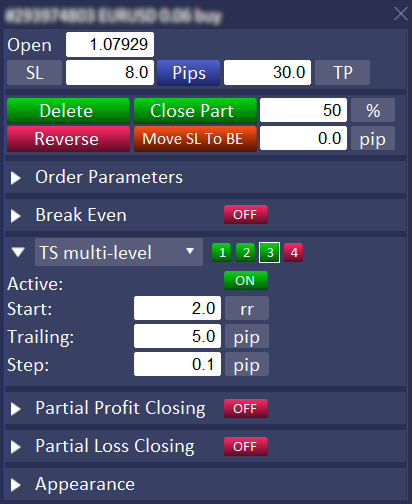
Once you have set all the parameters, you can place the order. You should now see your settings for multi-level Trailing Stop in the order parameters window.
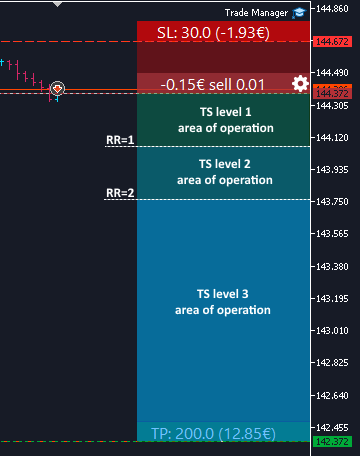
Below is a diagram of how a multi-level Trailing Stop works, with tightening Stop Loss at each stage of the way to Take Profit.
Trailing Stop following high and lows
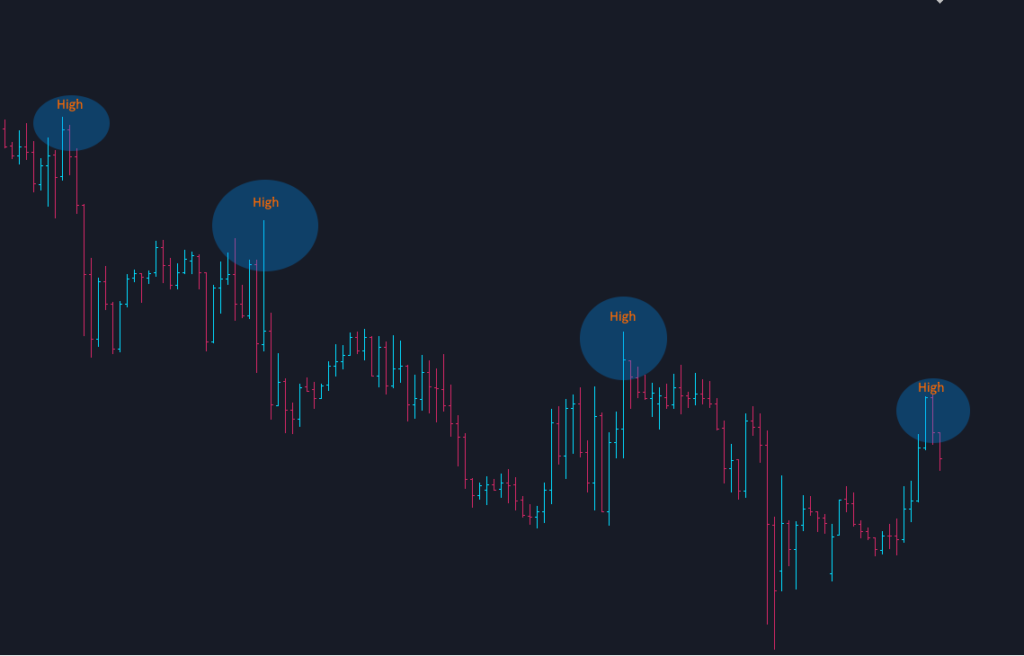
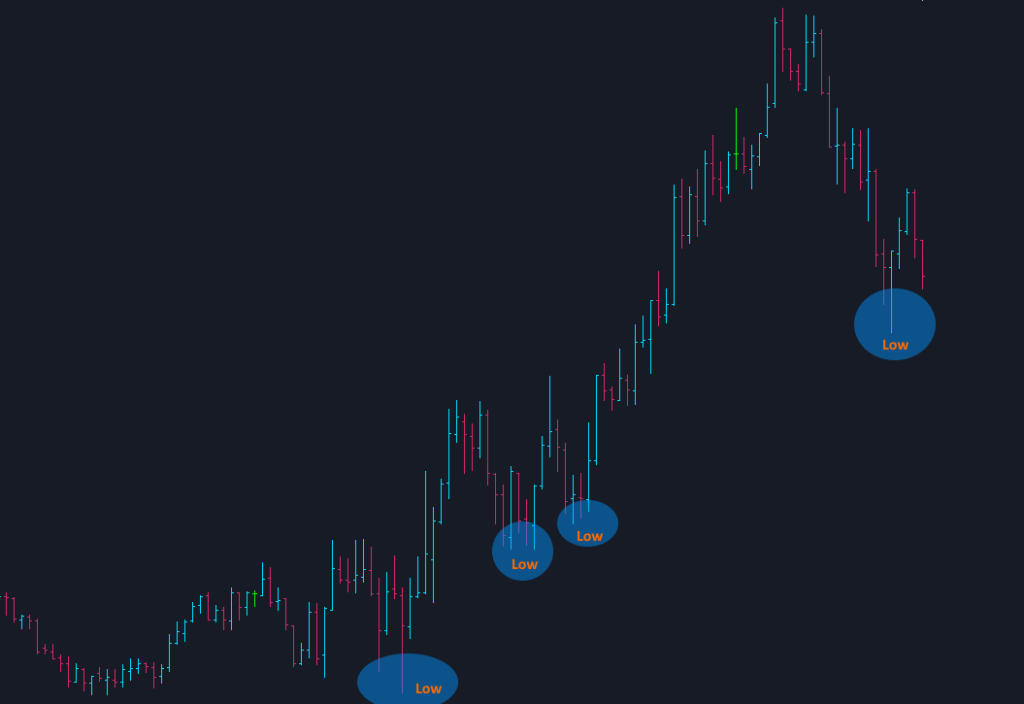
When the security we are trading on is in a trend, it will move in the selected direction, periodically perform a pullback and then continue to move in the selected direction, creating a sequence of higher lows or lower highs.
Trade Manager has a Trailig Stop function in a variant where can be set to follow higher lows in an uptrend or follow lower highs in a downtrend.
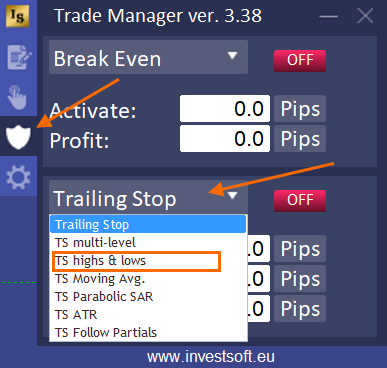
To activate Trailing Stop following highs/lows, go to the third tab in the main panel, find the trailing stop parameters, expand the drop down list and select the “TS high & lows” option from the list.
Then define the operating parameters of this Trailing Stop variant:
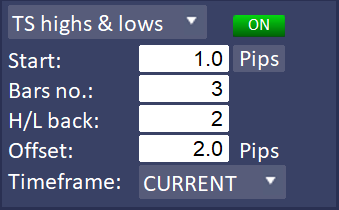
- Start – number of pips of profit to activate trailing stop. The “Start” can be set as:
- distance in pips from the opening price
- percent (%) of the distance from the opening price to TP, e.g. TP = 88 pips TS Start = 30% means activate Trailing Stop at 26.4 pips of profit (30% of 88 pips)
- Risk Reward (RR) means distance as ratio of SL distance eg activation = 1.2 R: R and SL = 30 pips then activate BE at 36 pips of profit. This is always related to initial Stop Loss.
- price (pr.) – a certain price level
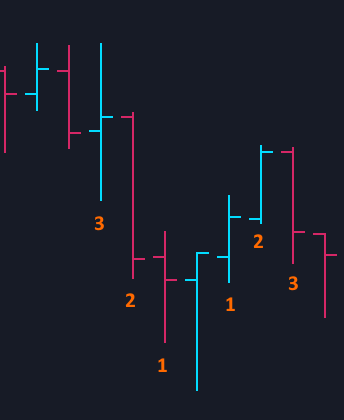
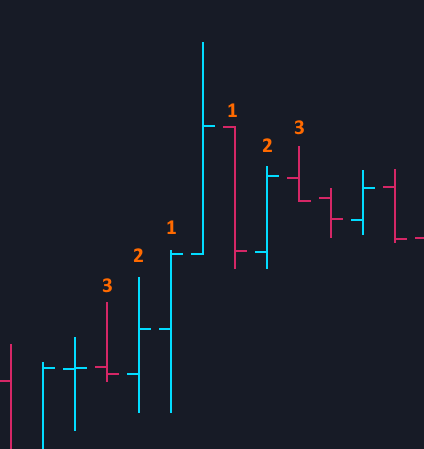
- Bars no. – the number of bars before and after the peak/hole, which have a lower bar high/low than the bar that defines the peak/hole, e.g. 3 bars before and after.
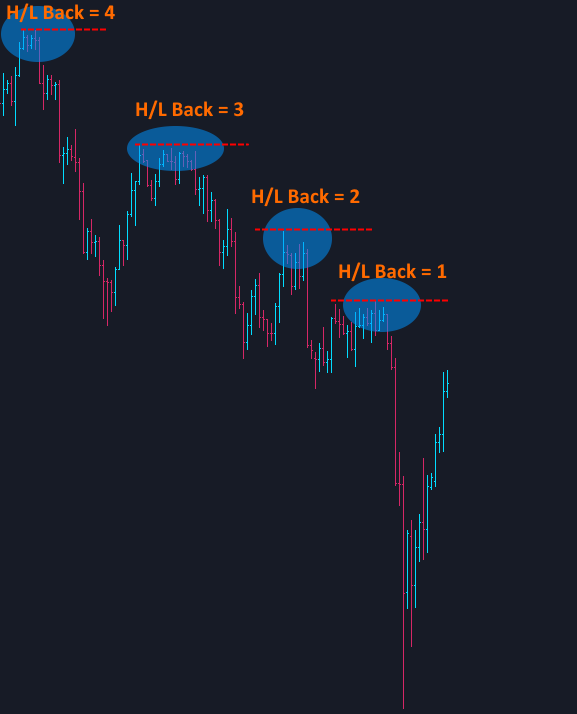
- H/L back – at which peak/hole the Stop Loss should be set. For example, if you set the value to 1, the SL will always be set at the last (newest) peak/hole, if you set it to 2, then at the penultimate H/L one, etc.
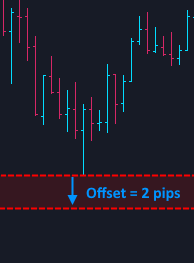
- Offset – here you can specify whether and by how many pips the Stop Loss should be moved away from the peak or hole. If you set the value to 0, SL will always be set at the peak or hole. If you set e.g. 2 pips, the program will set the SL 2 pips above the peak or 2 pips below the hole.
- Timeframe – here you can specify whether the program should look for a peak or hole on the current chart or on a chart with a different timeframe.
Once you have set all the parameters, activate trailing stop by clicking the red OFF button turning it into green ON. Now you can place the order with Trailing Stop.
Trailing Stop based on a Moving Average
One variant of Trailing Stop is following the moving average. A moving average is simply a way to smooth out price fluctuations to help you distinguish between typical market “noise” and the actual trend direction. Therefore, an interesting solution is to keep the Stop Loss at the level set by this one of the most popular indicators.
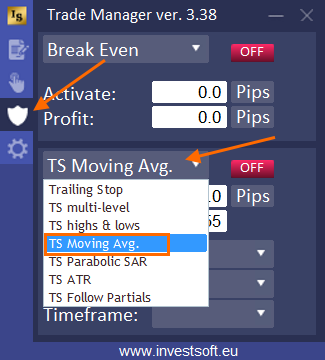
To activate Trailing Stop following Moving Average, go to the third tab in the main panel, find the trailing stop parameters, expand the drop down list and select the “TS Moving Average” option from the list.
Then define the operating parameters of this Trailing Stop variant:
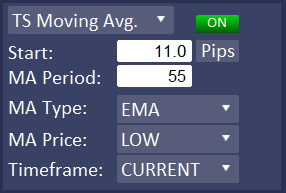
- Start – number of pips of profit to activate trailing stop. The “Start” can be set as:
- distance in pips from the opening price
- percent (%) of the distance from the opening price to TP, e.g. TP = 88 pips TS Start = 30% means activate Trailing Stop at 26.4 pips of profit (30% of 88 pips)
- Risk Reward (RR) means distance as ratio of SL distance eg activation = 1.2 R: R and SL = 30 pips then activate BE at 36 pips of profit. This is always related to initial Stop Loss.
- price (pr.) – a certain price level
- MA Period – the number of bars/candles including in the moving average calculation. The shorter “Period”, the fewer the data points that are included in the moving average calculation, which means the closer the moving average stays to the current price. The longer its “Period”, the more data points that are included in the moving average calculation, which means the less any single price can affect the overall average.
- MA Type – selecting the moving average calculation method:
- SMA – Simple averaging
- EMA – Exponential averaging
- SMMA – Smoothed averaging
- LWMA – Linear-weighted averaging
- MA Price – type of price that will be used to calculate the moving average:
- CLOSE – close price
- HIGH – maximum price
- LOW – minimum price
- OPEN – open price
- MEDIAN – median price calculated by formula (high + low) / 2
- TYPICAL – typical price calculated by formula (high + low + close) / 3
- WEIGHTED – weighted close price calculated by formula (high + low + close + close) / 4
- Timeframe – here you can specify whether the program should calculate Moving Average on the current chart or on a chart with a different timeframe.
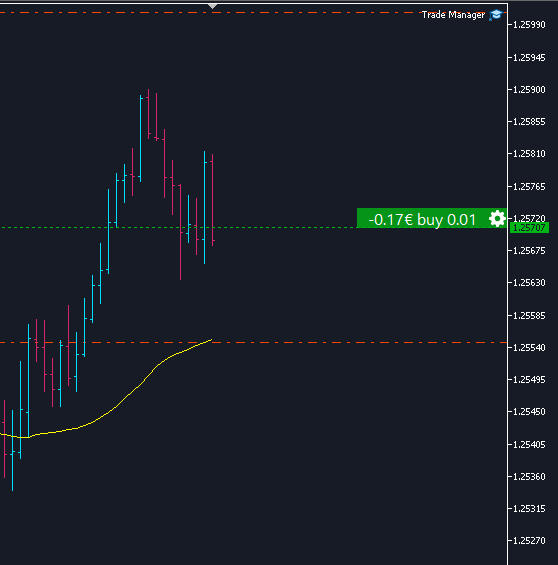
Once you have set all the parameters, activate trailing stop by clicking the red OFF button turning it into green ON. Now you can place the order with Trailing Stop.
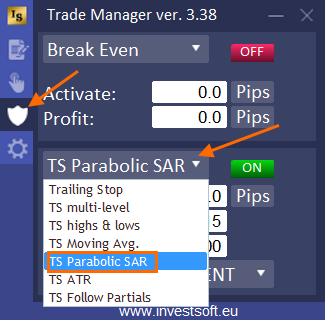
Trailing Stop based on the Parabolic SAR indicator
The Parabolic SAR, or Parabolic Stop and Reverse, is a trailing stop-based trading system and is often used as a technical indicator as well. The Parabolic SAR serves three basic functions:
- to highlight the current trend
- to attempt to forecast a reversal in the prevailing trend
- to provide potential exit and entry signals during a reversal
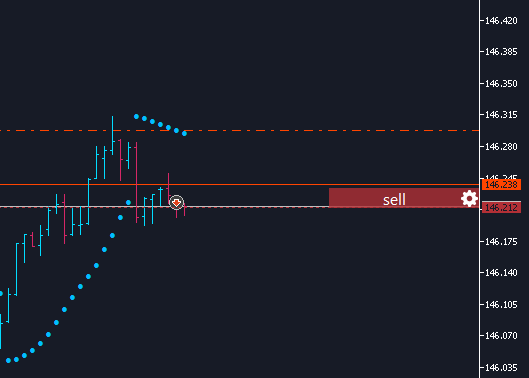
In Forex Trade Manager you can also use the Parabolic SAR indicator for the Trailing Stop function. To do this, go to the third tab in the main panel, find the trailing stop parameters, expand the drop down list and select the “TS Parabolic SAR” option from the list.
Then define the operating parameters of this Trailing Stop variant:
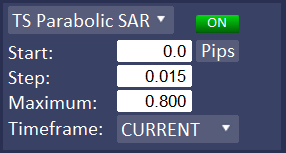
- Start – number of pips of profit to activate trailing stop. The “Start” can be set as:
- distance in pips from the opening price
- percent (%) of the distance from the opening price to TP, e.g. TP = 88 pips TS Start = 30% means activate Trailing Stop at 26.4 pips of profit (30% of 88 pips)
- Risk Reward (RR) means distance as ratio of SL distance eg activation = 1.2 R: R and SL = 30 pips then activate BE at 36 pips of profit. This is always related to initial Stop Loss.
- price (pr.) – a certain price level
- Step – the step of price increment
- Maximum – the maximum step
- Timeframe – here you can specify whether the program should calculate Parabolic SAR on the current chart or on a chart with a different timeframe.
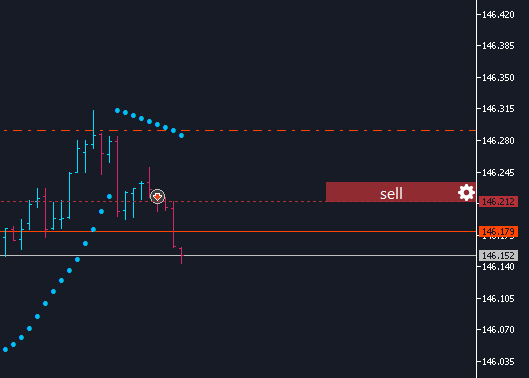
Once you have set all the parameters, activate trailing stop by clicking the red OFF button turning it into green ON. Now you can place the order with Trailing Stop.
Trailing Stop based on the ATR indicator
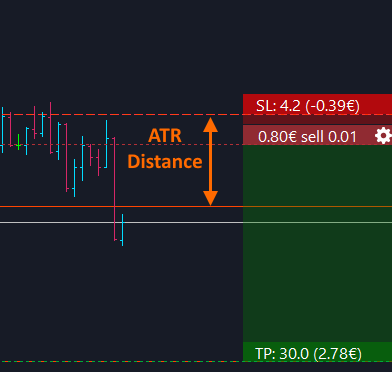
The average true range (ATR) is a technical analysis indicator that measures market volatility by decomposing the entire range of an asset price for that period. It was created to allow traders to more accurately measure the daily volatility of an asset by using simple calculations. ATR can therefore be used to determine the distance that the Stop Loss should maintain from the current price so that the trade is not terminated at the first price pullback.
To use the ATR indicator in your Trailing Stop, go to the third tab in the main panel, find the trailing stop parameters, expand the drop down list and select the “TS ATR” option from the list.
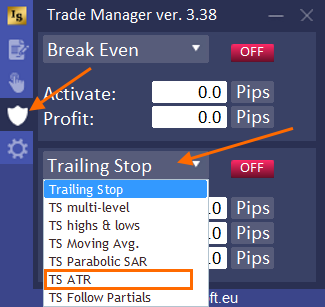
Then define the operating parameters of this Trailing Stop variant:
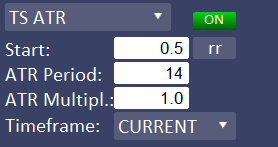
- Start – number of pips of profit to activate trailing stop. The “Start” can be set as:
- distance in pips from the opening price
- percent (%) of the distance from the opening price to TP, e.g. TP = 88 pips TS Start = 30% means activate Trailing Stop at 26.4 pips of profit (30% of 88 pips)
- Risk Reward (RR) means distance as ratio of SL distance eg activation = 1.2 R: R and SL = 30 pips then activate BE at 36 pips of profit. This is always related to initial Stop Loss.
- price (pr.) – a certain price level
- ATR Period – the number of recent bars/candles included in the calculation of the ATR indicator value
- ATR Multiplier – ATR value multiplier. You can set the Trailing Stop distance as a multiple of ATR.
- Timeframe – here you can specify whether the program should calculate ATR on the current chart or on a chart with a different timeframe.
Trailing Stop following the partial closing levels of the trade
In Forex Trade Manager it is possible to set partial closing levels. Some traders also use these levels to protect the profits of their trades by resetting the SL to the previous level after closing subsequent parts. This operation can be automated and the Trailing Stop function can be activated to follow the partial closure levels.
To do this, go to the third tab in the main panel, find the trailing stop parameters, expand the drop down list and select the “TS Follow Partials” option from the list.
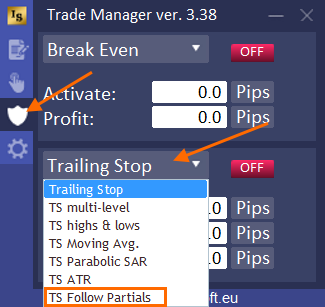
We have 4 checkboxes to select, which determine at which partial closing levels the program should move the Stop Loss.
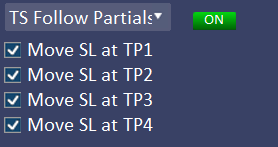
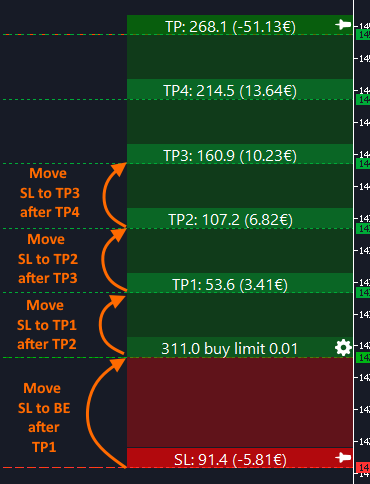
And now, if we check all 4 checkboxes, the program will move:
- SL to BE after TP1 activation
- SL on TP1 after TP2 activation
- SL on TP2 after TP3 activation
- SL on TP3 after TP4 activation
ATTENTION! A necessary condition for the following function to work is the activation of the partial transaction closing function described here.
Another example is if we have all 4 levels of partial closure active
but only 2 checkboxes are checked:

then the program will perform the following moves:

Partial profit and loss closing
The partial closing is a feature that allows you to exit trade with stages, therefore you can taking the next parts of profit as the price goes in the right direction or perform a phased exiting from a losing trade, reducing the loss.
With automatic setting of partial order closing, you can set default parameters which are automatically copied to the individual settings of each opening order.
ATTENTION! If, in the program parameters in the “——- LINES – ORDERS ———–” section, you disable the option of individually setting parameters for each open order (no information bars for open orders and no possibility of calling the panel with settings) by setting the parameter “Active” = FALSE, then the settings from the main panel apply to all open orders. In this situation, each change in the main panel is immediately applied to all active orders.
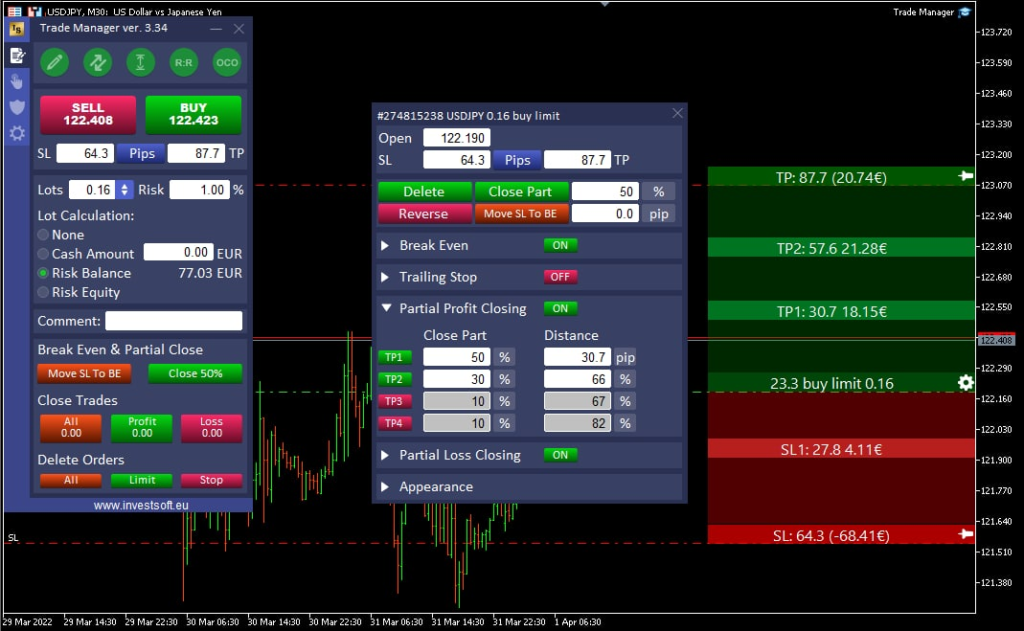
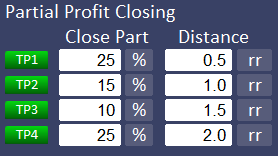
We can set up to 4 levels of partial closings in profit and also max. 4 levels of partial closing of trades on a loss.
For each stage of closing a part of the transaction, we can define the size of the part to be closed and the distance from the opening price.
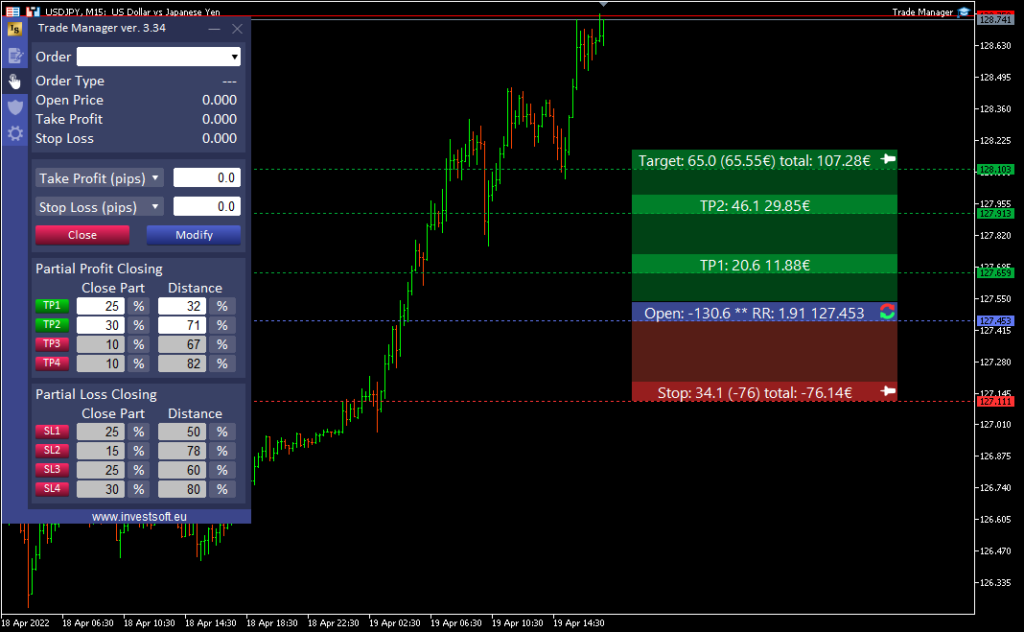
After enabling a selected level, an additional bar appears in the open / stop / target block representing the given level of partial transaction execution. The level of transaction execution can be adjusted by moving the bar on the chart or changing the settings on the main panel for a planned transaction or in the order panel for orders already placed.
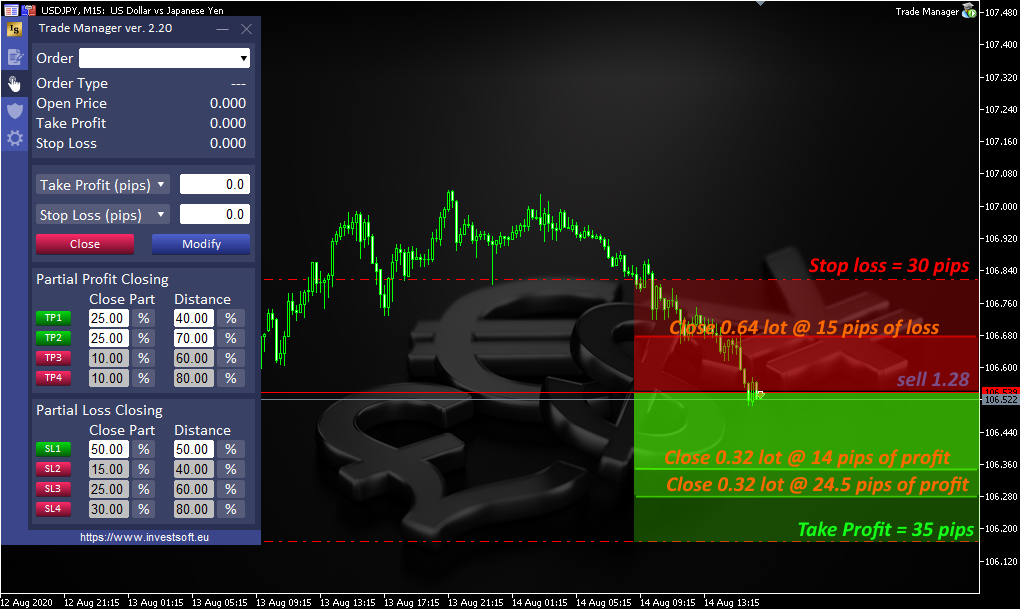
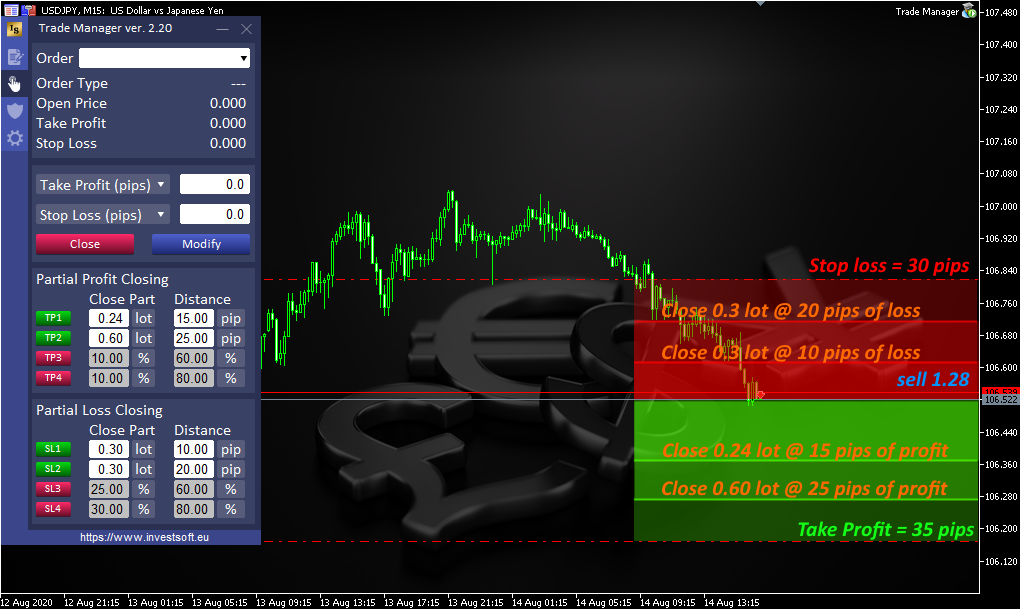
The size of the part to be closed can be specified in lots or as a percentage of the initial order size.
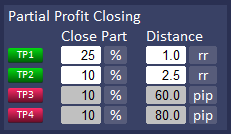
The level where the part of the trade should be closed also can be defined:
- in pips – the distance from the opening price
- as percent (%) – percentage of the distance from the opening price to the take profit or to the stop loss.
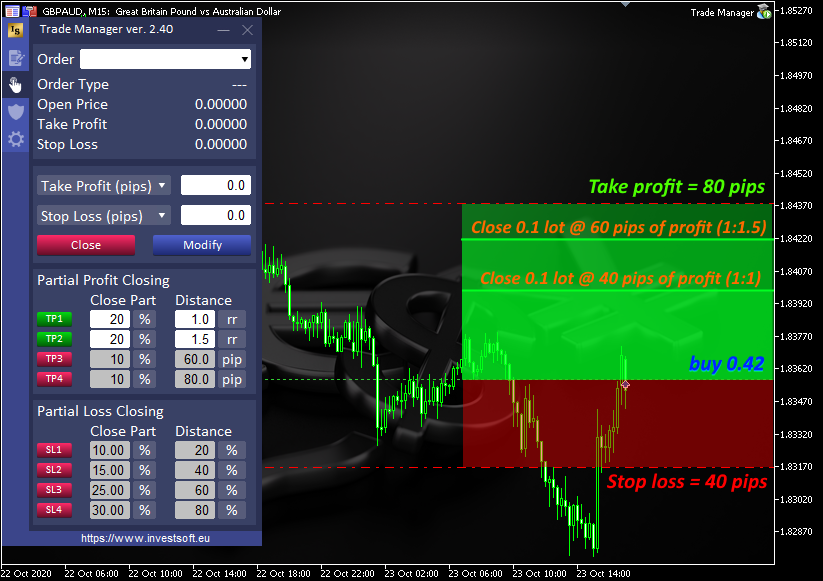
- as risk reward ratio (rr) – means distance as ratio of SL distance. If you set the value rr = 1.0, then part of the order will be closed when the current price is in the distance equal to the distance of the SL from the open price. If the value is set to y = 2.0, part of the order will be closed when the price is 2 x SL distance to open price and so on.
When the Stop Loss of a transaction has changed, whether by an automatic Break Even, Trailing Stop, manually by the trader or otherwise, the program calculates the distance defined as risk reward (“rr”) based on the initial Stop Loss distance.
- as price (pr.) – a certain price level
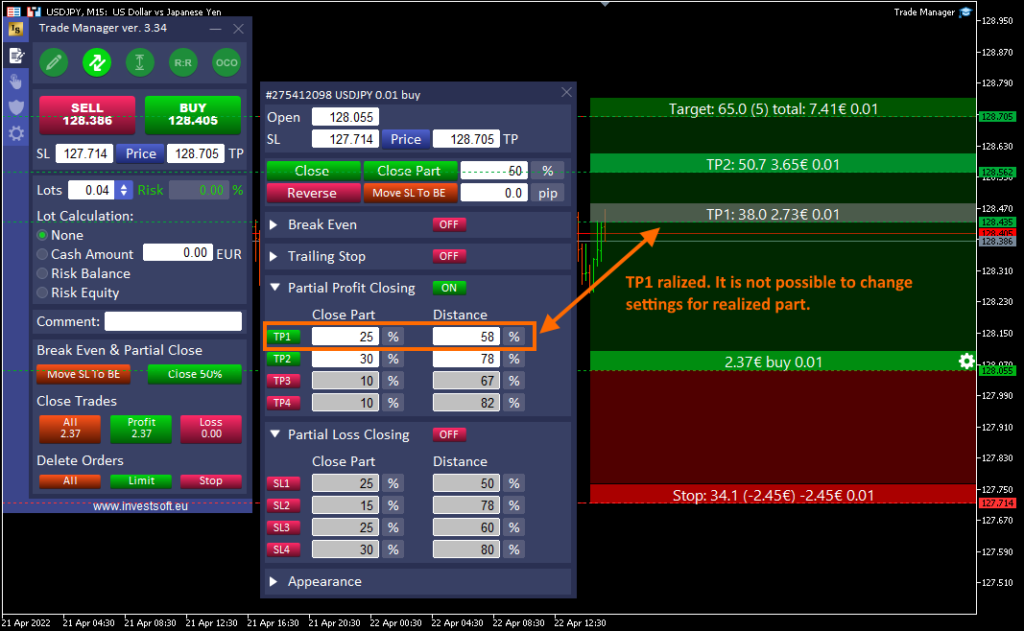
When a certain partial closure level is realized it becomes “inactive”. The color of this level changes and you cannot drag it on the chart, change its settings in the panel nor deactivate it.
You can define the appearance of the partial closing lines drawing on the chart in parameters. Find a description here.
Also in the configuration tab you can define what information is to be displayed on the lines. A detailed description can be found here.
Some examples below:
Equity control feature
The Equity Control feature is designed to protect your capital – it allows you to set a maximum loss limit or a target profit level, after which all open trades will be automatically closed.
In day-to-day trading, it helps you manage risk and lock in profits – for example, by ending the day when you reach +$100 profit or stopping trading after a -$50 loss.
The Equity Control feature in Trade Manager can be found under the third tab of the panel.

In the “Trade Closure by Equity” section, you’ll find several parameters to configure:
- Profit – here you can define the maximum profit at which all open positions will be automatically closed, effectively locking in your gains. You can define this profit in the account currency (e.g. $100), or click the button next to the field to switch to percentage mode (e.g. 2% of account balance). For example, if you set the limit to 2%, once your equity increases by 2%, Trade Manager will close all positions and secure the profit.
- Loss – here you can define the maximum allowed loss. When the total floating loss from all open trades reaches this value, all trades will be automatically closed to protect your capital. As with profit, this can be defined either in account currency or as a percentage of the account balance.
- Track Trades For – this option determines which trades should be included in equity tracking. You can choose:
- all symbols – to track equity across all open trades on all instruments
- name of current symbol – to track trades on the symbol where Trade Manager is currently running
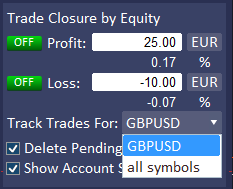
- Delete Pending Orders – if enabled, this option will delete all pending orders once the equity target (profit or loss) is reached and trades are closed
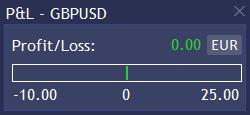
- Show Account Status Panel – when activated, this displays a real-time status panel showing your current profit/loss progress relative to your target or stop level. In this panel, you can:
- See current profit/loss in account currency or as a percentage
- View a progress bar that visually shows how close you are to your defined profit or loss threshold
Once all parameters are set, you need to activate the Equity Control function. You can choose to monitor: only profit target, only loss limit or both, by switching the corresponding toggle from OFF to ON next to each parameter.
From that moment, Trade Manager will actively monitor your open positions.
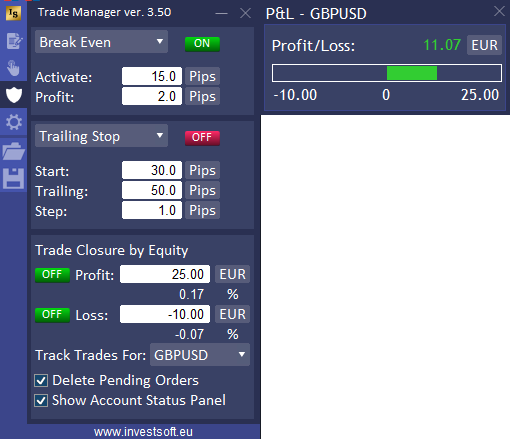
When the equity reaches either the profit target or loss limit you’ve defined, the software will automatically close all open trades.
Unlimited lot
Each symbol in the Metatrader has the parameters set to the maximum allowable size of a single transaction (max. volume). However, when trading with a large deposit, this is a problem as even when assuming a low-risk trade, this limit is often reached. To solve this problem, we introduced an option in the program that would calculate the actual lot size based on the risk given without limits, and then submit several orders to have the requested amount open in total.
For example, if we have a symbol for which the maximum volume is 50 lots, and according to the given risk, we should open a transaction of 80 lots, then the program will calculate the amount of the transaction equal to 80 lots, and when a BUY or SELL transaction is requested, the program will open two transactions:
- 1st trade of 50 lots (max. allowable lot per transaction)
- 2nd trade of 30 lots
which will result in a total of 80 lots open trades.
To activate this function, set “Unlimited Lot” = TRUE in the program parameters.

However, you can define the size of a single part yourself in the Maximum Lot parameter.
For example, we want to open a trade of 100 lots, but the selected symbol allows us to open a trade of max. size, e.g. 50 lots, then with the setting Unlimited Lot = true and Maximum Lot = 0 the program will open 2 orders of 50 lots (100 lots in total).
If, however, we set Unlimited lot = true and Maximum Lot = 20, then the program will open 5 transactions of 20 lots.

See example video:
Hotkeys
Placing orders can be even faster and more convenient when we can use keyboard shortcuts. In the Trade Manager you can assign hotkeys to the most frequently used functions.
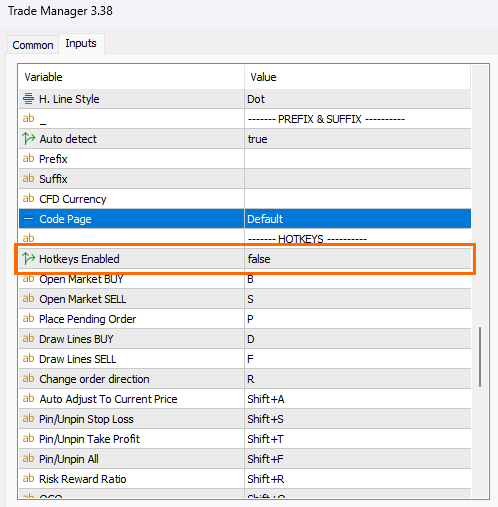
For individual functions, you can define your own hotkey in the standard Trade Manager settings window:
In the selected field, enter the key that is to be responsible for calling the function. You can use combinations with the Shift key. Then enter the word “Shift” and the “+” sign and a key in the given field, e.g. “Shift+b” (you have to type it).
It is also possible to use the Esc key. Just define the key by typing Esc.
ATTENTION! The key combination with SHIFT DOESN’T WORK on MT4 MAC/Linux terminal due to wine emulator issue. In this situation, keyboard shortcuts should be defined as independent keys (without using SHIFT), e.g. ‘b’, ‘s’, ‘c’, ‘k’, etc.
If you leave the field blank, then no shortcut key will be assigned to the function.
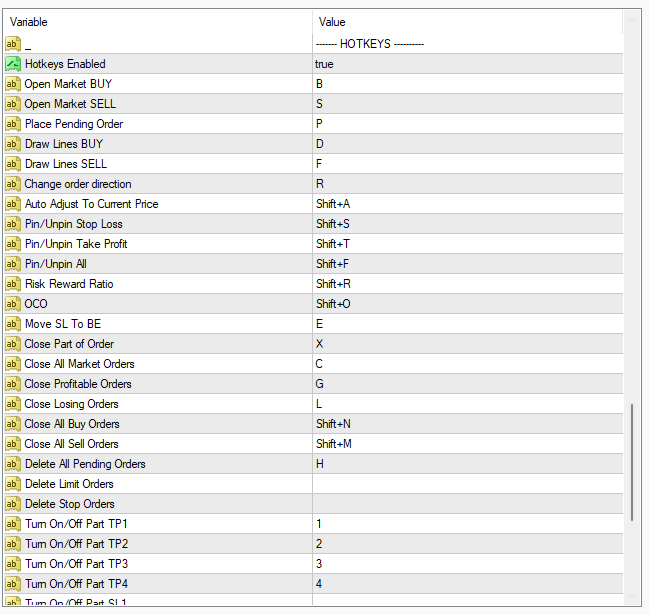
The operation of keyboard shortcuts can be disabled by setting the “Hotkeys Enabled” parameter = FALSE.
You can define shortcut keys for the following functions:
- Open Market BUY
- Open Market SELL
- Place Pending Order – first you have to draw the lines and then use the selected keyboard shortcut to place a pending order
- Draw Lines BUY – drawing an open/stop/target line with BUY direction where the mouse pointer is on the chart
- Draw Lines SELL – drawing an open/stop/target line with SELL direction where the mouse pointer is on the chart
- Change order direction – when you have drawn lines on the chart, you can switch direction buy to sell or sell to buy
- Auto Adjust To Current Price – activate or deactivate the function of automatic adjustment of the opening price to the current price
- Pin/Unpin Stop Loss
- Pin/Unpin Take Profit
- Pin/Unpin All – pin or unpin Stop Loss and Take Profit
- Risk Reward Ratio – activate or deactivate the function to keep fixed RR for planned order
- OCO – activate or deactivate the function OCO (One Cancel the Others)
- Move SL To BE – move Stop Loss to Break for all orders or selected order
- Close Part of Order – close part of all orders or selected order
- Close All Market Orders
- Close Profitable Orders
- Close Losing Orders
- Close All Buy Orders
- Close All Sell Orders
- Delete All Pending Orders
- Delete Limit Orders
- Delete Stop Orders
- Turn On/Off Part TP1, TP2, TP3, TP4 – activate/deactivate partial profit levels
- Turn On/Off Part SL1, SL2, SL3, SL4 – activate/deactive partial loss levels
- Turn On/Off Automatic BE – activate or deactivate automatic Break Even for all orders or selected order
- Turn On/Off Automatic TS- activate or deactivate Trailing Stop for all orders or selected order
- Minimize/Restore Panel
- Show Open Price Panel – opens the dialog window for entering the opening price of a pending order.
Most shortcuts refer to the functions on the main panel, but there are functions such as “Move SL to BE”, “Close Part” or automatic BE or TS functions, which may apply to both general settings on the main panel and settings for a specific active/placed order .
In this situation, the program checks whether we have an open window with the settings of a given order:
If the window for a selected order is displayed on the chart, in this situation the function eg “Move SL to BE” will be called only for this selected order.
If the order parameters window is not open, then the function is called on the main panel and applies to all transactions.
Trading Alerts
When the program manages your trades for you, you don’t have to sit in front of the screen all the time. However, if you want to be kept informed about what is happening with your transactions, then you can set notifications in the program. In the program settings, you can choose for which actions the program should send a notification:
- Open Market Order
- Close Market Order
- Place Pending Order
- Activate Pending Order
- Delete Pending Order
In addition, you can choose the method of notification:
- sound notification along with a message on the screen
- sending an email
- sending a notification to a smartphone.
To use notifications about trades to your mailbox, you must first configure your mail in the MT4 / MT5 platform.
To do this, on your MT4 / MT5 terminal go to menu Tools -> Options and in the opened window go to the “Email” tab.
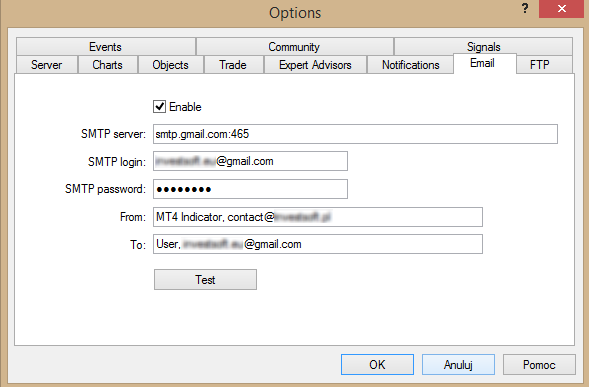
Check “Enable email notifications” and fill the following fields:
- SMTP server – the address of the SMTP server and port used. This server is used to send
emails. The record must be made in the following format “[server web address]:[port]”. - SMTP login – login for authentication on the mail server. Usually it is an email address.
- SMTP password – password for authentication on the mail server (your mailbox password).
- From – the email address, from which the message will be sent.
- To – the email address, to which the message will be sent
After filling the above fields, click the “Test” button to check if the sending of the message is working properly. You should receive a test message to your mailbox.
If everything works fine, confirm the configuration with the “OK” button and now you can start to use email notifications in the Trade Manager.
Same with mobile notifications. You must first configure the ability to send notifications in the metatrader platform. Detailed instructions can be found here: https://www.metatrader5.com/en/terminal/help/startworking/settings#notifications
Include spread in Stop Loss and Take Profit
Many traders in their strategies set fixed stop loss and take profit distances increased by the current Spread values. To avoid having to manually adjust the SL/TP distance with the spread, we have added a feature to Trade Manager that automatically takes into account the spread value in the SL and TP distance at the time of placing the order.
In the program configuration, in the “Spread Multiplier” field, you can specify the multiple of the spread value that should be taken into account when placing an order. Setting “Spread Multiplier” = 0 disables the function of including the spread in orders.
If you set the value, e.g. 2, then when placing an order, the SL and TP distance will be increased by twice the spread value.
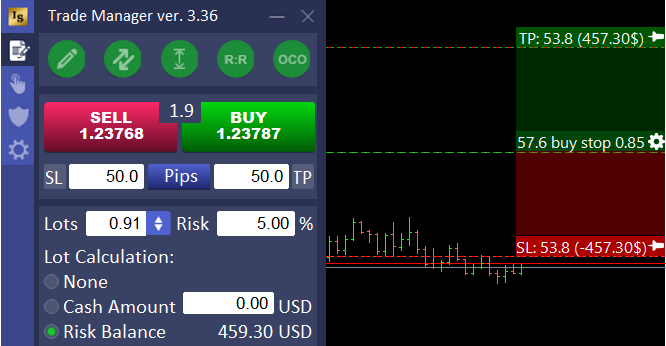
Let’s take an example, we plan to set up a pending order with SL = 50 pips and TP = 50 pips and the current spread is 1.9 pips.
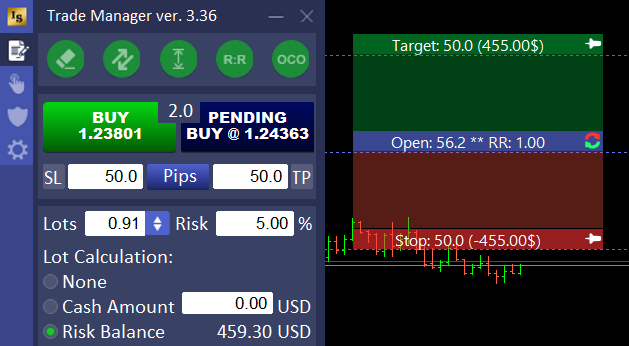
Therefore, when we click to place a pending order, then the program will automatically increase the SL and TP by 2×1.9 pips = 3.8 pips

Note that the program has also adjusted the trade size so as not to exceed the set trade risk.
After placing the order, the program restored the original SL and TP values.
The functions can be used both when placing market and pending orders.
Settings Templates
The Trade Manager offers the option to save settings from the panel and create templates that can be quickly loaded. This is a highly useful feature for traders using different strategies on the financial markets, as it allows you to easily switch between various settings tailored to each strategy.
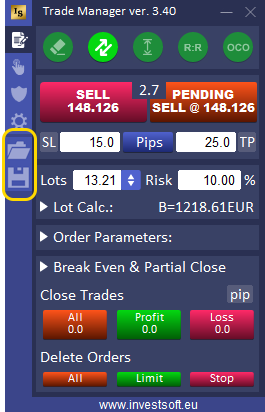
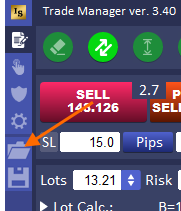
The buttons to save and load settings are located on the left side of the main panel.
Creating a Settings Template
To create a new template, follow these steps:
- Prepare the settings – Set all parameters in the main panel that you want to save.
- Save the template – Click the button with a disk icon on the left side.

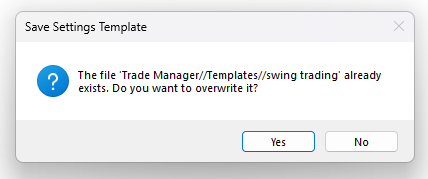
- Name the template – A dialog box will appear where you can enter a name for your new template and confirm by pressing “OK.”
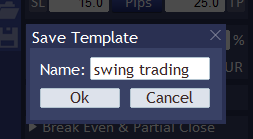
If the name already exists, the program will ask if you want to overwrite the existing file. Click “Yes” to replace it with the new settings or “No” to enter a different name.
Once saved, you can easily load the template from the list of available templates.
Loading a Saved Template
To load a saved template:
- Click the folder icon on the left side of the main panel.
- A list of available templates will appear, sorted alphabetically. Templates marked as favorites (with a star) will appear at the top.
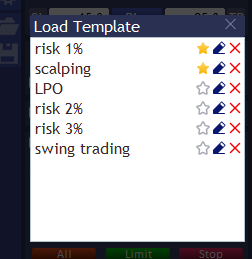
- Select a template by clicking on its name in the list.
Managing Saved Templates
You can manage saved templates in the following ways:
- Add to Favorites – Click the star icon next to the template name to make it appear at the top of the favorites list. The star will turn yellow. To remove the template from favorites, click the star again, which will turn gray.
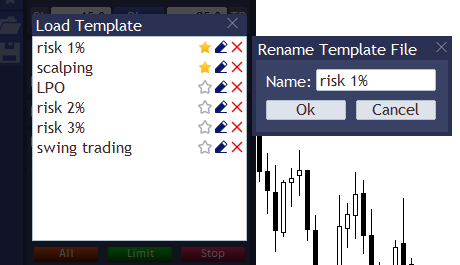
- Rename Template – Click the pencil icon next to the template name. In the dialog box, enter a new name and confirm by clicking “OK.” If the new name already exists, the program will ask if you want to overwrite it.
- Delete Template – To delete a template, click the red “X” button next to the template name.
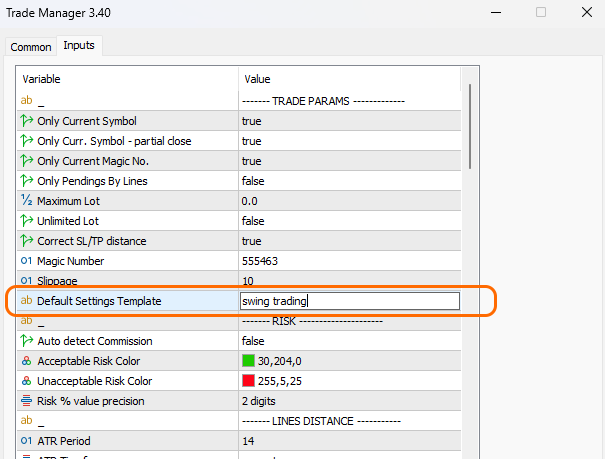
Loading a Default Template at Program Startup
Trade Manager allows you to automatically load a selected template at startup. To set a default template:
- Enter the Trade Manager settings by pressing F7.
- In the “Trade Params” section, find the “Default Settings Template” option.
- Type the name of the template that should load automatically when the program starts.
Summary
The template save and management function enables you to create different settings for various trading strategies, allowing quick switching between them. This feature helps you effectively manage strategies and adjust settings to meet your current trading needs.
Program configuration option
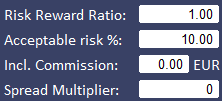
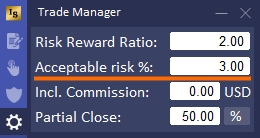
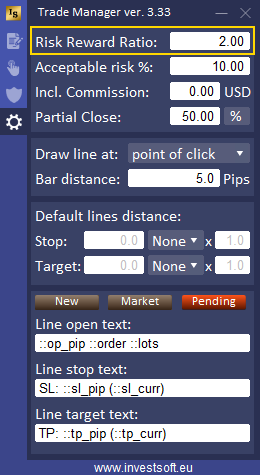
Risk Reward Ratio
In the Risk Reward Ratio field, you can specify a constant RR value that will be maintained by the program when you use the RR function:
More information on how the R:R feature works can be found here: Fixed Risk Reward Ratio
Acceptable risk %
If you set the lot size manually, the program shows the risk level for the planned transaction in the main panel. If you have a set level of maximum acceptable risk for one transaction, you can specify it in this field. Then the program will change the color of the text with the risk level when the designated level is exceeded. For more information, see Lot size calculation
Include commission
More and more brokerage accounts have low or no spreads but a commission is charged when opening (and sometimes closing) the trade. This is the cost of the transaction and should be included in the transaction size calculations.
In the Trade Manager, you can define a commission for each 1 lot of an opened transaction in the configuration field.
ATTENTION! Enter the sum of the commission of the opening and closing of the transaction.
This value is taken into account when calculating the transaction size and affects the SL and TP values in the account currency displayed in the block.
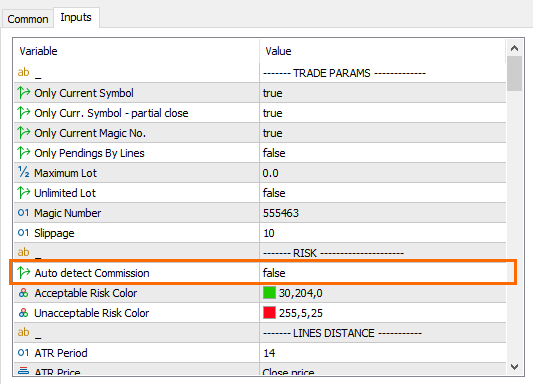
In the program parameters you can turn on the “Auto detect Commission” function (set it to TRUE), so program will try to read the commission amount for 1 lot for the current symbol based on the order history in the moment of program run.
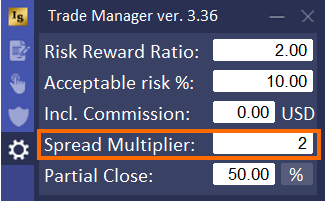
Spread Multiplier
Here you can specify the multiple of the spread value that should be taken into account when placing an order. Setting “Spread Multiplier” = 0 disables the function of including the spread in orders.
If you set the value, e.g. 2, then when placing an order, the SL and TP distance will be increased by twice the spread value.
More information can be found in the “Include spread in Stop Loss and Take Profit” section
Line drawing location settings
Here you can define how the opening price line should be set by default when you plan to open a new trade. You have the following options:
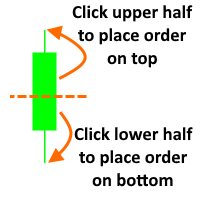
- point of click – the opening price line is positioned exactly where you left-click
- over/below bar – the opening price line is placed above or below the selected candle

When you choose “below / over bar” to set the lines above or below the candle click the pencil icon on the main panel to draw lines on the chart and then select a candle and click on the top half of the candle to set the open price of the buy pending order at the top of the candle or click on the bottom half of the candle to set the sell open price at the bottom of the candle.
In the “Bar distance” field you can also define the offset of the order opening price to the minimum or maximum of a selected bar / candle
Default lines (Stop Loss and Take Profit) distance
In this section of configuration you can set how the program should set default SL and TP distance relating to the opening price during the drawing the open / stop / target block on the chart.
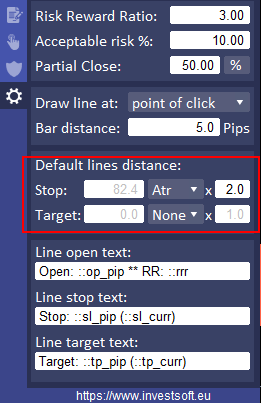
You can choose from the drop down list:
- NONE – that is remembering the last SL / TP distance
- PIPS – i.e. always constant, the same distance defined in pips, i.e. even if you set different distances in the previous order, the next time you draw a block, the distances will be constant defined in the configuration
- ATR – that is the distance SL / TP from the opening price as a multiple of the ATR value (you can set the multiplier next to the selection field).
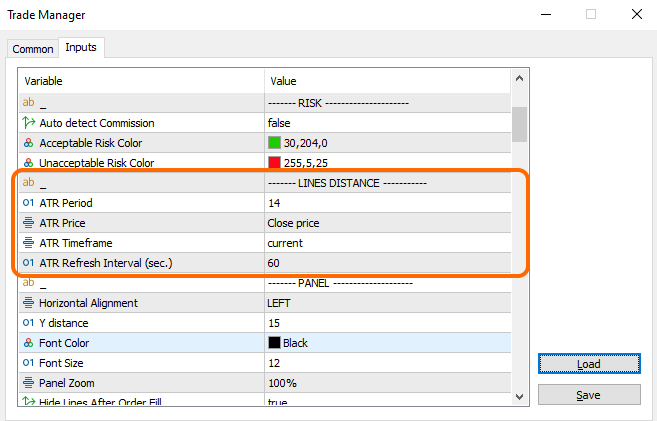
You can set the ATR parameters in the program settings window in the section “LINES DISTANCE” described here.
You can set automatic, cyclical updating of Stop Loss and Take Profit distances based on the value of the ATR indicator.
If you set “ATR Refresh Interval (sec.)” = 10 then the program will be updating SL and TP distances for every 10 seconds, but If you set the “ATR Refresh Interval (sec.)” = 0, then the program will set the SL or TP distance only once when loading the program or each time you drawing a lines on the chart.
Attention! The update works when we specify SL and TP distances as pips. Only when you have drawn lines is also an update when SL and TP is defined as price.
Texts configuration
The texts on the bars can be freely defined in the program configuration tab. Separate texts can be defined for a planned order, for a market order and for a pending order.
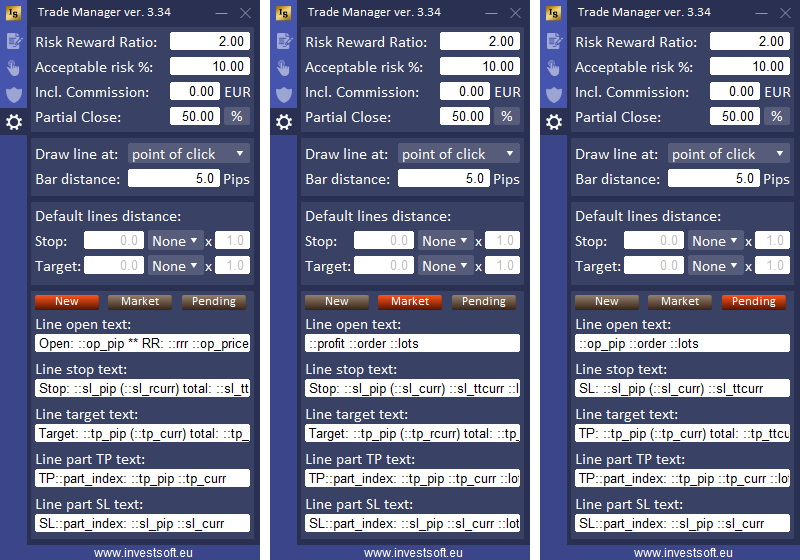
The values to be displayed on the bars are defined with the following markers:
::op_price – open price e.g. 1.23964
::op_dprice – open price distance as price e.g. 0.00059
::op_pip – open price distance in pips e.g. 5.9
::op_pt – open price distance in points e.g. 59
::op_ipt – open price distance as an integer by omitting the decimal part. For example, a price difference between 22364.34 and 22331.11 will be shown as 33.
::tp_price – take profit e.g. 1.39649
::tp_dprice – take profit distance as price e.g. 0.00139
::tp_pip – take profit distance in pips e.g. 13.9
::tp_point – take profit distance in points e.g. 139
::tp_ipt – take profit distance as an integer by omitting the decimal part. For example, a price difference between 22364.34 and 22331.11 will be shown as 33.
::tp_curr – take profit value in account currency e.g. $1648.33
::tp_rcurr – take profit value in account currency without decimal places and currency symbol e.g. 1648
::tp_bpct – take profit value as % of the account balance e.g. 5%
::tp_epct – take profit value as % of the account equity e.g. 11%
::tp_ttcurr – total TP amount in account currency including partial profits
::tp_ttrcurr – total TP amount in account currency including partial profits without decimal places and currency symbol e.g. 1648
::tp_tbpct – total TP amount as % of the account balance including partial profits
::tp_tepct – total TP amount as % of the account equity including partial profits
::sl_price – stop loss e.g. 1.19694
::sl_dprice – stop loss distance as price e.g. 0.00077
::sl_pip – stop loss distance in pips e.g. 7.7
::sl_point – stop loss distance in points e.g. 77
::sl_ipt – stop loss distance as an integer by omitting the decimal part. For example, a price difference between 22364.34 and 22331.11 will be shown as 33.
::sl_curr – stop loss value in account currency e.g. $732.10
::sl_rcurr – stop loss value in account currency without decimal places and currency symbol e.g. 732
::sl_bpct – stop loss value as % of the account balance e.g. 5%
::sl_epct – stop loss value as % of the account equity e.g. 11%
::sl_ttcurr – total SL amount in account currency including partial profits
::sl_ttrcurr – total SL amount in account currency including partial profits without decimal places and currency symbol e.g. 1648
::sl_tbpct – total SL amount as % of the account balance including partial profits
::sl_tepct – total SL amount as % of the account equity including partial profits
::rrr – risk reward ratio e.g. 2.5. It calculates the ratio between TP distance and SL distance
::prrr – shows the current RR ratio. It calculates the ratio between current price distance (to order open price) and SL distance (this is something like a current profit but as RR). Apply only for market orders.
::islrrr – RR ratio to the initial Stop Loss. If we use Break Even or Trailing Stop in the order, this value will always be calculated in relation to the initial Stop Loss.
::pislrrr – display the current profit ratio (the distance of the current price to the opening price of the trade) to the initial stop loss (the distance of the original SL to the opening price)
::lots – calculated or current order lot
::profit – profit of the current order (include commission and swap) e.g. 346.34
::rprofit – profit of the current order without decimal places (include commission and swap) e.g. 346
::bprofit – profit of the current order (exclude commission and swap) e.g. 346.34
::rbprofit – profit of the current order without decimal places (exclude commission and swap) e.g. 346
::pbprofit – profit of the current order as % of the account balance e.g. 5.25%
::peprofit – profit of the current order as % of the account equity e.g. 5.25%
::order – order type name
::part_index – index of partial SL or TP
::ticket – current order ticket
::magicno – current magic number set for the order
Description of program parameters
In the Trade Manager settings window, you can define how the program should work and what the individual components of the program should look like.
To display the program settings window, right-click anywhere on the chart and select “Expert Advisors” (MT4) lub “Experts List” and “Properties” from the context menu or simply press the F7 key.
The individual parameters are described below.
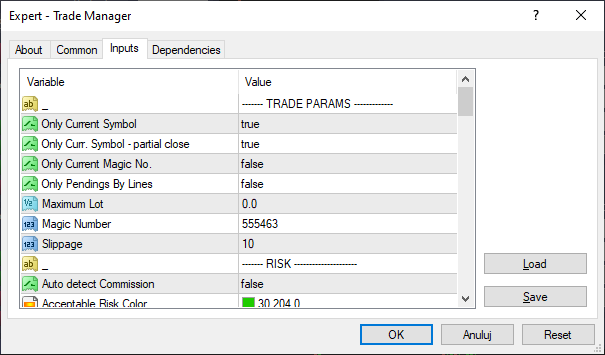
——- TRADE PARAMS ————-
In this section, you define how the program should handle orders.
- “Only Current Symbol” – set to TRUE cause that the Trade Manager manages only trades opened for current symbol, FALSE value cause that program manages trade for different symbols
- “Only Curr. Symbol – partial close” – this setting applies only to the partial close section and the value TRUE means to partially close only the trades for the symbol the Trade Manager is working on, the value FALSE means to partially close all open trades, regardless of the symbol.
- “Only Current Magic No.” – set to TRUE to manage only trades with Magic Number defined in parameter “Magic Number”. FALSE means to manage trades regardless of Magic Number value.
- “Only Pendings By Lines” – if you set this to TRUE, then when you plan to open a trade by drawing lines (open, stop and target) on the chart, you can only open a pending order (BUY or SELL button is disabled).
- “Maximum Lot” – you can define here max. allowed lot size. If you try to open a trade with a larger lot, you will get a warning when clicking the button on the panel to open/place an order. Value 0.0 turns off this option.
- “Correct SL/TP distance” – enabling/disabling the automatic correction of Stop Loss and Take Profit distances in a market order in case of slippage at the opening of the transaction. More details here.
- “Magic Number” – an identifier that is assigned to the orders placed by the Trade Manager. When the program should manage only the transactions submitted by the panel (according to the settings), it selects orders on the basis of this number.
- “Slippage” – it is a difference between the expected price of a trade, and the price the trade actually executes at. Slippage often occurs during periods of higher volatility, when market orders are used, and also when large orders are executed when there may not be enough interest at the desired price level to maintain the expected price of trade. Here you can define max deviation of the price.
——- RISK ——————
- “Auto detect Commission” – enabling/disabling the option of automatic reading of the commission amount for 1 lot from the order history by the program.
- “Acceptable Risk Color” – definition the color of risk % value in the main panel while lot size does not exceed the specified max. the risk value specified in the program configuration.
- “Unacceptable Risk Color” – definition of the color risk % value in the panel to warn the trader while lot size is too large and exceeds acceptable risk amount (this value you can set config tab on the panel).
——- LINES DISTANCE ———–
- ATR Period – is the number of days, weeks, months, or years included for ATR calculations
- ATR Timeframe – the time frame from which the ATR is computed
- ATR Refresh Interval (sec.) – how frequently (in seconds) the program should update the SL and TP values in the panel based on the ATR value. Value 0 means no refreshing.
——- PANEL ——————–
In this section you can define the appearance and behavior of the main panel and the panel for managing an open order.
- “Horizontal Alignment” – positioning the panel horizontally. We have the following options to choose from:
- LEFT – a panel at the left edge of the chart (default option)
- CENTER – a panel in the middle of the chart window
- RIGHT – a panel at the right edge of the chart window
- “Y distance” – distance of the panel from the top edge of the chart (in pixels)
- “Font Color” – the color of the font in the panel
- “Font Size” – font size in the panel
- “Panel Zoom” – enlarge/reduce the size of the panel. You can choose from: 80%, 100%, 125%, 150%, 175%, 200% and 250%
- “Hide Lines After Order Fill” – automatically removing open/stop/target lines from the chart after placing an order
- “Min. Panel After Order Fill” – automatically minimized panel after placing an order
- “Order Window Location” – default location of the order panel. The following options are available:
- At Open Bar – display the panel next to the information bar near the order opening price
- Center Chart – display a panel in the middle of the chart
- Last Location – display the panel in the last remembered location of the panel.
- “Spread Display” – ways to display the spread on the main screen. We can choose from:
- Disabled – hiding the spread field in the main panel and disabling the option of adding a spread to SL and TP
- Pips – spread displayed in pips
- Points – spread displayed in points
——- LINES – ORDERS ———–
In this section you can define default settings for the appearance of information bars placed at each opened order on the chart.
- “Active” – possibility to enable or disable information bars for transactions.
- “Text Color” – font color.
- “Background Market Buy” – The color of the bar background for the market order Buy.
- “Background Market Sell” – the color of the bar background for the Sell market order.
- “Background Pending Buy” – background color of the bar for the Buy stop / limit pending order.
- “Background Pending Sell” – the color of the bar background for the Sell stop / limit pending order.
- “Opacity Market Order” – background transparency of the market order bar.
- “Opacity Pending Order” – background transparency of the pending order bar.
- “Width” – the default width of the bar.
——- LINES ——————–
In this section you will find settings that will allow you to define the appearance of the Open / Stop / Target block displayed when you plan to open an order.
- Font & Font size – the name and size of the font used on the bars
- Fill opacity – transparency of fills between open / stop / target bars
- Bars opacity – transparency of open / stop / target bars
- Text opacity – transparency of texts
- Target & Stop fill color – the color of filling the space between the bars
- Lines visibility – visibility of horizontal lines:
- Disabled – lines are never displayed
- On hover – lines appear when you hover the mouse over the block area
- Always visible – lines visible all the time whenever the block is on the chart
- Position – block position on the chart:
- Unlimited – the ability to move the block across the entire chart area
- At Newest Bar – fixed location of the block behind the newest candle. The distance from the latest candle can be defined in the “Position Offset to Bar” parameter.
- Align Right – fixed position of the block on the right edge of the chart
- Position Offset to Bar – block distance from the newest candle. The value is given as the width of the bar. Positive values mean that the left edge of the block is moved to the right of the current bar / candle. Negative values mean that the left edge of the block is moved to the left of the current bar / candle.
- Bars Space Fill – TRUE means that the background is displayed between the open-target and open-stop bars. FALSE hides the background between the bars.
- Icons Visible – TRUE displays reverse and pin icons on open / stop / target bars. FALSE hides icons.
——- LINES – PARTS ————–
In this section you can find settings that allow you to define the appearance of the Partial TP and Partial SL bars in the Open / Stop / Target block
- Parts Visible – turn on/off parts visualization on charts
- Bars Background Visible – turn on/off parts background bar
- Bars Background Opacity – set opacity of parts background bar
- Text Alignment – text alignment for partials
- P.TP Fill Color – background bar fill color for unrealized TP parts
- P.TP Hit Fill Color – background bar fill color for realized TP parts
- P.TP Text Color – font color for TP parts
- P.TP H. Line Width – horizontal line width for TP parts
- P.TP H. Line Style – horizonstal line style for TP parts
- P.SL Fill Color – background bar fill color for unrealized SL parts
- P.SL Hit Fill Color – background bar fill color for realized SL parts
- P.SL Color – font color for SL parts
- P.SL H. Line Width – horizontal line width for SL parts
- P.SL H. Line Style – horizonstal line style for SL parts
——- LINE OPEN —————-
——- LINE TAKE PROFIT ———
——- LINE STOP LOSS ———–
——- PREFIX & SUFFIX ———-
——- HOTKEYS ———-
In this section, you can define your own keyboard shortcuts for various program functions. For a detailed description, please refer to the Hotkeys section in the user manual.
——- ALERTS ———-
In this section, you can enable or disable notifications for various trading events on the platform.
- On Screen Alert – Displays a notification message on the screen along with a sound alert.
- Email Alert – Sends a notification to your email inbox.
- Notification on Mobile – Sends a push notification to your smartphone.
- Open Market Order – Notifies you when a market order is opened.
- Close Market Order – Notifies you when a market order is closed.
- Place Pending Order – Notifies you when a pending order is placed.
- Activate Pending Order – Notifies you when a pending order is activated.
- Delete Pending Order – Notifies you when a pending order is deleted.
For more information on configuring trading alerts, please refer to the Trading Alerts section in this user manual.
Hi Janusz
Just purchased Trade Manager…can you tell me how I save the settings once I have them set to my liking please? Not terribly tech savvy!
Thanks.
Hello, Steve please send me message at :
https://www.investsoft.eu/contact
Best Regards,
Denis
InvestSoft
I initially rented and then purchased the product. The functionality is superb and the user guide is very detailed. The support from Denis is great. Compliments to the team for creating, maintaining and supporting an excellent product!
Thank you so much Johan Benade means a ton to us!
EA useful. Thanks to a friend Ricardo that sent me the link to purchase it.
Works also on Windows Tab, so more useful . Thanks for the investsoft’s Team
Hello, Vetea thank you so much for kind words much appreciate it!
How do I get rid of the target? I used the partial take profit and trial stop functions, I do not want the target. Can I get rid of the target somehow?
Hello, Alex please send us message at :
https://www.investsoft.eu/contact
Evening ,
Is there a way to incorporate Compound Money Management EA in this EA tool .To be able to compound and Partial close with this tool would be very Beneficial. Pyramiding trades is the way forward .
I also do have the EA Manager ,Enjoying it very much – Thanks for updating and adding new features to the EA consistently .
Pieter
Hello, Pieter please send me message at :
https://www.investsoft.eu/contact
Best Regards,
Denis
InvestSoft
for pending orders does it make sense to use Trailing and LPO together? or only 1 of these settings needs to be used?
Hello, Adil can you please send me message at :
https://www.investsoft.eu/contact
Best Regards,
Denis
InvestSoft