List of changes and new features in Trade Manager ver. 3.38:
- Multi-level Break Even
- Multi-level Trailing Stop
- Trailing Stop following high and lows
- Trailing Stop based on a Moving Average
- Trailing Stop based on the Parabolic SAR indicator
- Trailing Stop based on the ATR indicator
- Trailing Stop following the partial closing levels of the trade
- Hotkeys improvements
- Reconstruction of the manual Break-Even and Partial Cosing sections in the main panel
- Fixes and improvements
Multi-level Break Even
Depending on the strategy we use in Forex trading, it is sometimes needed to move our Stop Loss to the break-even point or above it more than once.
When the price goes in the direction we expect and starts making profits, we usually move the Stop Loss to the break-even level so that, in the worst case, we can exit the transaction at zero without reducing the size of our deposit. However, when the price continues to follow our expectations and approaches the Take Profit we have set, it would be a good idea to move the Stop Loss to the next level again, protecting a significant part of the profit already earned. If the price returns from around our Take Profit, we will exit this transaction with a profit.
In Forex Trade Manager, such a task can be performed by the multi-level break even function.
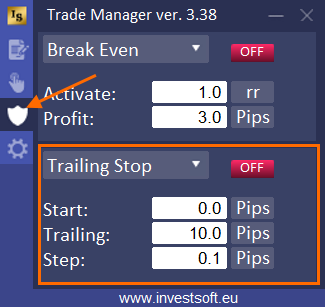
To activate multi-level break even, go to the third tab in the main panel and find the break even parameters.
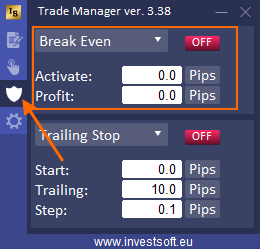
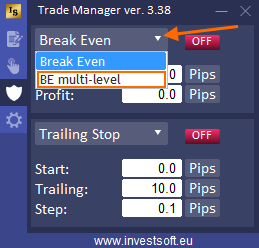
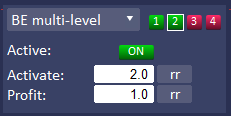
Then click on the header and select the “BE multi-level” option from the list.
Four buttons will appear next to the list which indicate 4 different break even levels that you can define and activate.
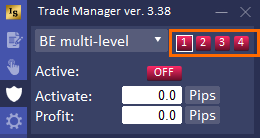
Click the button with the number “1” (you will see a white frame around the button which means it is an active button) and enter the parameters for the first level of Break Even:
- Activation – that is the level / moment when the stop loss should be moved to Break Even. The moment of activation can be set as:
- distance in pips from the opening price
- percent (%) of the distance from the opening price to TP, e.g. TP = 120 pips BE Activation = 30% means activate BE at 36 pips of profit (30% of 120 pips)
- Risk Reward (RR) means distance as ratio of SL distance eg activation = 1.0 R: R and SL = 30 pips then activate BE at 30 pips of profit; another example BE activation = 1.5 R: R and SL = 30 pips then activate BE at 45 pips of profit. This is always related to initial Stop Loss.
- price – a certain price level
- Profit – the amount you need to protect by a BreakEven option. You can set this value in pips, percent (%), risk reward (rr) or price.
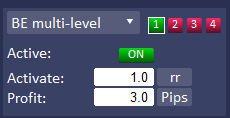
Activate this BE level by clicking the red “OFF” button, which will now glow green.
The button with the number “1” will also light up green, which means that break-even is active for the first level.
Then click the “2” button and enter new parameters for the second BE level and activate it.
Do the same for subsequent levels if you need to activate them.
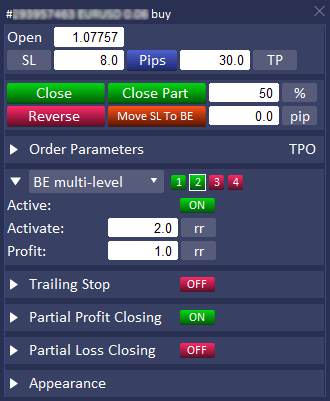
Once you have set all the parameters, you can place the order. You should now see your settings for multi-level Break Even in the order parameters window.
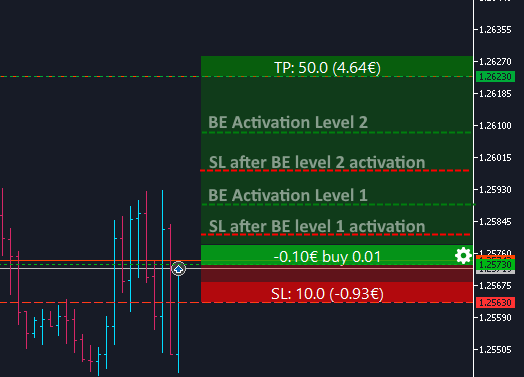
This is what an example activation path for a two-level Break Even might look like.
Multi-level Trailing Stop
When we use Trailing Stop, we usually determine at the beginning of the transaction what distance the Stop Loss from the current price should be maintained by the program. At the initial stage of the transaction, it is good to maintain a sufficiently large distance so that the first pullback does not close our transaction. However, when the price approaches Take Profit, it is best to keep the SL distance closer to the current price. So that you do not have to sit in front of the chart and constantly monitor the price movement to modify the Trailing Stop parameters at the right moment, you can use a multi-level Trailing Stop in the Forex Trade Manager.
To activate multi-level Trailing Stop, go to the third tab in the main panel and find the trailing stop parameters.
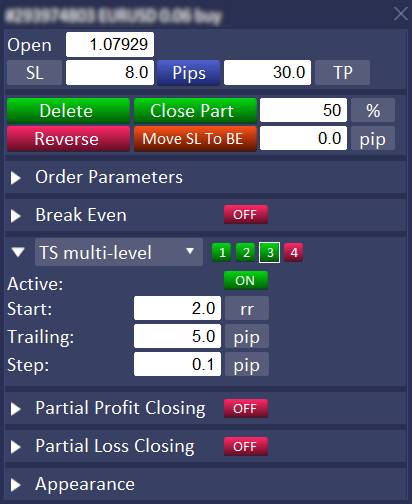
Then click on the header and select the “TS multi-level” option from the list.
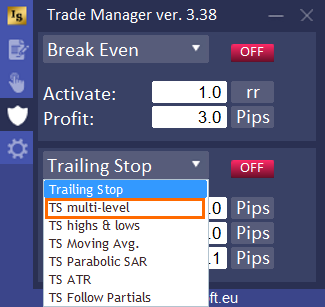
Four buttons will appear next to the list which indicate 4 different trailing stop levels that you can define and activate.

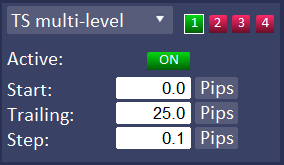
Click the button with the number “1” (you will see a white frame around the button which means it is an active button) and enter the parameters for the first level of Trailing Stop:
- Start – number of pips of profit to activate trailing stop. The “Start” can be set as:
- distance in pips from the opening price
- percent (%) of the distance from the opening price to TP, e.g. TP = 88 pips TS Start = 30% means activate Trailing Stop at 26.4 pips of profit (30% of 88 pips)
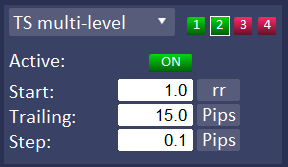
- Risk Reward (RR) means distance as ratio of SL distance eg activation = 1.2 R: R and SL = 30 pips then activate BE at 36 pips of profit. This is always related to initial Stop Loss.
- price (pr.) – a certain price level
- Trailing – when trailing stop will start and move stop loss, here we can define a distance of stop loss to current price. The “Trailing” value can be defined as
- fixed stop distance from the current price, e.g. 20 pips,
- percent (%) of earned profit. For example, if we set the parameter trailing = 25%, then when we have profit = 40 pips, then the stop will be moved 10 pips from the opening price (25% of 40 pips = 10 pips).
- Risk Reward (RR) – in this case, you can define the distance maintained by the stop loss to the current price as a fraction or a multiple of the initial stop loss. For example, if we have a trade with an initial stop loss = 50 pips, then by defining the trailing as 1.5 rr then at each move it will be a distance from the current price equal to 1.5 * initial stop loss = 50 pips which is 75 pips.
- Step – how many pips of profit causes the move of the stop level, i.e. how often stop loss is to be moved. You can define this parameter as distance in pips or risk reward related to the initial Stop Loss.
Activate this TS level by clicking the red “OFF” button, which will now glow green.
The button with the number “1” will also light up green, which means that trailing stop is active for the first level.
Then click the “2” button and enter new parameters for the second Trailing Stop level and activate it.
Do the same for subsequent levels if you need to activate them.
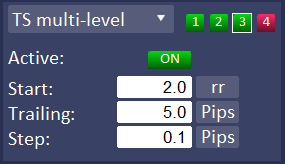
ATTENTION! It is important to set the Trailing Stop activation levels in ascending order, e.g. TS Start = 0 pips at level 1, then TS Start = 20 pips at level 2, TS Start = 40 pips at level 3, etc.
Once you have set all the parameters, you can place the order. You should now see your settings for multi-level Trailing Stop in the order parameters window.
Below is a diagram of how a multi-level Trailing Stop works, with tightening Stop Loss at each stage of the way to Take Profit.

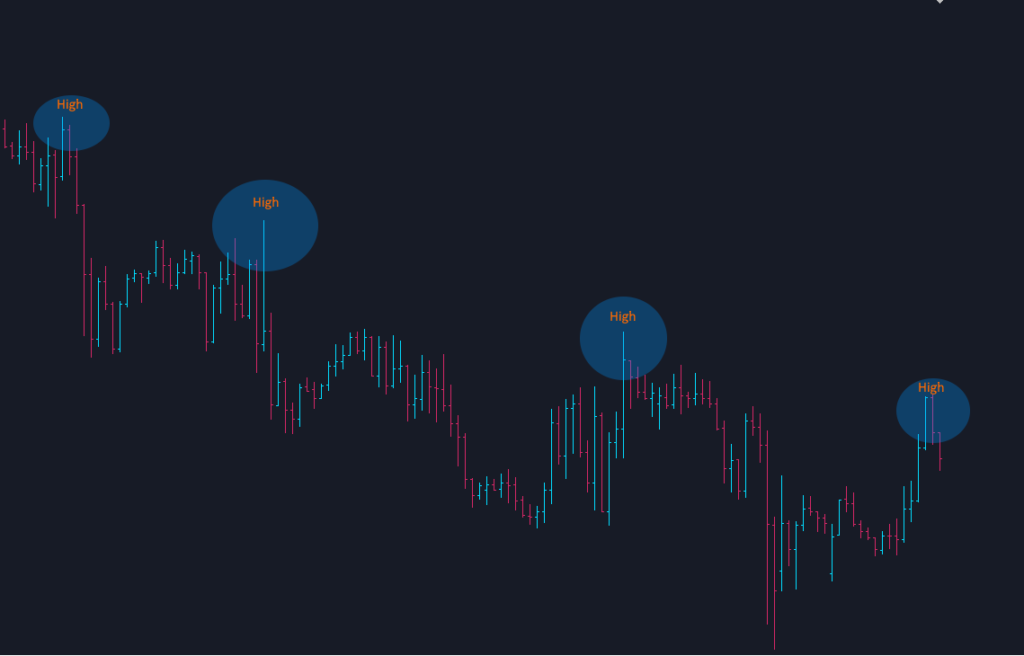
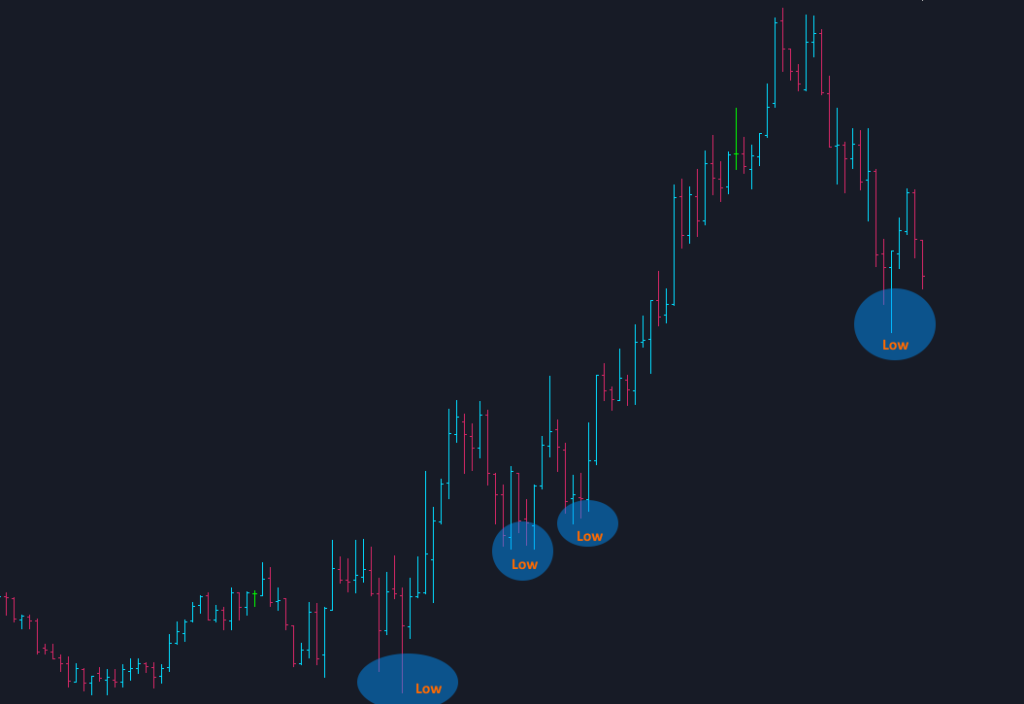
Trailing Stop following high and lows
When the security we are trading on is in a trend, it will move in the selected direction, periodically perform a pullback and then continue to move in the selected direction, creating a sequence of higher lows or lower highs.
Trade Manager has a Trailig Stop function in a variant where can be set to follow higher lows in an uptrend or follow lower highs in a downtrend.
To activate Trailing Stop following highs/lows, go to the third tab in the main panel, find the trailing stop parameters, expand the drop down list and select the “TS high & lows” option from the list.

Then define the operating parameters of this Trailing Stop variant:
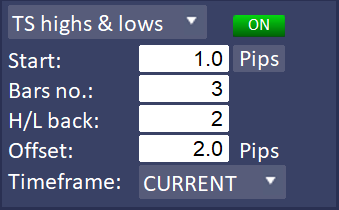
- Start – number of pips of profit to activate trailing stop. The “Start” can be set as:
- distance in pips from the opening price
- percent (%) of the distance from the opening price to TP, e.g. TP = 88 pips TS Start = 30% means activate Trailing Stop at 26.4 pips of profit (30% of 88 pips)
- Risk Reward (RR) means distance as ratio of SL distance eg activation = 1.2 R: R and SL = 30 pips then activate BE at 36 pips of profit. This is always related to initial Stop Loss.
- price (pr.) – a certain price level
- Bars no. – the number of bars before and after the peak/hole, which have a lower bar high/low than the bar that defines the peak/hole, e.g. 3 bars before and after.
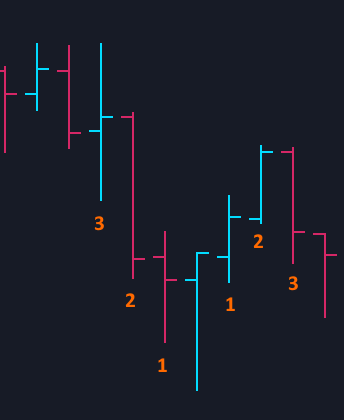
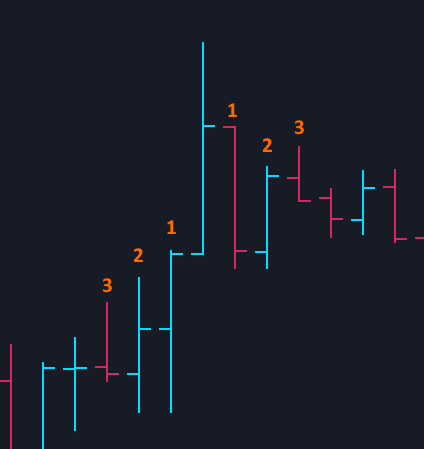
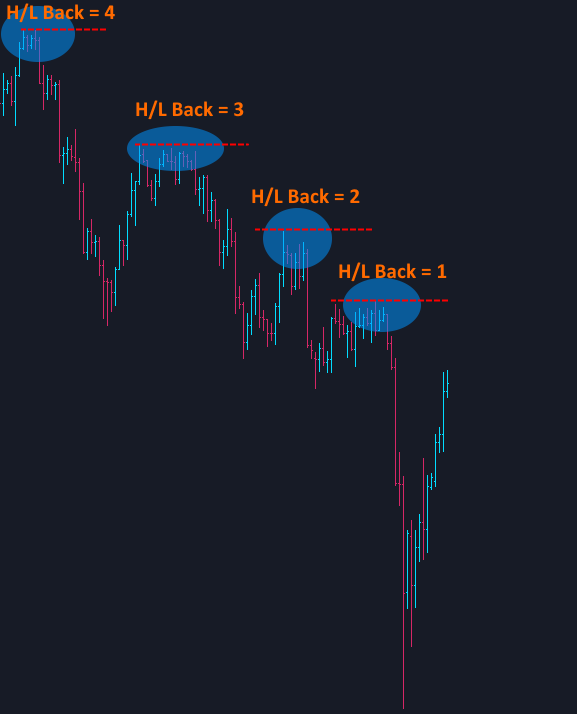
- H/L back – at which peak/hole the Stop Loss should be set. For example, if you set the value to 1, the SL will always be set at the last (newest) peak/hole, if you set it to 2, then at the penultimate H/L one, etc.
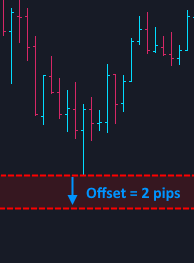
- Offset – here you can specify whether and by how many pips the Stop Loss should be moved away from the peak or hole. If you set the value to 0, SL will always be set at the peak or hole. If you set e.g. 2 pips, the program will set the SL 2 pips above the peak or 2 pips below the hole.
- Timeframe – here you can specify whether the program should look for a peak or hole on the current chart or on a chart with a different timeframe.
Once you have set all the parameters, activate trailing stop by clicking the red OFF button turning it into green ON. Now you can place the order with Trailing Stop.
Trailing Stop based on a Moving Average
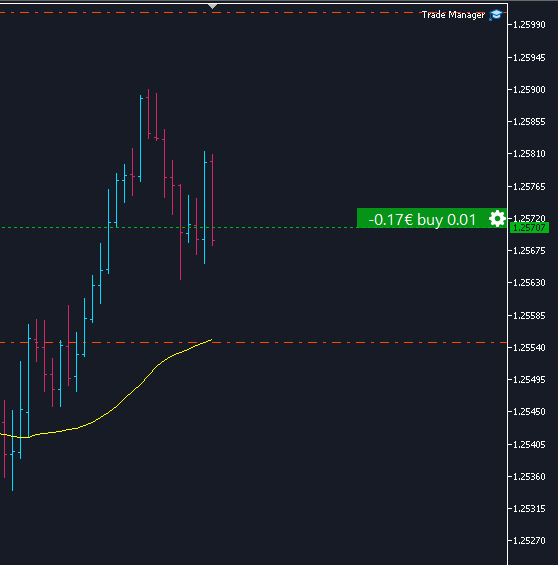
One variant of Trailing Stop is following the moving average. A moving average is simply a way to smooth out price fluctuations to help you distinguish between typical market “noise” and the actual trend direction. Therefore, an interesting solution is to keep the Stop Loss at the level set by this one of the most popular indicators.
To activate Trailing Stop following Moving Average, go to the third tab in the main panel, find the trailing stop parameters, expand the drop down list and select the “TS Moving Average” option from the list.
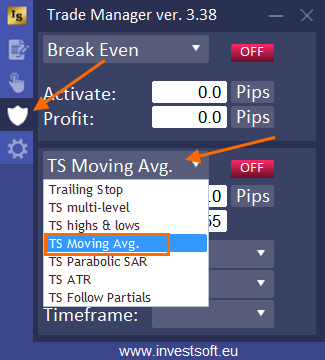
Then define the operating parameters of this Trailing Stop variant:
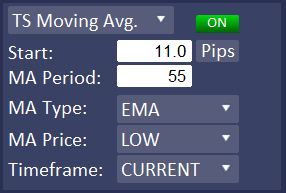
- Start – number of pips of profit to activate trailing stop. The “Start” can be set as:
- distance in pips from the opening price
- percent (%) of the distance from the opening price to TP, e.g. TP = 88 pips TS Start = 30% means activate Trailing Stop at 26.4 pips of profit (30% of 88 pips)
- Risk Reward (RR) means distance as ratio of SL distance eg activation = 1.2 R: R and SL = 30 pips then activate BE at 36 pips of profit. This is always related to initial Stop Loss.
- price (pr.) – a certain price level
- MA Period – the number of bars/candles including in the moving average calculation. The shorter “Period”, the fewer the data points that are included in the moving average calculation, which means the closer the moving average stays to the current price. The longer its “Period”, the more data points that are included in the moving average calculation, which means the less any single price can affect the overall average.
- MA Type – selecting the moving average calculation method:
- SMA – Simple averaging
- EMA – Exponential averaging
- SMMA – Smoothed averaging
- LWMA – Linear-weighted averaging
- MA Price – type of price that will be used to calculate the moving average:
- CLOSE – close price
- HIGH – maximum price
- LOW – minimum price
- OPEN – open price
- MEDIAN – median price calculated by formula (high + low) / 2
- TYPICAL – typical price calculated by formula (high + low + close) / 3
- WEIGHTED – weighted close price calculated by formula (high + low + close + close) / 4
- Timeframe – here you can specify whether the program should calculate Moving Average on the current chart or on a chart with a different timeframe.
Once you have set all the parameters, activate trailing stop by clicking the red OFF button turning it into green ON. Now you can place the order with Trailing Stop.
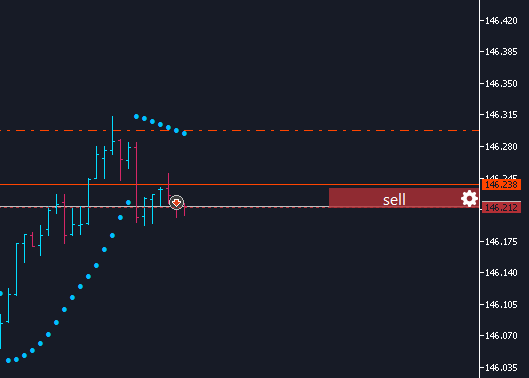
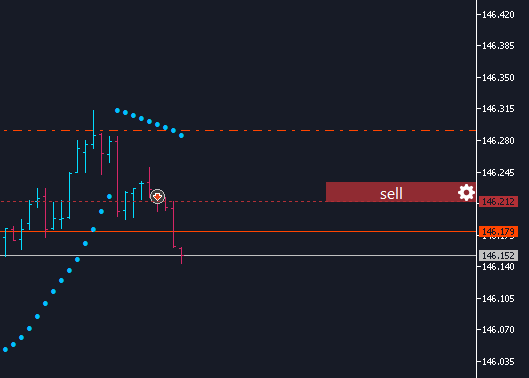
Trailing Stop based on the Parabolic SAR indicator
The Parabolic SAR, or Parabolic Stop and Reverse, is a trailing stop-based trading system and is often used as a technical indicator as well. The Parabolic SAR serves three basic functions:
- to highlight the current trend
- to attempt to forecast a reversal in the prevailing trend
- to provide potential exit and entry signals during a reversal
In Forex Trade Manager you can also use the Parabolic SAR indicator for the Trailing Stop function. To do this, go to the third tab in the main panel, find the trailing stop parameters, expand the drop down list and select the “TS Parabolic SAR” option from the list.
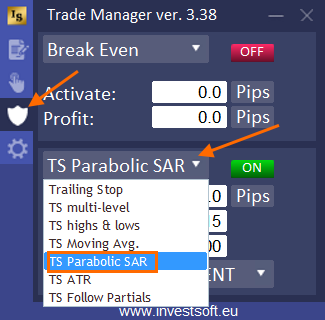
Then define the operating parameters of this Trailing Stop variant:
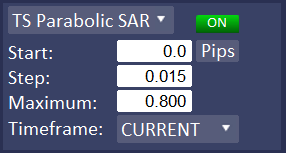
- Start – number of pips of profit to activate trailing stop. The “Start” can be set as:
- distance in pips from the opening price
- percent (%) of the distance from the opening price to TP, e.g. TP = 88 pips TS Start = 30% means activate Trailing Stop at 26.4 pips of profit (30% of 88 pips)
- Risk Reward (RR) means distance as ratio of SL distance eg activation = 1.2 R: R and SL = 30 pips then activate BE at 36 pips of profit. This is always related to initial Stop Loss.
- price (pr.) – a certain price level
- Step – the step of price increment
- Maximum – the maximum step
- Timeframe – here you can specify whether the program should calculate Parabolic SAR on the current chart or on a chart with a different timeframe.
Once you have set all the parameters, activate trailing stop by clicking the red OFF button turning it into green ON. Now you can place the order with Trailing Stop.
Trailing Stop based on the ATR indicator
The average true range (ATR) is a technical analysis indicator that measures market volatility by decomposing the entire range of an asset price for that period. It was created to allow traders to more accurately measure the daily volatility of an asset by using simple calculations. ATR can therefore be used to determine the distance that the Stop Loss should maintain from the current price so that the trade is not terminated at the first price pullback.
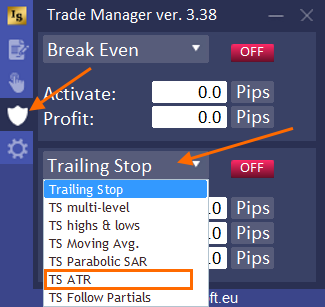
To use the ATR indicator in your Trailing Stop, go to the third tab in the main panel, find the trailing stop parameters, expand the drop down list and select the “TS ATR” option from the list.
Then define the operating parameters of this Trailing Stop variant:
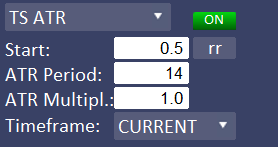
- Start – number of pips of profit to activate trailing stop. The “Start” can be set as:
- distance in pips from the opening price
- percent (%) of the distance from the opening price to TP, e.g. TP = 88 pips TS Start = 30% means activate Trailing Stop at 26.4 pips of profit (30% of 88 pips)
- Risk Reward (RR) means distance as ratio of SL distance eg activation = 1.2 R: R and SL = 30 pips then activate BE at 36 pips of profit. This is always related to initial Stop Loss.
- price (pr.) – a certain price level
- ATR Period – the number of recent bars/candles included in the calculation of the ATR indicator value
- ATR Multiplier – ATR value multiplier. You can set the Trailing Stop distance as a multiple of ATR.
- Timeframe – here you can specify whether the program should calculate ATR on the current chart or on a chart with a different timeframe.

Trailing Stop following the partial closing levels of the trade
In Forex Trade Manager it is possible to set partial closing levels. Some traders also use these levels to protect the profits of their trades by resetting the SL to the previous level after closing subsequent parts. This operation can be automated and the Trailing Stop function can be activated to follow the partial closure levels.
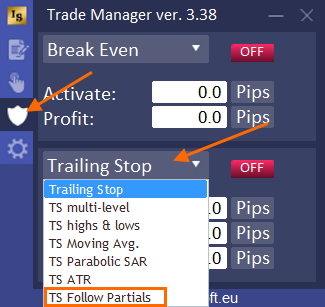
To do this, go to the third tab in the main panel, find the trailing stop parameters, expand the drop down list and select the “TS Follow Partials” option from the list.
We have 4 checkboxes to select, which determine at which partial closing levels the program should move the Stop Loss.
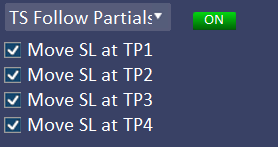
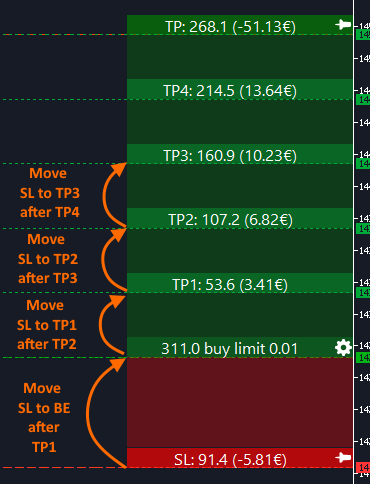
And now, if we check all 4 checkboxes, the program will move:
- SL to BE after TP1 activation
- SL on TP1 after TP2 activation
- SL on TP2 after TP3 activation
- SL on TP3 after TP4 activation
ATTENTION! A necessary condition for the following function to work is the activation of the partial transaction closing function described here.
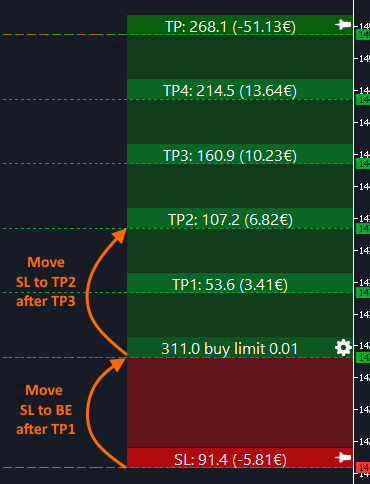
Another example is if we have all 4 levels of partial closure active
but only 2 checkboxes are checked:
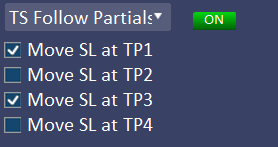
then the program will perform the following moves:
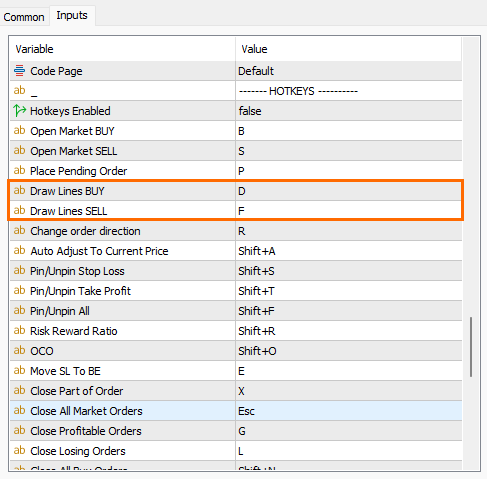
Hotkeys improvements
- ability to completely disable hotkeys in the program settings
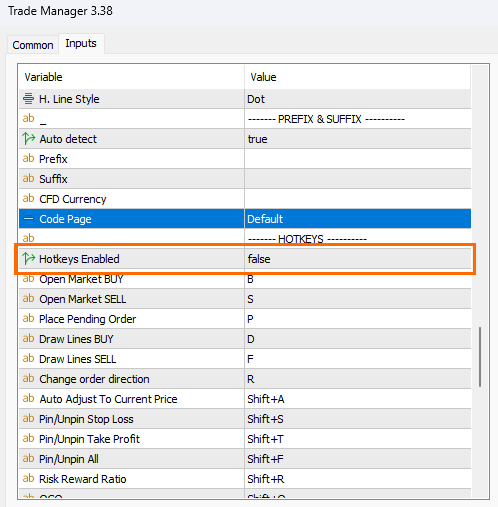
- ability to assign the ESC key
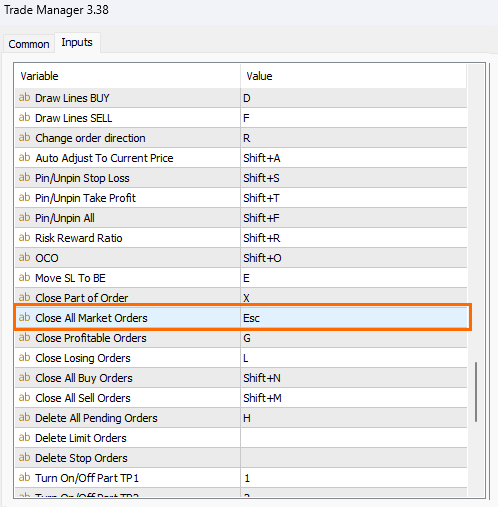
- ability to assign a separate hotkey for drawing the open/stop/target block in the SELL direction
Reconstruction of the manual Break-Even and Partial Cosing sections in the main panel
In the new version, we have rebuilt the manual move SL to BE and partial closing section. The functions available in this section applies to all currently open trades of the current symbol. These section can be collapsed or expanded.
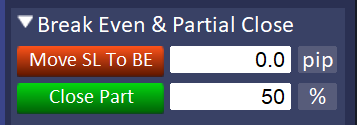
The Move SL to BE feature will move the SL to BE for all trades that meet the move conditions (the trade must be in profit). In the text field next to the button, we can define the SL offset relative to the opening price, i.e., for example, we can set the SL after the move to be 3 pips above or below the opening price to cover any commission costs and slippage.
The offset value can be defined as distance in pips, distance percent from open price to TP (%), risk reward (rr) or price (pr.).
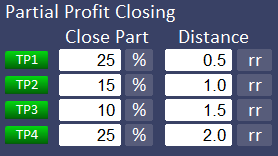
The “Close Part” button closes part of all open trades for the current symbol. In the text field next to the button you can specify which part should be closed. This can be a % of the current lot or a fixed lot value.
Fixes and improvements
We have fixed the fact that information bars remain in a fixed location for open transactions. As we know, when switching charts or minimizing-restoring the chart window, these bars sometimes changed their position. From this version, their position remains unchanged until the user drags it to another place.
We have fixed the change of background color and text in the information bar when a transaction is open
We have improved the deletion of virtual pending orders using hotkeys.
hi i have the last version 3.37 how to ugrade to this one ?
Hello, Ariel please send me message at :
https://www.investsoft.eu/contact
Thank you for the updates.
My concern is the size of the file which ahd increased to 4.3MB from the previous 3.8MB..
When you have a number of positions open, I tend to close the EA so hopefully it won’t take up the memory of the VPS…
I did find the chart unresponsive when I have a few positions.. anything one can do about it?
Hello, San its our pleasure. The file size increases whenever new functions are added because additional code + graphics take up some space. An increase of 0.5 MB on modern machines is negligible, but when it comes to VPS, it all depends on which variant you have purchased, because the cheapest ones may generally have problems with memory clogging, and not only due to Trade Manager or Metatrader. Alternatively, you can turn off the background between the open/stop/target bars in Trade Manager, which will reduce memory consumption (tell him where to do it). If you need any help please dont hesitate to send us message at :
https://www.investsoft.eu/contact
Does MT4 / Trade Manager ver.3.38 have to be open on my computer at all times to work when I am away from my computer?
Hello, Michael if you want to use breakeve,trailing stop, partial option then yes. But you can use VPS for that, please send us message at :
https://www.investsoft.eu/contact
Best Regards,
Denis
InvestSoft
Hi, I really like the trade manager and find it very useful, but it is very small. Is there a way to increase its appearance on my screen? Thanks
Hello, Cam please send us message at :
https://www.investsoft.eu/contact
Best Regards,
Denis
InvestSoft
Hallo
ich habe mir den trade manager gekauft. ich bekomme ihn nicht zum starten. ich habe ihn instaliert. alles ist auf englisch und bestimmte einstellungen werden nicht erklärt. schade
Hello, Enrico gothe please send us message at :
https://www.investsoft.eu/contact
Best Regards,
Denis
InvestSoft